11
NOTE: REMOVING INPUT POWER
Always put the Axxium Pro UPS into the Off mode before removing input power. Axxium Pro system batteries
will discharge if the input line voltage is disconnected or turned off without first turning off the Axxium Pro UPS.
If the input power source will be disconnected or turned off for more than a day or two, you should put the UPS
into Sleep mode. (Sleep mode allows the UPS to remain unpowered for up to 6 months without having to remove
or recharge batteries.)
Failure to properly power down the Axxium Pro UPS could permanently damage any installed batteries. Also, if
batteries become severely discharged, the UPS might not start immediately when input power is restored.
3.a. Remove the front bezel(s) covering the chassis rack.
The bezels have spring latches on the left and right
sides that hold them in place.
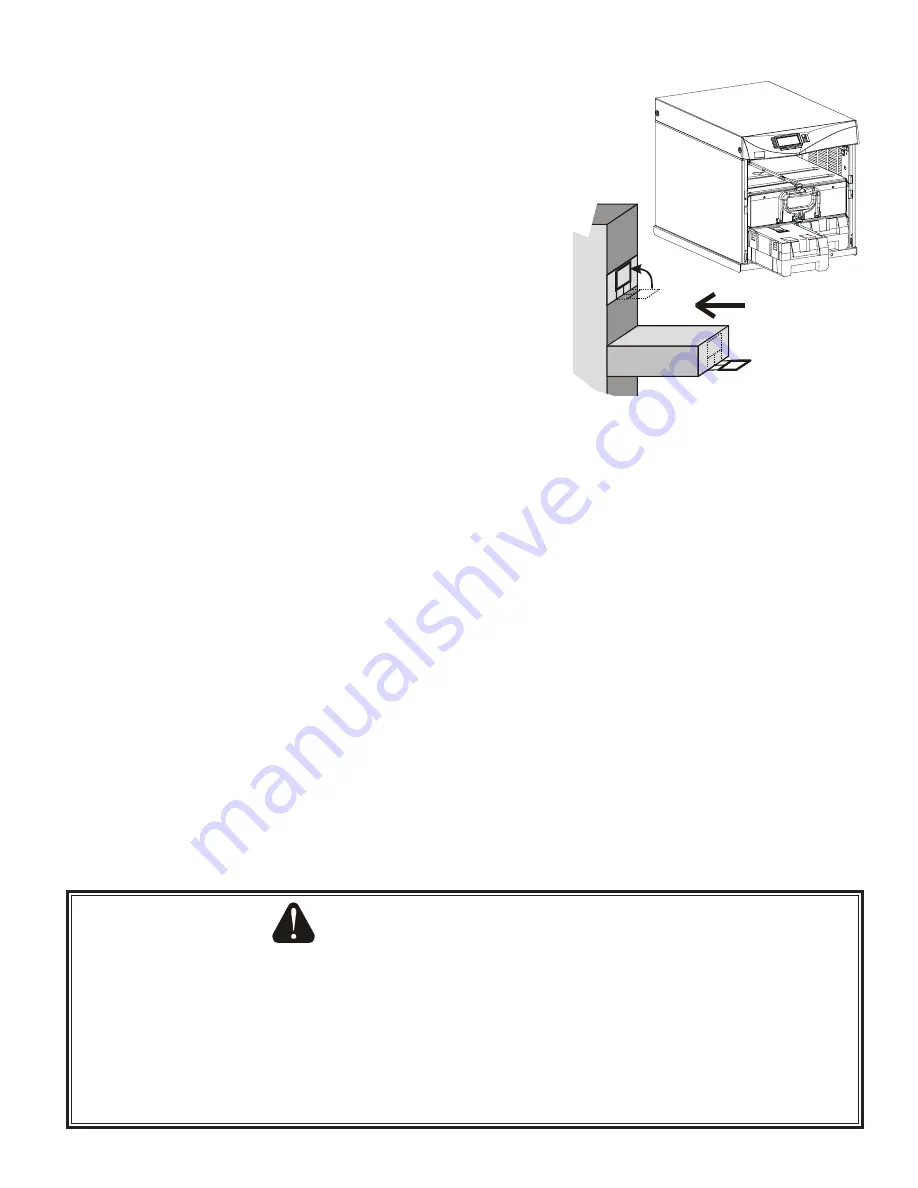
3.b. Insert battery modules into the chassis rack as shown.
Push each module in firmly until the front latch snaps to
hold it securely. Two battery modules (side-by-side) are
required to complete each battery string.
NOTE: All power modules in the Axxium Pro UPS
cabinet must be of the same type: Single-phase
(universal) modules have white labels; split-phase
modules have blue labels. Do not mix blue and white
modules in the same UPS cabinet
3.c. Insert all power modules into upper slots of the chassis
rack as shown in this drawing. To insert a module, tip the
front down slightly and lift the rear edge over a safety
stop on the center support rail. NOTE: Keep the
module handle extended until the module is fully inserted. Push the module in firmly. The power
module has a cam-latch at the base of the handle; raising the handle pulls the module into the rack. A
latch and thumbscrew at the top of the handle secure the handle. Record all power module serial
numbers on the warranty registration form (see Section 903).
3.d. Insert and latch battery modules into the chassis rack of all optional external battery cabinets. Make
sure that the DC disconnect switch on the back of the battery cabinet is closed (pulled out).
3.e. Reinstall cabinet front bezels.
4. TURN THE UPS ON
4.a. When AC line voltage is present on the input and at least one power module is installed, the UPS
display is automatically on. See Section 301 for setting initial operating parameters. Use the proper
operating panel buttons next to the display to put the UPS into the Auto mode or manually set it to
operate in Bypass mode or Battery mode. (NOTE: The unit has no physical On/Off switch.)
4.b. If the UPS has been turned off, press the On button (as labeled by the operating panel display) to turn
the UPS on again. NOTE: The UPS will not turn on if AC line input is not present.
4.c. If the UPS has been manually set to operate in Bypass or Battery mode, change the System Mode
menu selection (menu 3 1) to Auto to return to normal Auto mode operation.
4.d. Verify the proper output voltage on the front panel display.
NOTE:
The first time you turn the UPS on, you must set or verify certain operating parameters before putting
it into operation. See Section 301 for details on configuring these parameters at initial start-up.
(3.c)
(3.b)
Figure 6. Installing Modules


