background image

Bel-Cypher  N 


DANGER 

This equipment is electrical instrument. Do not splash water. 
Such action causes electric shock or trouble of equipment.


WARNING 

This X-ray Unit may be dangerous to patient and operator unless safe exposure factors and operating in-
structions are observed. 

Follow the local zoning authority's regulations regarding X-ray room that you are going to install 
Bel-Cypher N. 
 

The floor should have strength of 650N/1 0 0 c m

                          2

  and should be rigid. 

This  equipment  has  units which  are  more  than  20kg.  Heavy  units  should  be  brought  up  by  more  than  2 
people. 

Do not put things in area where equipment functions. 

In  order  to  avoid  influence  by  other  electric  equipment,  use  separated  power  source  from  the  other  electric 
equipment. 

Those  who  install  X-ray  apparatus  should  wear  X-ray  protector  apron. 

Pay  attention  when  Sliding  Unit  is  moves  up  and  down. 

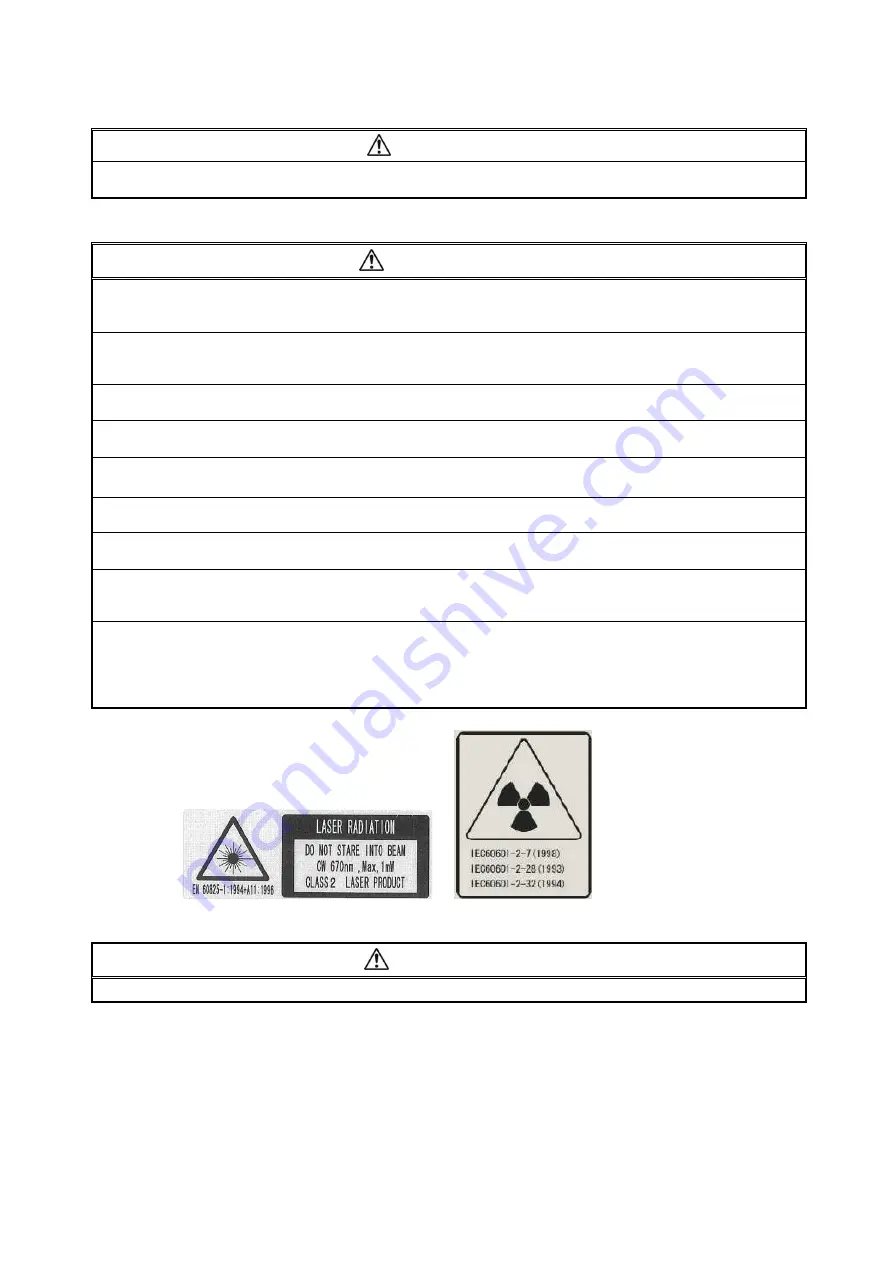
LASER  RADIATION,  DO  NOT  STARE  INTO  A  BEAM,  CLASS  2  LASER  PRODUCT 

1.

Laser Beam is applied. For safety, instruct patient not to look at the laser beam. 

2.

Before the beam is lightened, lower Frankfort Line Beam to bottom. 

3.

Do  not  set  the  beam  to  patient's  eyes. 


CAUTION 

Do  not  turn  ROTATION  ARM  by  hand.  It  might  cause  a  trouble  of  the  equipment. 


Summary of Contents for Bel-Cypher N

Page 1: ...tice Read this installation Manual thoroughly before Installation The classification is shown as follows According to the type of protection against electric shock Class According to the degree of pro...

Page 2: ...and certification procedures for the Bel Cypher N X Ray The instructions contained in this book should be thoroughly read and understood before attempting to install the Bel Cypher N unit After the i...

Page 3: ...surement of equipment 05 1 3 6 Checking of each components and accessories 06 1 3 7 Installation Procedure 07 1 14 8 Methods to install LAN Card for Panoramic Radiography 08 1 3 9 Methods to install a...

Page 4: ...Installation Manual 4 After installation read Operation Manual to understand operation procedures 5 Discharge Be sure to observe Installation Manual If accidents or troubles of the equipment happen d...

Page 5: ...ly conducted by an au thorized service personnel only Meanings DANGER Explains danger that may cause serious adverse effect to a human body WARNING Explains an instruction where personal injury or phy...

Page 6: ...ore than 20kg Heavy units should be brought up by more than 2 people Do not put things in area where equipment functions In order to avoid influence by other electric equipment use separated power sou...

Page 7: ...ill in wall and a floor 2 3 Others 1 Ethanol for disinfections 2 Waste Clothe 3 Cleanser 3 User supplied Network Card NIC and PC NOTE IN GENERAL MAJOR STRUCTURAL MODIFICATIONS ARE NOT REQUIRED HOWEVER...

Page 8: ...ic Bitewing Adult Child TMJ Exposure Time Panorama 10 sec Panoramic Bitewing 4 6 sec TMJ 2 5 sec x 4 Magnification Ratio Panorama 1 2 to 1 3 Panoramic Bitewing 1 2 to 1 3 TMJ 1 2 Image receiver Digita...

Page 9: ...ach parts and Dimension of equipment Names of each parts of equipment Arm Section X Ray Generator Pillar Chinrest Unit Exposure Switch Rotation Unit Control Unit Digital Sensor Grip Base Sliding Unit...

Page 10: ...Bel Cypher N 2 Dimensions of equipment with Free Standing Base...

Page 11: ...Bel Cypher N Dimensions of equipment without Free Standing Base...

Page 12: ...sher 6 4 pcs Flat Washer 6 4 pcs Hexagon socket flat screw M6 x 16 4 pcs Washer 4 pcs 13 Fixing bolts for Sliding Unit ASSY and Rotation Unit ASSY Hexagon Bolt M8 x 30 4 pcs Flat Washer 8 4 pcs Spring...

Page 13: ...Bel Cypher N Accessories 2 1 Accessories 1 Head Holding Rods Panorama 2 Chinrest Panorama 3 Bite Block Panorama 4 Ear Rods TMJ 4 divisions...

Page 14: ...Bel Cypher N 2 2 Expendable Supplies Bite Block Cover 3 X ray Exposure Switch with Holder 4 CD containing TWAIN Driver...

Page 15: ...r waste clothe on the pillow for protecting scratch of Pillar Then put the Pillar on the pillows Sliding Unit ASSY is down side 2 Remove pillar cover from Pillar Assy Take out pillows and put them on...

Page 16: ...Free Standing Base Type Floor Type 4 Attach the Wall Bracket to upper part of the Pillar by 2 flat head cap screws 1 Cap Screw M10 X 30 6 sets 2 Spring 10 6 sets 3 Washer 10 6 sets 1 Flat head screw...

Page 17: ...liding Unit up then insert the Steel Rod to lower hole 6 Lift Sliding Unit set 2 counter weight and adjusting weight s in upper counter weight frame then attach the cover Opening Shaft Nut Nylon washe...

Page 18: ...t 2 counter weight in lower counter weight frame then attach the cover 8 Attach pillar cover 1 Bind Screw M3 6 2 sets 2 Nylon washer 3 2 sets Pillar cover 1 Screw M4 10 2 sets Opening Counter Weights...

Page 19: ...strike anchors Tighten M8 nuts Confirm that the apparatus is securely fixed When coach bolts diameter 8mm length 40mm are used Move the apparatus to the place where the Bel Cypher N is installed Tight...

Page 20: ...e from the hole located at the bottom of the column to the grounding terminal in the X Ray room Connect Earth Wire to facility Earth Ground in accordance with National Electric Code and local codes Se...

Page 21: ...holder with two men hook the Rotation Unit ASSY onto Sliding Unit Align rotation unit by using taper pins 11 2 Insert taper pins with a hammer 11 3 Tighten and Fix hexagon bolts Hook Rotation Unit AS...

Page 22: ...Bel Cypher N 12 Remove Carriage Holder from Rotation unit Assy Take the carriage holder off the rotation unit assembly 1 Nut 8 4sets 2 Spring Washer 8 4sets 3 Cap screw M6 4sets...

Page 23: ...Bel Cypher N 13 Connect the wire harness from Sliding Unit to the PC board of Rotation Unit...

Page 24: ...Bel Cypher N 14 Connect the wire harness from Rotation Unit to wire harness from Sliding Unit...

Page 25: ...ll Chinrest unit to sliding unit 15 1 Align positioning pins of Chinrest Unit ASSY to positioning holes of Sliding Unit ASSY 15 2 Attach Chinrest Unit by cap screw M5 20 4 sets Spring washer 5 4 sets...

Page 26: ...unit cover Left side Put the sliding unit cover from front Slowly rotate arm to 90 degrees position Turn the ball screw in order to bring rota tion unit to forward end 1 Bind Screw M3 16 2 sets 2 Bin...

Page 27: ...handle assy insert handle to detent pin fix handle by cap screw Connect CNSM Fix by a cap screw M6 40 18 Put the rotating unit cover on rotating Unit Put Frankfurt plane knob Attaches cover Fix with...

Page 28: ...Bel Cypher N 19 Attach the Upper Cover on the Pillar 20 Insert Chinrest and Head Holding Rods or Ear Rods to Chinrest ASSY Pillar cover Hole Spiral code Chinrest Unit Head Holding Rods...

Page 29: ...tall a LAN Card for Panoramic radiograph 1 Change User Accounts and Safety Rem If Operating System is Windows XP skip this section 1 Start Control Panel click User Accounts and Family Safety 2 Choose...

Page 30: ...the bar to Never notify then click OK 5 After user account control setting is changed O S requests to reboot PC If you need to add an expanded LAN card go to next section install LAN card without rebo...

Page 31: ...PC power plug into the outlet and turn the power of PC ON 5 After starting up of the Windows the driver is installed automatically If the driver is not installed automatically follow instructions desc...

Page 32: ...er N 8 Install wizard comes up Click Next 9 License agreement screen comes up choose I accept the terms in the license agreement then click Next 10 Setup Options screen comes up do not make change cli...

Page 33: ...en comes up click Install 12 When below screen is shown click Continue Anyway 13 After installation is completed click Finish 14 Connect LAN cable of Bel Cypher N to the PC Make sure to connect LAN ca...

Page 34: ...Cypher N 9 Methods to install a TWAIN driver in imaging software 1 Set IP address 1 Open Control Panel 2 Choose Network and Internet 3 Choose Network and Sharing Center 4 Choose Change adapter settin...

Page 35: ...owing IP address 7 Set IP address and subnet mask as follows You need to set following values first You need to set following values first You need to set following values first You need to set follow...

Page 36: ...o Bel Cypher N Then choose property If you use the NIC supplied with Bel Cypher right click Intel R Gigabit CT Desktop Adapter and choose property 3 Property screen of NIC comes up 4 Choose Advanced t...

Page 37: ...Bel Cypher N 3 DCAM API Install 1 Run setup exe in Common DCAM API of Library CD 2 click Install 3 Click Next 4 Check I accept the terms of the license agreement then click Next...

Page 38: ...elow screen is shown click Finish to finish installation 4 Install DirectX 1 Run DXSETUP exe in Common DXInst of Library CD 2 When below screen is shown check I accept the agreement then click Next 3...

Page 39: ...ly then run Setup bat stored in a CD 2 Set Bel Cypher N TWAIN Driver of Install Disc 3 NET Framework 3 5 SP1 setup display such as Fig 2 1 starts automatically Click Accept Fig2 1 NET Framework 3 5 SP...

Page 40: ...e Setup screen 5 The dialogue such like Fig 2 3 is displayed NET Framework 3 5 SP1 and Visual C Run time is installed Fig 2 3 Visual C Run time Install screen 6 After the installation was completed th...

Page 41: ...splayed Click Next Fig 2 5 Select Installation Folder screen 8 The dialogue such like Fig 2 6 is displayed Click Next Fig 2 6 Confirm Installation screen 9 The dialogue such like Fig 2 7 is displayed...

Page 42: ...Bel Cypher N 10 The dialogue such like Fig 2 8 is displayed Click Close Fig 2 8 Installation Complete screen 11 Installation is completed...

Page 43: ...0 101 Subnet mask 255 255 0 0 Default IP address Subnet mask for PC NIC IP address 169 254 87 101 Subnet mask 255 255 0 0 6 1 Change IP address of sensor Set up for PC and set up for Bel Cypher should...

Page 44: ...Bel Cypher N 5 Click DeviceDiscovery 6 When IP address for sensor is displayed click Open 7 When Open Success is displayed then click IP Change 8 IP address change screen comes up...

Page 45: ...close window by clicking on upper right corner to close IP_Address_Change screen 13 Click Close and Memory save 14 Click on upper right corner to close GigE_IP_Tool_ _ exe if OS is 64bit GigE_IP_Tool_...

Page 46: ...program of Bel Cypher N 2 When above TWAIN screen is shown click L M or S then hit Ctrl Alt i simultaneously 3 IP address set up screen comes up 4 Enter new IP Adress and SubnetMask Set IP address an...

Page 47: ...Bel Cypher N 5 Click Settings 6 When Turn on the the power of the X ray equipment again is displayed then turn off and on the power of Bel Cypher N...

Page 48: ...ble click Internet Protocol Version 4 TCP IPv4 in The connection uses the following items 4 Enter IP address and Subnet mask Set IP address and Subnet Mask as NIC is included within sensor and Bel Cyp...

Page 49: ...The lowest specifications of P C CPU Intel Core2 Duo E6850 3 00GHz 4MB 1333MHz FSB Chipset Intel X38 Express Video Controller NVIDIA Quadro FX380 256MB or equivalent Memory 4GB OS Windows XP Professio...

Page 50: ...ktop Adapter We validated below three patterns Direct connection not through HUB Connect through 100M HUB Connect through Gigabit HUB NIC setting is done by auto negotiation Below HUBs are used for va...

Page 51: ...Figure 1 Cover radiation aperture with lead Turn on the power of PC that is connected to Bel Cypher N Hit Ctrl Alt T simultaneously to get into Test mode Set exposure condition by referring the Opera...

Page 52: ...ration Manual 2 2 Confirm the operation with X ray 2 2 1 Cover radiation aperture with lead 2 2 2 Set exposure condition by referring the Operation Manual 1 Exposure Orbit Panorama 5 Manual Exposure 6...

Page 53: ...age Vac 2 Does 1 meet the rating description on the Controller plate OK NG 3 Rating Values of the Circuit Protector on the Rotation Unit Voltage V Current A 4 Are there any problems when the power plu...

Page 54: ...with up down switch OK NG 4 Does up down operation of main body have a prob lem Allophone OK NG 5 Does Sliding Unit stop at the highest and the lowest position OK NG 6 Positioning Beams in Panorama 6...

Page 55: ...A at Panoramic mode Allophone OK NG Vibration OK NG 10 Check in T M J 10 1 Does equipment work normally with exposure op eration at 0kV 0mA at TMJ mode Allophone OK NG Vibration OK NG 10 2 After the f...

Page 56: ...KARA BELMONT USA Inc 101 Belmont Drive Somerset NJ 08873 Toll Free 800 223 1192 Toll Free Fax 800 280 7504 www belmontequip com TAKARA COMPANY CANADA LTD 2706 South Sheridan Way Mississauga Ontario Ca...

Page 57: ...Bel Cypher N 12 Revision data of this manual This manual was created on Oct 2008 Revised July 2014 Document number B02 T170...

Reviews: