background image

Operation METPOINT® BDL compact


METPOINT® BDL compact 

71


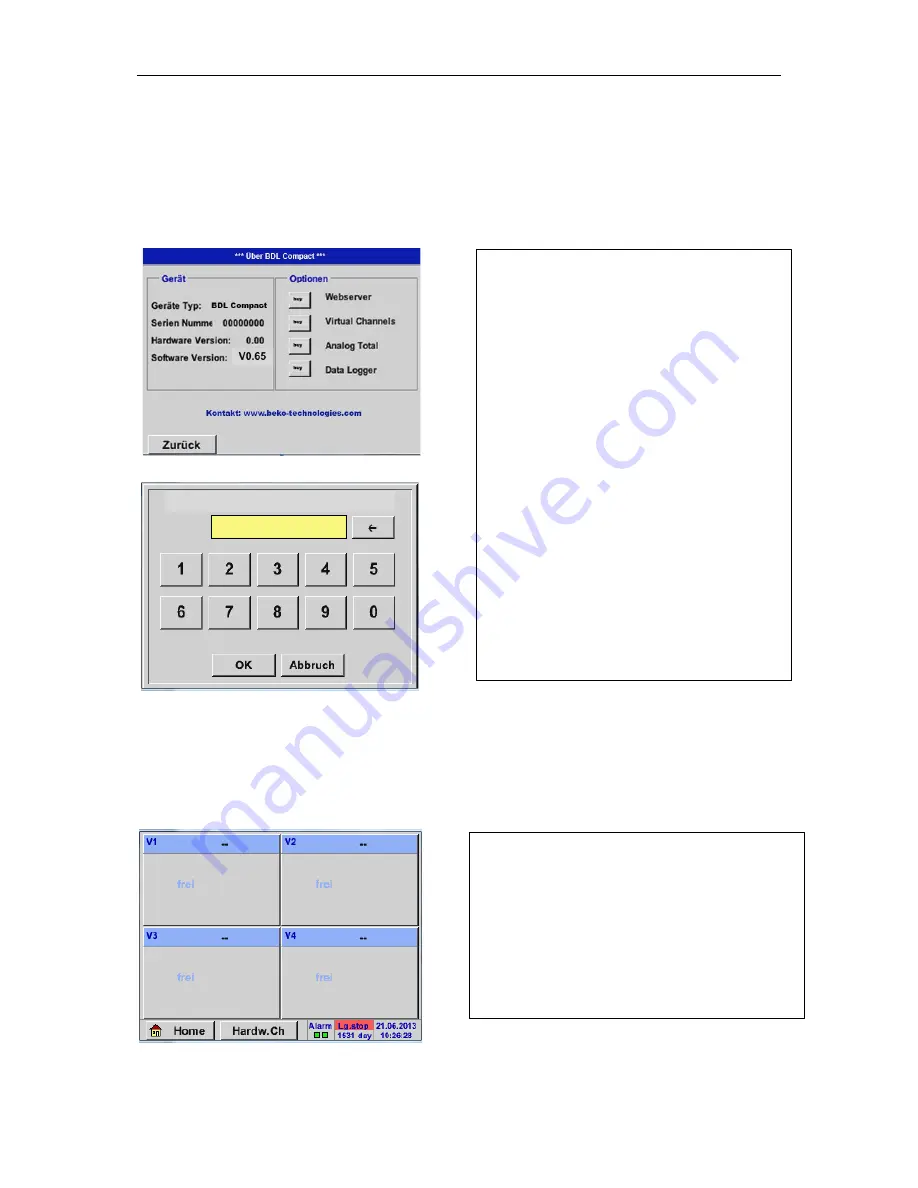
14.3.8.1  Activate the option "virtual channels" 

After having acquired the "virtual channels" option, the latter needs to be activated first. 


Main menu 

 Settings 

 Via METPOINT

®

 BDL compact 


Enter Code für Option 2


14.3.8.2  Virtual channels settings 


Main menu 

 Settings 

 Sensor settings 

 Virtual channels 


D By pressing the 

Buy

 button for "virtual chan-

nels", you will be requested to enter the activa-
tion code. 


Please enter your activation code into the text 
field and activate it by pressing the 

OK

 button. 


After having activated the "virtual channels" but-
ton in the sensor setting menu, an overview of the 
available four channels will appear. 


Note: 

Channels are not preset as a standard. 

Summary of Contents for METPOINT BDL compact

Page 1: ...EN English Instructions for installation and operation Data logger METPOINT BDL compact 10 089 ...

Page 2: ...METPOINT BDL compact Please read these installation and oper ating instructions carefully before mounting and starting up the device and follow our directions Perfect func tioning and safe operation of the BDL can only be guaranteed when the provisions and notes stipulated here are strictly adhered to ...

Page 3: ...s DP 109 series 25 12 2 Connection consumption dew point sensors DP FS series 26 12 3 Connection pulse sensors 26 12 3 Analogue 2 wire 3 wire and 4 wire current signal 28 12 4 3 and 4 wire voltage supply 0 1 10 30 VDC 31 12 5 2 3 and 4 wire terminal assignment of PT100 PT1000 KTY81 32 12 6 Assignment with RS485 such as SD23 32 13 Connecting the METPOINT BDL compact with a PC 33 14 Operation METPOI...

Page 4: ...3 Selection of the sensor type 72 14 3 8 4 Configuration of the individual virtual values 73 14 3 8 4 1 Activation of the individual virtual values 73 14 3 8 4 2 Definition of the operand 73 14 3 8 4 3 Definition of the operations 74 14 3 8 4 4 Definition unit 75 14 3 8 5 Resolution of the decimal places designating and recording data values 76 14 3 8 6 Example calculation specific performance 78 ...

Page 5: ...864 and ANSI Z 535 Danger Imminent hazard Consequences of non observance serious injury or death Warning Potential hazard Consequences of non observance possible serious injury or death Caution Imminent hazard Consequences of non observance possible injury or property damage Notice Potential hazard Consequences of non observance possible injury or property damage Important Additional advice info h...

Page 6: ...hese operating instructions must only be carried out by qualified personnel with the qualifications described hereinafter Qualified personnel Due to the specific training and knowledge concerning the measuring and control technology and due to their experience and knowledge of the country specific provisions standards in force and directives qualified personnel are capable of carrying out the desc...

Page 7: ...layed With a simple finger movement the curve courses can be tracked from the start of the measurement The big difference to standard paperless graphic display recorders is reflected in the simplicity of the start up and in the measuring data evaluation All of the sensors are directly identified by the METPOINT BDL compact and they are provided with voltage Everything is ideally matched Multifunct...

Page 8: ...is suitable for the chosen employment must be carried out by the user It must be ensured that the medium is compatible with the components which come into contact with it The technical data listed in the data sheet are binding Improper handling or operation outside the technical specifications is impermissible Claims of any kind on the basis of improper use are excluded 6 Type plate The type plate...

Page 9: ...hrough improper transport storage or use of unsuitable lifting tools Measures The METPOINT BDL compact must only be transported or stored by authorised and trained skilled personnel Only use suitable and technically sound lifting tools for the transport In addition observe the respectively valid regional provisions and directives Caution Danger through damaged components Do not start up a damaged ...

Page 10: ...ent across all channels 280 mA Ambient temperature during operation 0 C 50 C Storage and transport temperature 20 C 70 C Ambient humidity 0 95 non condensing Degree of protection 3 IP 44 EN 60529 Lithium manganese dioxide battery 4 Panasonic CR2032 Connections 7 pieces threaded cable connection M12x1 5 Body nickel plated brass Clamping zone 3 7 mm SW 16 mm Torque 8 Nm 1 piece RJ45 for the Ethernet...

Page 11: ...al output the analogue output and pulse output are looped through e g the FS DP series Data logger 4 GB memory card micro SDHC class 4 Housing materials Housing aluminium powder coated Front foil made of polyester anti glare 3M adhesive 3M7952 3M467 Weight 2 7 kg Dimensions W x H x D 180 x 166 x 115 mm Optional Web server Optional Galvanically isolated pulse output 2x max 30V AV 60V DC 250mA Optio...

Page 12: ... accordance with EN 60529 IP International Protection 4 Protected against the access to dangerous parts with a wire Ø 1 0 mm Protected against solid foreign particles with a Ø 1 0 mm 4 Protected against splash water 4 Type Lithium manganese dioxide battery Panasonic CR2032 Nominal voltage 3 V Capacity 225 mAh Max continuous current 0 2 mA Diameter 20 mm Height 3 2 mm Weight 2 9 g Operating tempera...

Page 13: ... EN 61326 1 EN 61326 2 3 EMC interference emission group 1 class B EN 61326 1 Safety provisions for electrical equipment for measurement control and laboratory use EN 61010 1 1 CE labelling according to the 2006 95 EG Low Voltage Directive 2 The provisions of Directive 2011 65 EU on the restriction of the use of certain hazardous sub stances in electrical and electronic equipment are complied with...

Page 14: ...to an equipment cabinet or fixed on the wall using suitable dowels and screws Details can be found in the following drawings Dimensions for wall mounting NOTE The wall mounting must withstand four times the weight of the device 10 8 kg Dimensions for the mounting of the instrument panel ...

Page 15: ...Dimensions METPOINT BDL compact 15 Cutout for the mounting of the instrument panel ...

Page 16: ...electric supply mains during service measures Danger Missing earth connection When the earth connection protective earth is missing there is the risk in the event of malfunction that contactable conductive components may carry supply voltage Touching of such parts leads to an electric shock with injuries and death It is imperative to connect the plant to earth or to connect the protective conducto...

Page 17: ...flexible insulating tubing The additional flexible insulating tubing must withstand the electrical and mechanical stresses which can occur during the intended use see EN 61010 1 Clause 6 7 2 2 1 DANGER Supply voltage When wiring the connecting lead it must be ensured that the double or reinforced insulation be tween the electric circuits that are dangerous in the case of contact and the contactabl...

Page 18: ...he electronic components while supply voltage is applied Basics In order not to cause damage through incorrect handling during the intervention in electronic devices the protective measures regarding the prevention of electrostatic charges need to be observed in com pliance with the DIN EN 61340 5 1 IEC 63140 5 and DIN EN 100 015 standards Through this the development of electrostatic discharges a...

Page 19: ...lashing against the housing from any direction must not have harmful effects DANGER Subsequent to all installation and service measures at the data logger the indicated de gree of protection must be re established and guaranteed During the implementation of any works on the METPOINT BDL compact it is imperative to observe the following points Use original seals only These must be clean and free fr...

Page 20: ...ion for the power cable plug C 0 75 2 5 mm2 AWG12 AWG24 Line cross section for alarm contacts plug A B 0 14 1 5 mm2 AWG16 AWG28 Line cross section for sensors 0 14 1 5 mm2 AWG16 AWG28 DANGER Supply voltage An incorrect connection during the installation works involves risks for persons and the material and a malfunction of the BDL compact may occur 11 1 Pin assignment plug C supply voltage Input v...

Page 21: ... assignment connector D galv isolated pulse output pulse transmission 11 3 1 Basic version support pulse transmission 1 2 3 4 5 6 7 Support Pin Support Pin Support Pin Support Pin Support Pin Support Pin Support Pin 11 3 2 Option galv isolated pulse 1 2 3 4 5 6 7 Impulse 1 Impulse 1 Not used Impulse 2 GND Not used Impulse 2 In systems with two digital boards 2x2 digital channels only one pulse inp...

Page 22: ...en wiring the electric connecting lead it must be ensured that the double or reinforced insulation between the electric circuits that are dangerous in the case of contact and the contactable secondary circuit remains maintained NOTE The additional insulation must be suitable for a test voltage of 1500 V alternating current The thickness of the insulation must be at least 0 4 mm E g flexible insula...

Page 23: ... 14 1 5 mm2 AWG16 AWG28 1 NC Normally Closed 2 COM 3 NO Normally Open CAUTION NC 1 and COM 2 are closed during the following operating conditions in the event of an alarm in the event of a sensor break in the event of a voltage breakdown Load of the potential free alarm contacts min switching current 10 mA max switching voltage 250V AC 30V DC max switching current acc to VDE 3 A Contact material A...

Page 24: ...4 20 mA PIN 1 PIN 2 PIN 3 PIN 4 PIN 5 PIN 6 Connecting plug UV Not used Not used IOUT UV GND Connecting lead 4025253 5m brown white blue black SD23 0 10 V PIN 1 PIN 2 PIN 3 PIN 4 PIN 5 PIN 6 Connecting plug UV UOUT GND Not used UV Not used Connecting lead 4025253 5m brown white Black blue SD23 RS 485 PIN 1 PIN 2 PIN 5 PIN 6 PIN 7 PIN 8 Connecting plug UV Not used UV Not used Bus A Bus B Connecting...

Page 25: ...sensors from BEKO TECHNOLOGIES 12 1 Connection dew point sensors DP 109 series METPOINT BDL compact DP 109 The digital data transmission between METPOINT BDL compact and the DP 109 dew point sensors is implemented via the SDI bus line Alternatively the user can use the DP 109 as a 4 20 mA analogue sensor in 2 wire technology METPOINT BDL compact with an external transmission Ensure that the electr...

Page 26: ...nsmission between the METPOINT BDL compact and the sensors DP 110 FS109 and FS 211 is implemented via the SDI bus line METPOINT BDL compact with an external transmission Ensure that the electric circuit is closed in any case 12 3 Connection pulse sensors Signal level 0 low 0 0 7 VDC Signal level 1 high 2 5 30 VDC t 400 µs max frequency pulse duty factor 1 1 1000 Hz Input resistance min 100 kOhm ...

Page 27: ...rams of the different sensor types METPOINT BDL compact 27 Externally required R 4K7 Caution Counts one unit of con sumption when switch ing on the METPOINT BDL com pact Externally required R 4K7 Connection impossible ...

Page 28: ... 4 wire current signal Sensors with 4 20 mA output in 2 wire technology METPOINT BDL compact METPOINT BDL compact with an external trans mission Ensure that the electric circuit is closed in any case e g pressure sensors 1 6 16 40 100 250 400 bar or temperature sensors with an integrated transducer 4 20mA ...

Page 29: ... different sensor types METPOINT BDL compact 29 Sensors with a 0 4 20 mA output in 3 wire technology METPOINT BDL compact METPOINT BDL compact with an external transmission Ensure that the electric circuit is closed in any case ...

Page 30: ...e different sensor types 30 METPOINT BDL compact Sensors with 0 4 20 mA output in 4 wire technology METPOINT BDL compact METPOINT BDL compact with an external trans mission Ensure that the electric circuit is closed in any case ...

Page 31: ... diagrams of the different sensor types METPOINT BDL compact 31 12 4 3 and 4 wire voltage supply 0 1 10 30 VDC Sensors with a voltage output in 3 wire technology Sensors with a voltage output in 4 wire technology ...

Page 32: ...ypes 32 METPOINT BDL compact 12 5 2 3 and 4 wire terminal assignment of PT100 PT1000 KTY81 2 wire PT100 PT1000 KTY81 3 wire PT100 PT1000 KTY81 4 wire PT100 1000 KTY81 12 6 Assignment with RS485 such as SD23 Sensor with an RS485 interface e g SD23 ...

Page 33: ...ith an RJ45 plug connector When the METPOINT BDL compact was connected with the PC via a suitable cable graphic and tabular data evaluations can be implemented with the METPOINT READER SW201 software Network settings for Windows PCs Windows 7 Start System control Network and sharing centre Change adapter settings Lan connection Properties Internet protocol version 4 TCP IPv4 Use the following IP a...

Page 34: ...The measured values can be displayed as a curve or as values Words in green letters mainly point to the illustration s in the chapter section But also related im portant menu paths or menu items are marked in green letters The menu navigation is generally shown in green letters The table of contents and the chapter references in blue letters contain links to the respective chapter headers 14 1 Mai...

Page 35: ...ings the language and time should be set Note Chapter 12 2 4 1 Language English menu navigation Main Settings Device Settings Set Language Chapter 12 2 4 2 Date time English menu navigation Main Settings Device Settings Date Time Hard and soft ware version Alarm indica tion Status data logger Interval data logger and re maining storage space Date and time ...

Page 36: ...4 3 1 Password setting Main menu Settings Password setting In the event that a wrong password is entered Enter password or Repeat new password will appear in red letters In the event of a forgotten password a new password can be created by entering the master password The master password is supplied along with the device documentation Password when delivered 4321 If required it can be changed unde...

Page 37: ... 2 3 4 5 6 A1 D D D A A A A2 D D D A A A B1 D A A D B2 D A A D D Digital channel A Analogue channel 14 3 2 1 Selection of the sensor type example BEKO digital sensor type Main menu Settings Sensor settings A1 After having entered the password an overview of the available channels will appear Depending on the version these are 2 or 4 chan nels Note Normally no channels are preset If no sensor was c...

Page 38: ... measuring results will be falsified No uniform standard exists for the inner diameter of the pipe Please ask the manufacturer or if possible check the measurements yourself Now the Type BEKO digital is selected for the VA FA 400 series and confirmed by OK Here the inner diameter of the flow pipe can be entered in the event that it was not automatically correctly set In addition the counter readin...

Page 39: ...nd settings have been accepted Caution Reference temperature and reference pressure setting ex works 20 C 1000 hPa All the volume flow m h and consumption values m that are indicated on the display refer to 20 C and 1000 hPa according to ISO 1217 suction condition Alternatively 0 C and 1013 hPa standard cubic metre according to DIN 1343 can also be en tered as the reference Under no circumstances ...

Page 40: ...selected measuring data the data logger must be activated subsequent to the completion of the settings see Chapter 12 2 1 2 Logger settings data logger For the value to be recorded a name with 10 characters can be entered in order to simplify its identification at a later moment in the menu items Graphics and Graphics current values Otherwise the designation would be A1a for example A1 is the chan...

Page 41: ...lay buttons Main menu Settings Sensor settings A1 Alarm button Relay buttons In the alarm settings an alarm 1 and alarm 2 incl hysteresis can be entered for each channel Via the alarm overview menu item via the main menu the alarm settings can also be configured or changed Here for example alarm 1 is set to relay 1 and alarm 2 to relay 2 It is possible to choose between five different de lays The ...

Page 42: ...menu Settings Sensor settings A1 Typ Name 0 00 ltr min 2345678 ltr 0 00 m s The settings are completed by means of the OK buttons Subsequent to the alarm activation at channel A1 The delays T1 to T4 are freely definable but they apply commonly to all relays Here the desired delay time for T1 needs to be defined Delay time T0 cannot be changed and is an im mediate alarm Please confirm with OK BEKO ...

Page 43: ...ing confirmed by OK the lettering is switched to black again The values and settings have been accepted In the advanced settings it can be deter mined whether the 4 20 mA analog output of the sensor should be based on the flow vol ume or on the velocity The text field with a green background was chosen In addition the measuring range can be set by pressing the scaling manual button After the confi...

Page 44: ... places see Chap ter 12 2 2 2 Denoting the measuring data and Determining the resolution of the decimal places Main menu Settings Sensor settings B1 9 5 rF 22 6 C 9 2 Ctd 14 3 2 7 Marking and setting text fields Main menu Settings Sensor settings A1 If the data logger is activated the following win dow appears By pressing yes the data logger can be deactivated only activated when settings and reco...

Page 45: ...resolution of the decimal places as well as the advanced settings see Chapter 12 2 2 5 Advanced settings are all described in Chapter 12 2 2 Sensor settings Main menu Settings Sensor settings A1 Text field name Main menu Settings Sensor settings A1 Text field type See also Chapter 12 2 2 8 Configuration of analog sensors It is possible to enter a name with up to 24 characters Nach Drücken des Type...

Page 46: ...as exactly as possible since otherwise the measuring results will be falsified No uniform standard exists for the inner diameter of the pipe Please ask the manufacturer or if possible check the measurements yourself A preset selection of suitable units Important Here the inner diameter of the flow pipe can be entered in the event that it was not auto matically correctly set Here 27 5 mm for exampl...

Page 47: ...rns to black and the values and settings are ac cepted Caution Reference temperature and reference pressure setting ex works 20 C 1000 hPa All the volume flow m h and consumption values m that are indicated on the display refer to 20 C and 1000 hPa according to ISO 1217 suction condition Alternatively 0 C and 1013 hPa standard cubic meter according to DIN 1343 can also be en tered as the reference...

Page 48: ...ecimal places as well as the short name and value name are all described in Chapter 12 2 2 Sensor settings For the marking of the text fields see Chapter 12 2 2 7 Marking and setting text fields 14 3 2 8 1 Type 0 4 20 mA Main menu Settings Sensor settings B1 Type text field 0 20 mA Main menu Settings Sensor settings B1 Right arrow 2nd page Scaling of the sensor here for example type 0 20 mA corres...

Page 49: ...e measured data of the sensor can be set to a certain value The positive or negative difference of the off set is indicated With the reset button the offset can be reset to zero A preset selection of suitable units for types 0 4 20 mA By pressing the page button paging forward is possible In addition internal user units can be de fined if required ...

Page 50: ...tings Sensor settings B2 Type text field PT100x Name 0 00 ltr min 2345678 ltr 0 00 0 00 Typ Here for example Type 4 20 mA Here the sensor type PT100 and the unit C were chosen Alternatively the sensor types PT1000 and KTY81 as well as the unit F can be selected Please refer to Chapter 12 2 2 8 1 Types 0 1 10 30 volt and 0 4 20 mA for further setting possibilities ...

Page 51: ...7001 m 9000 m h m h Main menu Settings Sensor settings B2 Right arrow 2nd page Unit pulse Normally the numerical value with the unit stands for 1 pulse on the sensor and can di rectly be entered into the 1 pulse text field Note Here all of the text fields are already lettered or assigned For the unit pulse a flow volume or energy consumption can be chosen as a unit ...

Page 52: ...it meter m ltr m kg Please refer to Chapter 12 2 2 8 1 Types 0 1 10 30 volt and 0 4 20 mA for further setting possibilities Units for the current consumption for the pulse type Note Example with the unit cubic metre The available units for the unit of the counter for the type pulse The counter reading can at all times be set to any or a desired value en beliebigen bzw gewünschten Wert gesetzt werd...

Page 53: ...14 3 2 8 4 Type no sensor Main menu Settings Sensor settings A2 Type text field No sensor Serves to declare a channel which is currently not required as not configured When returning from Type no sensor to sensor settings the channels are displayed as free ...

Page 54: ...Sensor settings A1 Reg address text field Via Modbus up to eight registry values from input or holding registers of the sen sor can be read out Selection via the register tabs Va Vh and activation by means of the respective use button Here the Modbus ID is entered which is deter mined for the sensor permissible values are 1 247 ex here Modbus ID 12 In addition the serial transmission settings baud...

Page 55: ...cation only insufficiently defines the byte order with which the values are transmit ted In order to cover all of the possible cases the byte order is freely adjustable in the BDL compact and must be adapted to the order of the respective sensor see sensor transducer data sheet Example high byte before low byte high word before low word etc Therefore settings must be defined in accordance with the...

Page 56: ...b and byte order A B C D Hword Lword Hbyte Lbyte Hbyte Lbyte 29235175522 AE 41 56 52 Data order 1 byte 2 byte 3 byte 4 byte A B C D AE 41 56 52 D C B A 52 56 41 AE Pressing the Unit text field will lead you to a list with the available units The unit is selected by pressing the button with the suitable unit The unit is accepted by actuating the OK button Changing between the individual list pages ...

Page 57: ... Main menu Settings Sensor settings A1 Scal text field Main menu Settings Sensor settings A1 OK The application of this factor allows for the ad justment of the output value by the latter By pressing the OK button the specifications are accepted and stored ...

Page 58: ... menu Settings Sensor settings A1 Type text field Select Modbus and confirm with OK Third step define a name Main menu Settings Sensor settings A1 Name text field Now a name needs to be entered Fourth step define the Modbus settings Main menu Settings Sensor settings A1 Modbus settings Note Further information regarding Marking and setting text fields can be found in Chapter 14 2 2 7 The correspon...

Page 59: ...ters Register Designation Address of register Reg format Unit Scal Va Temperature 1216 HR R4 C No scal Vb Rel humidity 1152 HR R4 rH No scal Vc Dew freezing point 1536 HR R4 C td No scal Vd Dew point 1472 HR R4 C td No scal The definition of other registers is imple mented in the same manner The settings of the reg data format are the same for all the registers The entry of the Modbus parameters i...

Page 60: ...Operation METPOINT BDL compact 60 METPOINT BDL compact 14 3 3 Device settings Main menu Settings Device settings Overview of the device settings ...

Page 61: ...3 3 2 Date time Main menu Settings Device settings Date time Here one out of 10 languages can be selected for the METPOINT BDL compact By pressing the Time zone text field and entry of the correct UTC the correct time can be set worldwide Changeover to summer winter time is imple mented by pressing the Summer time button ...

Page 62: ...NT BDL compact into an existing network is possible without requiring manual configuration of the latter For example an IP address from the address space class C network Note Private address space class A network 10 0 0 0 to 10 255 255 255 Private address space class B network 172 16 0 0 to 172 31 255 255 Private address space class C network 192 168 0 0 to 192 168 255 255 After having pressed for...

Page 63: ... setting the tick for enable Modbus RTU RS485 Modbus will be activated By pressing the Set to default button the pre ad justed default values are set Default values Baud rate 19200 Stop bit 1 Parity even When the BDL compact is connected to the end of the bus the termination can be activated via the Term button or a BIAS energised via the Bias but ton With the TCP and RTU buttons it is possible to...

Page 64: ...ata remain stored on the SD card and are available for external use By pressing the Erase SD card button all of the data are completely deleted from the SD card When activating the Relay buttons it is possible to allow for a relay cut off by means of the indicated alarm message Settings are only possible in the password pro tected menu A message is shown when an alarm occurs here e g alarm 1 yello...

Page 65: ... indicates which update option is available 14 3 3 7 1 System update Main menu Settings Device settings System System update 14 3 3 7 2 Securing the device settings Main menu Settings Device settings System update Securing the device settings Overview of the system update functions Stores the channel and system settings in an XML format on a USB stick Overview of the system settings ...

Page 66: ...Important If subsequent to the update the Restart button appears it must be pressed to restart the METPOINT BDL COMPACT When after having pressed the Check USB stick for available updates button the follow ing messages appear in the window the METPOINT BDL compact is not correctly connected with the USB stick or no data are available When the METPOINT BDL compact is cor rectly connected with the U...

Page 67: ...e METPOINT BDL compact 14 3 3 7 4 Loading device settings Main menu Settings Device settings System Loading device settings By means of the Loading device settings but ton the channel and system settings can be reset to the status of when it was last saved Important When the channel and system settings have been reset the OK button and afterwards the Reset button must be pressed Update for the cha...

Page 68: ...the BDL can be re booted by pressing the Restart button If required the screen calibration can be changed here Press Calibrate and a calibration cross will ap pear 1 on the upper left 2 on the lower right and 3 in the middle These crosses must be pressed consecutively When calibration is completed and the indica tion is averaged confirm with OK If this is not the case calibration can be re peated ...

Page 69: ...tly be set E g brightness to 50 Zum Beispiel Helligkeit auf 50 By means of the Darken after button the brightness can be reduced to a minimum at the end of a time interval to be defined here after 15 minutes As soon as the dimmed screen is activated again the brightness automatically goes back to the value that was last set prior to dimming This function can be used to clean the touch panel during...

Page 70: ... of a system Total consumption of the system several compressors Energy costs etc For a calculation example and description of the specific performance please refer to Section 12 2 7 6 Short description of the hardware and software version and the serial number of the METPOINT BDL compact Under options you can also acquire four differ ent functions if this was not done during the or dering The sys...

Page 71: ...4 3 8 2 Virtual channels settings Main menu Settings Sensor settings Virtual channels D By pressing the Buy button for virtual chan nels you will be requested to enter the activa tion code Please enter your activation code into the text field and activate it by pressing the OK button After having activated the virtual channels but ton in the sensor setting menu an overview of the available four ch...

Page 72: ...channels V1 Name text field If no sensor was configured yet the Type no sensor will appear Pressing the text field Type no sensor will en able you to go to the selection list of sensor types see next step If no sensor was configured yet the Type no sensor will appear By pressing the Generic button the virtual channel is selected By pressing the No sensor button the channel is reset The selection i...

Page 73: ...ngs Sensor settings Virtual channels V1 Right arrow 2nd page 1st operand Main menu Settings Sensor settings Virtual channels V1 1st operand A1 A virtual value is activated by pressing the re spective Value button for example V1a with subsequent actuation of the Use button By pressing the 1st operand field you will go to a selection list with the available hardware channels virtual channels and con...

Page 74: ...button e g A1b the selection is accepted If the Const value button was pressed the value needs to be determined via the numeric keypad By pressing the OK button the value is accepted By means of buttons and Clr the values can be corrected Button erases the last character Button Clr erases the entire value By pressing the text field 1st operation a list with the available mathematic operands will a...

Page 75: ...nit is ac cepted by pressing the OK button A change between the individual list pages is effectuated by pressing the Page button In the event that units cannot be selected you can create the unit yourself For this purpose one of the free pre defined User_x user buttons must be chosen Paging is effectuated with the Page button To enter the new unit press the Edit button By pressing the text field U...

Page 76: ... entered in order to simplify its identification at a later moment in the menu items Graphics and Graphics current values Otherwise the designation would be V1a for example V1 is the channel name and a the first measured value in the channel b would be the second and c the third The resolution of the decimal places is easily ad justable by pressing right and left 0 to 5 decimal places The resoluti...

Page 77: ...g the selected measuring data the data logger must be activated subsequent to the completion of the settings see Chapter 12 2 1 2 Logger settings data logger See also Chapter 12 2 2 2 Denoting the measuring data and 12 2 2 3 Recording measuring data With the Recording buttons the measuring data are selected which are stored at an activated data logger ...

Page 78: ...be at inputs A1 B1 and an electric meter at input B2 The total consumption of air and energy and the specific performance of the entire plant are calcu lated Main menu Settings Sensor settings Virtual channels V1 Right arrow 2nd page V1a Use Selection and entry of the operands and opera tions see Chapter 12 2 6 4 2 and Chapter 12 2 6 4 3 The result for V1a is the sum of consumption sensors A1 A2 B...

Page 79: ...nsumption read from the electric meter V1a total compressed air consumption V1b power consumption Here the calculation of the specific performance is implemented with V1c V1b V1a with 0 072 KWh m as the result The calculation of the overall costs is effectu ated with V1d B2 0 21 with 991 36 as the result The calculation of the energy costs per m of generated air is effectuated with V1e V1c 0 21 ...

Page 80: ...ctivated Main menu Settings via METPOINT BDL compact Enter Code für Option 3 14 3 9 2 Selection of the sensor type See also Chapter 12 2 2 8 Configuration of analog sensors Main menu Settings Sensor settings A1 By pressing the Buy button for analog total you will be requested to enter the activation code Please enter your activation code into the text field and activate by pressing the OK button I...

Page 81: ...ition of the Web server option the latter needs to be activated first Selection of the required sensor type by press ing the respective button here for example 4 20 mA Confirmation and acceptance with the OK but ton Selection of the units by pressing the respec tive Unit Measured value or Consumption rate text fields Enter scale values for 4 mA and 20 mA here 0 m h and 170m h If required it is pos...

Page 82: ...s of your BDL compact you can check the following op tions worldwide http IP Adresse des BDL compact Remark You will find the IP address of the BDL compact in Chapters 12 7 4 System overview and 12 2 4 3 Network settings By pressing the Buy button for analog total you will be requested to enter the activation code Please enter your activation code into the text field and activate it by pressing th...

Page 83: ...Operation METPOINT BDL compact METPOINT BDL compact 83 Info Status ...

Page 84: ...Operation METPOINT BDL compact 84 METPOINT BDL compact Actual Values ...

Page 85: ...re simultaneously recorded the smallest possible data logger interval is five seconds In the uppermost row the pre defined time in tervals 1 2 5 10 15 30 60 and 120 sec onds can be chosen for the recording A deviating individual time interval can be en tered into the text field with the white back ground on the upper right where the currently set time interval is always indicated here for example ...

Page 86: ... created and with the selection of the Comment text field a name or comment can be entered Important When a new recording file is to be created the Force new record file button must be activated Otherwise the recording file that was cre ated last will be used By pressing the Start time button and subse quently pressing the date time text field be low the date and the start time of the data logger ...

Page 87: ...ime button and subse quently pressing the date time text field be low the date and the time for the end of the data logger recording can be set Note When activating the stop time the latter will automatically be set to the current time plus one hour After having pressed the Date time text field the input window will appear in which the zone of the time or date which is highlighted in yellow can al...

Page 88: ...eated last will be used Subsequent to the start or stop time activa tion and the implemented settings the Start button is pressed and the data logger is on active The data logger will start recording at the set time The data logger can also be activated and deactivated without activated time settings namely by means of the Start and Stop but tons On the lower left it is indicated how many values a...

Page 89: ...nt values see Chapter 12 4 Graphics current values Zoom and scroll possibilities in the time range of the graphics Additional zoom and scroll possibilities in graphics and graphics current values During the running measurement no values are displayed Maximally an entire day can be displayed 24h The smallest possible range is displayed depending on the time interval of the record Earlier moment Lat...

Page 90: ...d a colour By pressing the Date text field the calen dar will appear from which the suitable date can easily be selected Here the stored measuring data can be selected according to the time start and stop comment and file name with an English date 1 The left y axis is already activated and a colour can now be assigned to it Note The grid setting is already possible at this moment but it is more us...

Page 91: ...ts to the remaining y axis are implemented in the same manner m h A1a A2a m s Two different grid settings with different units and colors Here the unit of the record to be displayed is selected from the menu Now the y axis scaling with min max and grid can be set By means of the A Scale button a calculated autoscaling can be defined ...

Page 92: ...of measuring data for example from a dew point sensor or several different sensors Fast access to the pre defined time ranges of 24 h 8 h 1 h 15 min and 2 min At the push of a button the graphics for the selected time range are displayed After having pressed this button the currently recorded measuring data are displayed in the current time range Screenshot button for the storage of the screen on ...

Page 93: ...viewed under Main menu Graphics current Here channel A1 was selected For each channel one value for the repre sentation in the graphics can be selected In addition like in the Main menu Graphics a color and the y axis scaling min max grid can be deter mined Channel A1 The flow volume as graphics When several channels are occupied all the graphics are displayed It must be observed that only the y a...

Page 94: ...urrent values view shows the current measured values of all the connected sensors In the event that the adjusted alarm limits are exceeded or underrun the respective meas ured value flashes yellow alarm 1 or red alarm 2 The individual channels can be selected and the settings viewed and checked but no changes can be implemented here Note Changes must be effectuated in the settings The current valu...

Page 95: ...ashes yellow for an alarm 1 and red for an alarm 2 Moreover one can see which relays were set for which channel as an alarm 1 and or as an alarm 2 This is indicated by the yellow and red or red yellow squares at the intersections between measuring channel and relay Here the desired layout can be selected by pressing the Next Layout button It is possible to choose between six different layouts with...

Page 96: ... menu Channels individual channels can be selected here In the alarm overview it is quickly visible which measured value has exceeded or un derrun the alarm range Note The alarm parameters can also be set and or changed here By means of the Selection buttons a period of time between start and end can be set The stored measured data which are within this pe riod are exported With Export logger data...

Page 97: ...y means of export system settings all the available sensor settings can be exported to a USB stick The selected date is always highlighted in green and the date figures of the Sundays are red as is the case in a calendar On days on which the measuring data were recorded the date figures are optically raised When several measurements were recorded on the same day these will appear subse quent to ha...

Page 98: ...ain menu Graphics Main menu Graphics current values Main menu Channels Main menu Current values Here the storage location USB stick or SD card can be selected The pictures are stored in a directory per day and are consecutively numbered Directory designation DJJMMTT D fix for the date JJ Year MM Month TT Day Path DEV0002 Hostname Bitmap For the host name see Main menu Settings System overview Exam...

Page 99: ...Export data Export screenshots Selection With Export screenshots the stored screen shots can be transmitted to a USB stick By means of the Selection buttons a period of time between start and end can be set The stored bitmaps which are within this period are exported The selected date is always highlighted in green and the date figures of the Sundays are red as is the case in a calendar On days on...

Page 100: ...eservation of the configuration data of the METPOINT BDL even in the event of a voltage drop DANGER Battery and SD card The replacement of the battery or of the SD card must only be carried out by authorised and skilled personnel and when the device is deenergised Danger Damage through ESD possible The device contains electronic components which may be sensitive to electrostatic discharge ESD or t...

Page 101: ...waste containers intended for city refuse or household waste At the end of its usability the product must be disposed of in an appropriate manner Materials such as glass plastic and some chemical compositions are for the most part recoverable reusable and can be reutilised According to the aforementioned directive the METPOINT BDL comes under category 9 and is according to 5 Law 1 the German Elekt...

Page 102: ...Declaration of conformity 102 METPOINT BDL compact 18 Declaration of conformity ...

Page 103: ...METPOINT BDL compact Supply voltage 100 240 V AC 1Ph PE 50 60Hz IP degree of protection IP 44 Ambient temperature 0 50 C Product description and function Data logger for storing and registration of stationary measurement data for industrial applications Low voltage directive 2006 95 EG Applied standards EN 61010 1 2010 Year of fitting with CE mark 14 EMV directive 2004 108 EG Applied standards EN ...

Page 104: ...og current signal 4 20mA 25 D Danger compressed air 7 10 Danger supply voltage 17 F Field of application 8 I Incorrect installation 7 P Processing 25 S Safety advice 7 Safety instructions 7 17 Skilled personnel 17 T Technical data 14 ...

Page 105: ...METPOINT BDL compact 105 ...

Page 106: ...METPOINT BDL compact ...

Page 107: ...METPOINT BDL compact 107 ...

Page 108: ... NL 4703 RB Roosendaal Tel 31 165 320 300 benelux beko technologies com Polska Poland BEKO TECHNOLOGIES Sp z o o ul Chłapowskiego 47 PL 02 787 Warszawa Tel 48 22 855 30 95 info pl beko technologies pl Scandinavia www beko technologies com España Spain BEKO Tecnológica España S L Torruella i Urpina 37 42 nave 6 E 08758 Cervello Tel 34 93 632 76 68 info es beko technologies es South East Asia BEKO T...

Reviews: