10
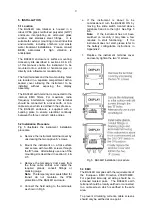
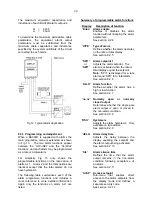
Fig 6 Dimensions and terminal connections
5.4 Installing a replacement battery
The internal battery will power the BA344D rate
totaliser for about five years; the exact time
depends upon how the instrument is
programmed and the input pulse frequency.
When the battery requires replacing the low
battery alarm annunciator on the instrument
display will be activated indicating that the rate
totaliser will continue to operate for about
another five hundred hours. When the battery
is exhausted the total and grand total will be
stored in permanent memory, totalisation will
stop and the instrument will display ‘bAtt’.
Replacement BA491 batteries are available
from BEKA associates and our agents. When
not installed in an instrument, at 20
o
C the
battery only loses about one percent of its
charge each year, so it is practical to hold
spares on-site. This long shelf life results from
an oxide layer which forms on the battery
internal electrodes and needs clearing before
use – see 5.4e and Appendix 2.
WARNING
To maintain the BA344D ATEX
certification, only a BEKA BA491
battery should be installed in the
instrument. No attempt should be
made to recharge or to open the
battery assembly.
The discharged battery may be removed and
the replacement fitted while the BA344D rate
totalisers is installed in the hazardous area.
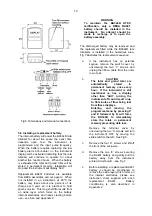
Fig 7 illustrates the replacement sequence:
a.
If the instrument has an external
keypad, remove the switch cover by
unscrewing the two ‘C’ screws and
unplug the ribbon cable from the outer
row of pins.
b.
CAUTION
The total and grand total are
automatically stored in
permanent memory once every
hour. If the instrument is still
operational i.e. has a display
other than ‘bAtt’, turning the
instrument off could result in up
to 59 minutes of flow being lost
from these displays.
Entering and leaving the
programme menu by pressing P
and E followed by E, will force
the BA344D to immediately
store the totals in permanent
memory preventing data loss.
Remove the terminal cover by
unscrewing the two ‘A’ screws and turn
the instrument OFF by moving the
slide switch to the left. See Fig 5.
c.
Remove the four ‘D’ screws and lift-off
the front of the enclosure.
d.
Remove the two ‘E’ screws securing
the BA491 battery and gently pull the
battery away from the instrument
printed circuit board – see Fig 7.
e.
Before installing a replacement BA491
battery it should be conditioned to
remove the oxide layer which forms on
the internal electrodes, please see
instruction sheet supplied with each
replacement BA491. Battery
conditioning is also described in
Appendix 2.
Summary of Contents for BA344D
Page 13: ...13...


