background image

12

X32 RACK DIGITAL MIXER

Quick Start Guide

13

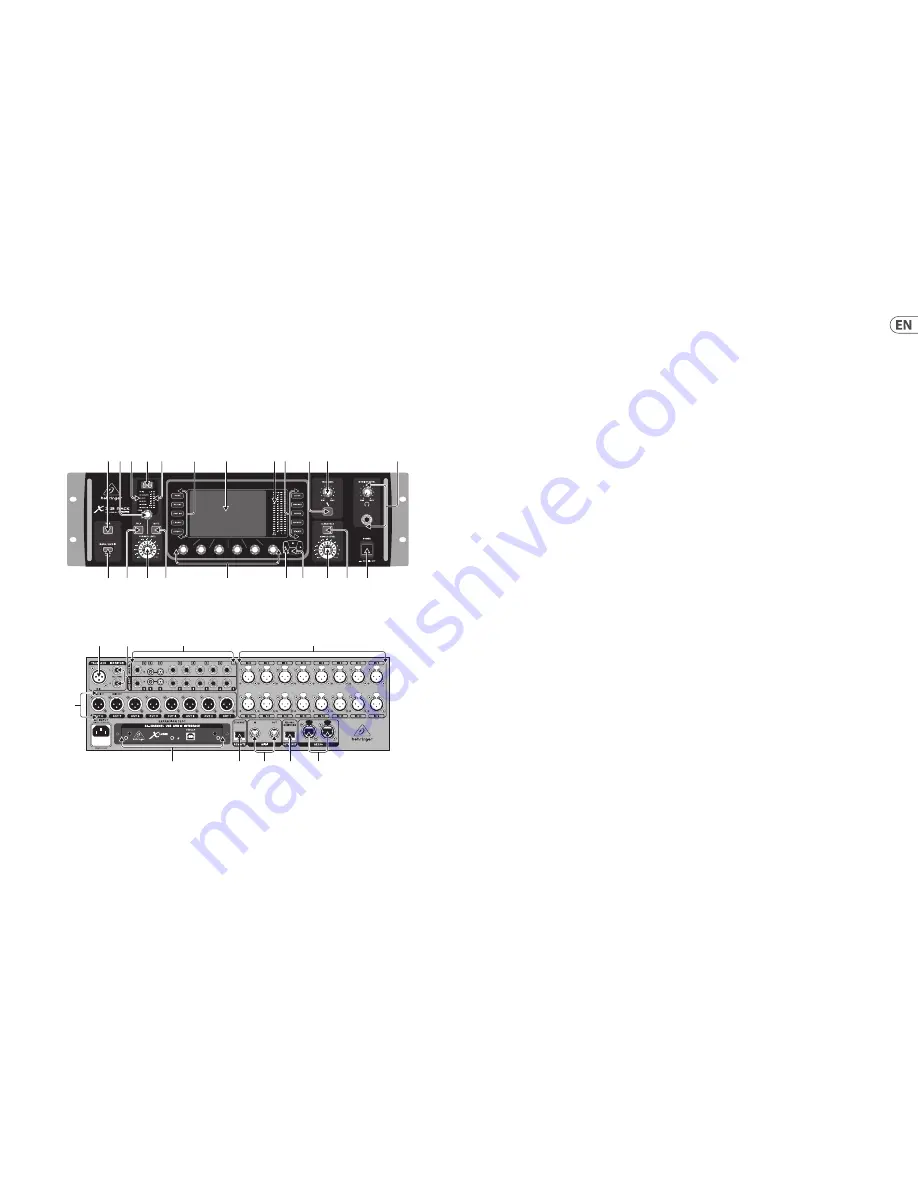
X32 RACK DIGITAL MIXER Controls

(EN)

  Step 2: Controls

(1) (3) (4) (5)

(11)

(13)

(17)

(6)

(10)

(16)

(21)

(7)

(8)

(19)

(20)

(9)

(12)

(14) (15)

(18)

(22)

(2)

(23)

(24)

(31)

(26)

(25)

(27)

(29)

(28)

(30)

(10)

(1) 

USB button opens the Recorder View on the 

MAIN DISPLAY, causing the LED to glow green. 

The LED will glow red to indicate access on the 

DATA/AUDIO input. An unlit LED indicates no 

data access and inactive Recorder View. 

(2) 

DATA/AUDIO USB input allows connection of 

USB flashdrives for firmware updates, loading/

saving scenes and show files, and playing back 

or recording WAV files. 

(3) 

CHANNEL SELECT control cycles through all 

channels by turning the knob. By pressing 

this knob, you can jump to the next type 

of channels.

(4) 

CHANNEL TYPE LEDs indicate which type of 

channel is currently selected.  

(5) 

CHANNEL NUMBER display shows the currently 

selected channel. 

(6) 

INPUT METER displays the pre-fader input 

level of the selected channel. 

(7) 

SOLO button routes the currently selected 

channel to the monitoring paths. The LED 

lights when active. 

(8) 

CHANNEL LEVEL control adjusts the currently 

selected channel’s output. 

(9) 

MUTE button mutes the currently selected 

channel. The LED lights when active. 

(10) 

MAIN MENU buttons open specific menus on 

the MAIN DISPLAY. 

(11) 

MAIN DISPLAY shows permanent information 

about the mixer’s configuration as well as 

information about the currently selected 

menu.  

(12) 

DISPLAY ENCODER knobs allow adjustment 

and on/off selection of the menu items 

indicated at the bottom of the MAIN DISPLAY. 

(13) 

MAIN METER indicates the Main Mono or SOLO 

level in the left meter and the Main Stereo 

level on the right. 

(14) 

PAGE SELECT buttons curse horizontally 

in the MAIN DISPLAY and make 

Yes / No confirmations. 

(15) 

LAYER SELECT buttons access different 

parameter layers that can be edited by the 

DISPLAY ENCODERS. 

(16) 

TALK button engages the Talkback 

microphone. Routing is defined in the 

Monitoring Preferences page. 

(17) 

TALK LEVEL knob sets the Talkback mic gain. 

(18) 

CLEAR SOLO button lights to indicate that 

one of the channels has been Soloed. Press to 

deactivate all active solo functions. 

(19) 

MAIN LR LEVEL knob adjusts the main stereo 

output bus. 

(20) 

ON/OFF button turns the power on and off. 

(21) 

MONITOR LEVEL knob adjusts the 

headphone and monitor output volume. 

Connect headphones to the 1/4" front 

panel input.

(22) 

TALKBACK input connects a talkback 

microphone via XLR cable.

(23) 

MONITOR outputs send audio to monitor 

speakers via 1/4" balanced cables.

(24) 

AUX IN and OUT jacks send and receive signals 

via 1/4" and RCA connectors.

(25) 

XLR OUT jacks send audio via XLR cable. 

Output signals are configured on the Routing/

Aux Out page of the MAIN DISPLAY. 

(26) 

X-USB card provides 32 channels of 

input and output via USB cable to and 

from any connected personal computer 

DAW application.

(27) 

ETHERNET connector allows full OSC-based 

remote control of the X32 RACK. 

(28) 

MIDI IN/OUT allows the unit to send and 

receive MIDI commands via standard 5-pin 

DIN cables. 

(29) 

ULTRANET connector sends 16 channels of 

audio to a P16 monitoring system. 

(30) 

AES50 A and B connectors allow 96 channels 

of bidirectional audio for connection to S16 

digital snakes or other X32 family products. 

Shielded CAT-5e cable should always be used 

for AES50 connections between X32 and 

S16 units.

(31) 

XLR IN jacks receive inputs via XLR cable. 

These inputs feature 16 MIDAS-designed mic/

line preamps with 72 dB of gain range. Each 

input has an adjacent red LED to indicate 

when 48 V phantom power supply is engaged.

Summary of Contents for X32 DIGITAL MIXER

Page 1: ...Quick Start Guide X32 RACK DIGITAL MIXER 40 Input 25 Bus Digital Rack Mixer with 16 Programmable MIDAS Preamps USB Audio Interface and iPad iPhone Remote Control ...

Page 2: ...ores TSde6 3mmodebayonetaprefijados Cualquierotra instalaciónomodificacióndebeserrealizadaúnicamente poruntécnicocualificado Estesímbolo siemprequeaparece leadviertedelapresenciadevoltaje peligrososinaislardentrodelacaja estevoltajepuedesersuficienteparaconstituirunriesgo dedescarga Estesímbolo siemprequeaparece leadviertesobreinstruccionesoperativas ydemantenimientoqueaparecenenla documentaciónad...

Page 3: ... BUGERA et COOLAUDIO sont des marques ou marques déposées de MUSICTribe Global Brands Ltd MUSICTribe Global Brands Ltd 2018Tous droits réservés Pourconnaîtrelestermesetconditionsdegarantie applicables ainsiquelesinformationssupplémentaires etdétailléessurlaGarantieLimitéedeMUSICTribe consultezlesiteInternetmusictri be warranty Vorsicht DiemitdemSymbolmarkierten AnschlüsseführensovielSpannung dassd...

Page 4: ...relhosparadesligaraunidadede funcionamento estadeveestarsempreacessível 13 Utilizeapenasligações acessóriosespecificados pelofabricante 14 Utilizeapenascom ocarrinho estrutura tripé suporte oumesa especificadospelo fabricanteouvendidos comodispositivo Quandoutilizarum carrinho tenhacuidadoao moveroconjuntocarrinho dispositivoparaevitardanos provocadospelaterpidação 15 Desligueestedispositivodurant...

Page 5: ...ape 1 Connexions DE Schritt 1 Verkabelung PT Passo 1 Conexões BasicConnections ConexionesBásicas ConnexionsBasiques GrundlegendeAnschlüsse ConexõesBásicas B215D B1800D PRO F1320D F1320D FCB1010 MIDI Pedal S16 Digital Snake P 16M P 16D XM8500 Laptop B3031A HPX6000 Front Panel Input FX2000 DI Box MP3 Player GTX30 XM8500 ...

Page 6: ...tèmederetourP16 X32RACKLivePerformanceSetupmitS16 X32undP16Monitorsystem X32RACKAjusteparaPerformancesAoVivocomSistemadeMonitoramento S16 X32 eP16 X32RACKRecordingStudioSetup X32RACKConfiguraciónparaestudiodegrabación ConfigurationdelaX32RACKpourstudiod enregistrement X32RACKAufnahmestudioSetup X32RACKAjustedeGravaçãoemEstúdio USB cable from X USB interface card Monitor Control Room Out L L R R L ...

Page 7: ...urse horizontally in the MAIN DISPLAY and make Yes No confirmations 15 LAYER SELECT buttons access different parameter layers that can be edited by the DISPLAY ENCODERS 16 TALK button engages the Talkback microphone Routing is defined in the Monitoring Preferences page 17 TALK LEVEL knob sets the Talkback mic gain 18 CLEAR SOLO button lights to indicate that one of the channels has been Soloed Pre...

Page 8: ...os de micro línea diseñados por MIDAS con un rango de ganancia de 72 dB Cada entrada dispone de un piloto a su lado para indicarle en qué momento está activada la alimentación fantasma de 48 V 1 La touche USB permet d ouvrir la fenêtre Recorder View sur l ÉCRAN PRINCIPAL La Led s allume en vert La Led s allume en rouge pour indiquer qu un accès au connecteur DATA AUDIO est en cours Si la Led reste...

Page 9: ... DieseEingängeverfügen über16vonMIDASentwickelte Mic Line VorverstärkermiteinemGain Bereichvon72dB DiezugehörigeLED jedesEingangsleuchtetrot wenn48V Phantomspannunganliegt 1 O botão USB abre o Recorder View vista do gravador no MAIN DISPLAY tela principal fazendo com que o LED acenda uma luz verde O LED acenderá uma luz vermelha para indicar acesso na entrada DATA AUDIO Um LED apagado indica que n...

Page 10: ... Channels 1L 4R control the 4 stereo output signals of side chain FX1 4 Output Signals can be freely assigned from any internal signal to any of the following outputs 8 analog local XLR outputs with adjustable digital delay for time alignment of speakers 8 virtual outputs marked with for routing over AES50 or card outputs 6 auxiliary sends on TRS outputs 16 channel personal monitoring using the co...

Page 11: ...ng loading or saving of equalizer settings On the Routing pages pressing the Utility button will offer loading or saving different presets of routing scenarios IntheScenesmenu pressingtheUtilitybuttonoffers copying loading savingornamingconsolescenes NOTE The X32 RACK DCA groups can be selected using the Channel Select control in order to adjust their fader level mute or solo status Note however t...

Page 12: ...sta tarjeta desde la web behringer com antes de conectar este mezclador a su ordenador Esta tarjeta es compatible con CoreAudio lo que le permite trabajar con ordenadores Apple OS X sin la necesidad de instalar ningún driver Los canales de matriz 1 6 reciben su señal exclusivamente de las señales MAIN LRC y de los buses de mezcla 1 16 Los pasos de procesado incluyen en este orden Punto de inserció...

Page 13: ...1 48 AES50 B1 8 AES50 B9 16 AES50 B17 24 AES50 A25 32 Local In 1 8 Local In 9 16 Local In 17 24 Local In 25 32 AES50 A1 8 AES50 A9 16 AES50 A17 24 AES50 A25 32 AES50 A33 40 AES50 A41 48 AES50 B1 8 AES50 B9 16 AES50 B17 24 AES50 A25 32 Local In 1 8 Local In 9 16 Local In 17 24 Local In 25 32 AES50 A1 8 AES50 A9 16 AES50 A17 24 AES50 A25 32 AES50 A33 40 AES50 A41 48 AES50 B1 8 AES50 B9 16 AES50 B17 ...

Page 14: ...ge d édition ou le réglage de chaque écran s effectuent à l aide des 6 codeurs poussoirs associés situés sous l écran En présence d un contrôleur continu ou d une liste tournez le bouton correspondant pour l édition indiqué par diverses icônes circulaires Enprésenced unetoucheoud uncommutateur unboutonrectangulaires afficheenbasdela zone Lefaitd appuyersurlecodeurmodifie l étatactif inactifdelafon...

Page 15: ... auf einem von 48 Kanälen des AES50 Ports A 48 Kanälen des AES50 Ports B 32 Kanälen der USB Interface Karte Link Lo Cut Ch01 01 01 0 00 0 00 A S16 A 48K B C X USB 37 14 11 6 12 18 24 30 36 42 48 54 clip home gate dyn eq sends main config Gain Gain 48V In Pre Post Ins Delay dB 0 00 Link Lo Cut Lo Cut Hz 20 Lo Cut Input Select Source PRE Insert Ins Pos InsF Connect Insert ms 0 3 Delay Delay Delay dB...

Page 16: ...tton im Display dunkelgrau leuchtet ist die entsprechende Funktion ausgeschaltet inaktiv Wenn er gelb leuchtet ist die Funktion eingeschaltet aktiv X32 RACK auf der Utilities Seite anpassen Drücken Sie den Utility Taster rechts neben dem Hauptdisplay um nützliche Funktionen im jeweiligen Zusammenhang aufzurufen Beispiel Wenn Sie den Equalizer eines Pultkanalzugs einstellen können Sie durch Drücken...

Page 17: ... da mesa Qualquer um e todos os sinais acima podem também ser espelhados em blocos de 8 sinais em qualquer um dos 48x canais na AES50 porta A 48x canais na AES50 porta B 32x canais no cartão de interface USB Link Lo Cut Ch01 01 01 0 00 0 00 A S16 A 48K B C X USB 37 14 11 6 12 18 24 30 36 42 48 54 clip home gate dyn eq sends main config Gain Gain 48V In Pre Post Ins Delay dB 0 00 Link Lo Cut Lo Cut...

Page 18: ...dortiver aparênciaverdeescura afunçãocorrespondente estarádesligada inativa quandotiveraparência âmbar afunçãoestaráligada ativa Personalização do X32 RACK através da página Utilitários Pressione o botão Utility localizado à direita do exibidor principal main display para apresentar funções de maneira condizente com o contexto Por exemplo Quando estiver ajustando o equalizador do canal da mesa é p...

Page 19: ...36 X32 RACK DIGITAL MIXER Quick Start Guide 37 X32 RACK DIGITAL MIXER Block Diagram ...

Page 20: ...l XLR 23 dBu Phantom power switchable per input 48 V Equivalent input noise level XLR input shorted 128 dBu CMRR XLR 20 dB gain typical 70 dB CMRR XLR 40 dB gain 80 dB Input Output Characteristics Frequency range 48 kHz sample rate 0 dB to 1 dB 10 Hz 22 kHz Dynamic range analog in to analog out typical 106 dB A D dynamic range preamp to converter typical 109 dB D A dynamic range converter and outp...

Page 21: ...apartado Support denuestrapáginaweb ycompruebesisuproblemaaparece descritoysolucionadoallí Deformaalternativa envíenosa travésdelapáginawebunasolicitudonlinedesoporteen periododegarantíaANTESdedevolvernoselaparato 3 Conexiones de corriente Antesdeenchufar esteaparatoaunasalidadecorriente asegúresedequedicha salidaseadelvoltajeadecuadoparasumodeloconcreto Encasodequedebasustituirunfusiblequemado de...

Page 22: ...We Hear You ...

Reviews: