Fitting the Fascia
(The coal pieces supplied are a natural
material. Occasionally it will be necessary to
reduce the size of the coal pieces. To do this
place them inside a plastic bag, place on a
suitable hard surface and tap gently with a
small hammer or similar tool).
Fitting the Adage and Ocean fascia.
1.
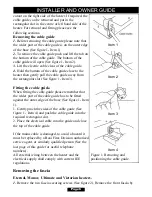
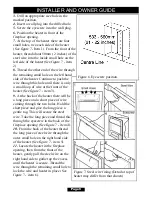
Removing the fascia may have moved the
magnets used to fix the fascia to the heater.
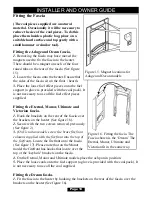
There should be a magnet on each of the four
raised tabs on the rear of the fascia (See figure
15).
2.
Locate the fascia onto the heater. Ensure that
the sides of the fascia sit on the floor / hearth.
3.
Place the loose fuel effect pieces onto the fuel
support (a glove is provided with the coal pack). It
is not necessary to use all the fuel effect pieces
supplied.
Fitting the Eternal, Manor, Ultimate and
Victorian fascia.
1.
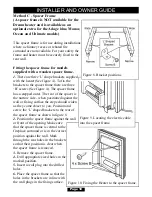
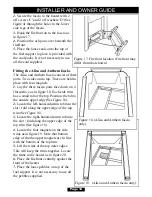
Hook the brackets on the rear of the fascia over
the brackets on the heater (See figure 16).
2.
Secure with the two screws removed previously
(See figure 2)
3.
(On Victorian models screw the brass firefront
columns supplied with the firefront into the top of
the firefront)
.
Locate the firefront onto the fascia
(See figure 17). Please note that on the Manor
model the firefront has hooks that locate over the
top of the ‘keyhole’ brackets on the fascia.
4.
On the Eternal, Manor and Ultimate models place the ash pan in position.
5.
Place the loose coals onto the fuel support (a glove is provided with the coal pack). It
is not necessary to use all the coal supplied.
Fitting the Dream fascia.
1.
Fit the fascia to the heater by hooking the brackets on the rear of the fascia over the
brackets on the heater (See figure 16).
Page 13
INSTALLER AND OWNER GUIDE
Figure 16. Fitting the facia. The
Fascia shown is the ‘Dream’ The
Eternal, Manor, Ultimate and
Victorian fit in the same way.
Figure 15. Magnet locations for
Adage and Ocean models


