After a working week:
• Cleaning the sander.
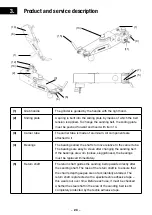
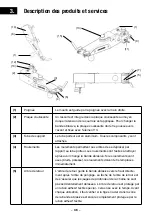
Clean the sander, especially the bearings and the sliding plate (item 2).
Clean the grinder from dirt, such as sanding dust. Non-corrosive brake and parts cleaners
are permitted as cleaning agents, e.g. Liqui Moly AIII 3389.
• Check for cracks or spindle play.
• Renew the wear protection of the return shaft.
• When replacing components, only original spare parts may be used.
Replacement of spare parts is only permitted by trained personnel. Training documents and
information on the correct replacement of spare parts are available from the manufacturer.
8.
Malfunction and repair
When changing the sanding belt, proceed as follows:
• Remove coarse dirt from the sliding plate (2). Coarse dirt can slide under the sliding
plate and cause the sliding plate to jam.
• Press the rear end of the sliding plate (2). The carrier tube (3) must be against a solid
object.
• Keep the sliding plate (2) pressed and turn the wing nut (13) clockwise until the sliding
plate (2) is fixed.
• Loosen the wing nut (8). You can then remove the cover (14).
• Pull the sanding shaft (6) out of the carrier tube - now the old sanding belt can be pulled
off to the rear.
• Push the new sanding belt into the sanding machine from the rear of the support tube.
Pay attention to the direction of rotation of the sanding belt!
• Make sure that the sanding belt is guided correctly over the shafts. The correct tape
guide is engraved on the side of the carrier tube (3).
• Insert the grinding shaft (6).
• Loosen the screw (13).
• Mount the side cover (14) with the wing screwdriver (8).
Tip: If the drive shaft (11) does not turn the new sanding belt completely, simply apply
additional pressure to the sanding belt with a finger over the sliding plate (29) until the
sanding belt turns completely.
Sanding belt change
– 29 –
Summary of Contents for Schleiferl
Page 17: ... 17 ...
Page 33: ... 33 ...

