background image

 5. 

 Settings

The following settings must be made before using the grinder.

Diameter  
Grinding shaft 
Schleiferl

Mark

Chain division

1.8 mm

no groove

1/4 “  Picco

2.6 mm

1 groove

3/8 “ Picco

3.2 mm

2 grooves

0,325 “

3.8 mm

3 grooves

3/8 “

4.2 mm

4 grooves

0,404 “

•   Use a screwdriver to check whether the sanding belt runs in the middle of the sander.
•   If necessary, correct the position of the sanding belt with the knurled screw (9).
•   Setting the angle displays to the desired grinding angle:

–   Chest angle/roof angle: The desired chest angle can be set using the elongated hole  

in the angle displays.


 –   Sharpening angle: The sharpening angle is set by removing the cover (14) using the  

wing nut (8) and placing it on the angle indicators. 
The position is defined by the incorporated recesses. 
The angle markings show the sharpening angle. 
The desired sharpening angle is set by bending the angle indicators.


Adjusting a central belt run 


Insert the appropriate grinding shaft for the chain division 

–  25  –

Summary of Contents for Schleiferl

Page 1: ... DE Bedienungsanleitung Seite 2 Schärfwerkzeug für Sägeketten EN Operating manual Page 18 Sharpening tool for saw chains FR Notice d utilisation Page 34 Outil d affûtage pour chaînes de scie Schleiferl ...

Page 2: ...rheitshinweise 6 5 Einstellungen 9 6 Bedienung 10 7 Wartung Prüfung 12 8 Störung und Reparatur 14 9 Außerbetriebsetzung 15 10 Entsorgung 15 11 Anwendungsberatung 15 12 Gewährleistung 16 13 Umweltaspekte 16 14 EG Konformitätserklärung 16 Inhalt 1 Technische Daten DE Bedienungsanleitung Achtung Die Schwingungsemission während der tatsächlichen Benutzung des Schleiferl kann je nach Benutzungs weise d...

Page 3: ...gschrauber Hex Schrauber Diese sind von verschiedenen Herstellern erhältlich Mögliche Geräte sind Makita DTD153 Makita DTD171 Milwaukee M18 FID2 Milwaukee M18 BID DeWalt DCF887 Bosch GDR 18V 200 C Die Auflistung der möglichen Schrauber erhebt keinen Anspruch auf Vollständigkeit und gibt keine Kaufempfehlung Die Liste zählt einzig Beispielgeräte auf mit denen das Schleiferl gut angetrieben werden k...

Page 4: ... Die Lager sind nach einem Schleifbandwechsel leicht zu reinigen Bei Verschleiß der Lagerung Geräusche Schwergängigkeit sind die Lager umgehend zu tauschen 5 Rückholwelle Die Rückholwelle führt das Schleifband direkt nach der Schleif welle nach oben Aufgabe der Rückholwelle ist es dass die Tiefenbegrenzer der Kette nicht ungewollt angeschliffen werden Die Rückholwelle ist mit einem speziellen Text...

Page 5: ...über 6 3mm Sechskant 1 4 Bit Aufnahme Das Schleiferl ist an der Antriebswelle formschlüssig mit einem geeigneten Antriebsgerät zu verbinden Dieses muss rechtsdrehend eingestellt werden 12 Flügelmutter Austauschwelle Mit dieser Mutter wird die Austauschwelle am Schleiferl fixiert 13 Flügelmutter Gleitplatte Diese Flügelmutter ist bei regulärem Betrieb lose Bei einem Schleifbandwechsel wird die Glei...

Page 6: ...onen an Staub Rauch oder auch Nebel erzeugen Dies kann neben einer Gesundheitsgefahr auch eine Explosionsgefahr beinhalten Bei Schleifarbeiten immer eine umfangreiche Schutzausrüstung tragen Schutzhandschuhe Schutzbrille Atemschutzmaske mit Filterklasse FFP2 Verhindern dass langes Haar lose Kleidungsstücke und Schmuck mit der Maschine in Berührung kommen und eingezogen werden Dies kann schwere Ver...

Page 7: ...den Überbeanspruchung und Überhitzung des Schleifbandes durch zu hohen Schleifdruck vermeiden Schleifbänder regelmäßig auf übermäßigen Verschleiß und Beschädigungen z B Risse an Kanten Bruchstellen oder starke Verschleißerscheinungen im Bereich der Verbindungs stelle kontrollieren und ggf ersetzen Bewahren Sie alle Sicherheitshinweise und Anweisungen für die Zukunft auf Halten Sie Ihren Arbeitsber...

Page 8: ...anden verletzen Vermeiden Sie Staubansammlungen am Arbeitsplatz Stäube können sich leicht entzünden Halten Sie das Werkzeug beim Arbeiten fest in den Händen und sorgen Sie für einen sicheren Stand Sichern Sie die Kettensäge Eine mit Zwinge oder einem Schraubstock festgehaltene Säge ist sicherer gehalten als eine lose angestellte Kettensäge Warten Sie bis das Schleiferl zum Stillstand gekommen ist ...

Page 9: ...n der Winkelanzeigen auf die gewünschten Schleifwinkel Brustwinkel Dachwinkel Mittels des Langlochs in den Winkelanzeigen kann der gewünschte Brustwinkel eingestellt werden Schärfwinkel Die Einstellung des Schärfwinkels erfolgt durch Demontieren der Abdeckung 14 mittels der Flügelmutter 8 und Anlegen an die Winkelanzeigen Die Position ist definiert über die eingearbeiteten Ausnehmungen Die Winkelm...

Page 10: ... die Größe der zu schärfenden Kette Kettenteilung Stellen Sie sicher dass keine leicht entzündlichen Gegenstände in der Nähe vorhanden sind und Bauteile nicht mit Kraftstoff benetzt sind Persönliche Schutzausrüstung Legen Sie die persönliche Schutzausrüstung an Schutzbrille Staubmaske Arbeitshandschuhe Vorbereitung Achtung Lesen Sie zuerst die Bedienungsanleitung bevor Sie das System nutzen Bitte ...

Page 11: ...and am Griff 1 aufgenommen Mit der linken Hand wird der Schrauber gehalten Ansetzen des Schleiferls am Sägezahn Das Schleiferl ist im Stillstand in den zu schärfenden Sägezahn zu führen Die Schleifwelle 7 ist dabei unter dem Zahndach des Sägezahns zu platzieren Die Winkelposition des Schleiferls zur Sägekette so ausrichten dass die jeweilige Winkelanzeige 15 parallel zum Kettensägenschwert ausgeri...

Page 12: ...ine Schneide besitzt Kontrollieren Sie ob die Winkel des Sägezahns entsprechend der Sägekettenhersteller ausgeformt sind Tiefenbegrenzer der Sägekette einstellen Hinweis Nach dem Schärfen der Sägezähne sind die Tiefenbegrenzer der Sägekette auf den jeweiligen Sägezahn einzustellen Dies kann nicht mithilfe des Schleiferls erfolgen Achtung Falsch bearbeitete Tiefenbegrenzer können schwere Verletzung...

Page 13: ...r Gleitplatte führen Drücken Sie am hinteren Ende der Gleitplatte 2 Dabei muss das Trägerrohr 3 an einem festen Gegenstand anstehen Halten Sie die Gleitplatte 2 gedrückt und drehen Sie die Flügelmutter 13 im Uhrzeiger sinn bis die Gleitplatte 2 fixiert ist Lösen Sie die Flügelmutter 8 Anschließend können Sie die Abdeckung 14 abnehmen Ziehen Sie die Schleifwelle 6 aus dem Trägerrohr nun lässt sich ...

Page 14: ... Sie die Abdeckung 14 Demontieren Sie das Schleifband 7 Schneiden Sie mit einem Messer die alten Klebebandrückstände von der Rückholwelle 5 Nehmen Sie ein passendes Textilklebeband Wir empfehlen das Klebeband zur Reparatur von Forstmaßbändern erhältlich bei BaSt Ing GmbH oder im Fachhandel Schneiden Sie 2 3 Streifen des Klebebandes auf die freigedrehte Länge der Rückhol welle ab Kleben Sie das Kle...

Page 15: ...ackung sollen einer umweltgerechten Wiederverwertung zugeführt werden Werfen Sie das Schleiferl nicht in den Hausmüll Das Schleiferl besteht aus hochwertigen Materialen wie z B Stahl Wellen Lager Blech Verschraubungen Aluminium Trägerrohr Gleitplatte ABS Kunststoff Antriebsrolle Es sind keine bedenklichen Gefahrstoffe verbaut Die verbauten Materialien können in einem Wert stoffhof entsorgt werden ...

Page 16: ...s Schleiferl besteht aus hochwertigen Materialien wie Aluminium und rostfreiem Stahl Nutzen Sie das Schleiferl möglichst lange und reparieren Sie das Schleiferl ggf um Ressourcen zu schonen Der Hersteller BaSt Ing GmbH Weipertshausen 13 82541 Münsing Tel 49 0 179 433 79 56 erklärt hiermit dass folgendes Produkt Produktbezeichnung Schleiferl Baujahr ab 06 2019 allen einschlägigen Bestimmungen der R...

Page 17: ... 17 ...

Page 18: ...ructions 22 5 Settings 25 6 Operation 26 7 Maintenance testing 28 8 Malfunction and repair 29 9 Render inoperative 31 10 Proper disposal 31 11 Application advice 31 12 Guarantee 32 13 Environmental aspects 32 14 EC Statement of Conformity 32 Content 1 Technical specifications EN Operation manual Attention The vibration emission during actual use of the grinder can deviate from the specified emissi...

Page 19: ...ivers are best These are available from various manufacturers Possible devices are Makita DTD153 Makita DTD171 Milwaukee M18 FID2 Milwaukee M18 BID DeWalt DCF887 Bosch GDR 18V 200 C The list of possible screwdrivers does not claim to be complete and does not give a purchase recommendation The list only includes example devices with which the grinder can be driven well If the Schleiferl not used as...

Page 20: ...easy to clean after changing the sanding belt If the bearings are worn noises sluggishness the bearings must be replaced immediately 5 Return shaft The return shaft guides the sanding belt upwards directly after the sanding shaft The task of the return shaft is to ensure that the chain s depth gauges are not accidentally abraded The return shaft is protected with a special textile adhesive tape th...

Page 21: ...The grinder is driven by a 6 3 mm hexagon 1 4 bit holder The grinder must be positively connected to the drive shaft with a suitable drive device This must be set clockwise 12 Wing nut exchange shaft The replacement shaft is fixed to the grinder with this nut 13 Wing nut sliding plate This wing nut is loose during regular operation When changing the sanding belt the sliding plate is pushed forward...

Page 22: ...risk of explosion Always wear extensive protective equipment when grinding Protective gloves Safety goggles Respiratory protection mask with filter class FFP2 Prevent long hair loose clothing and jewelry from coming into contact with the machine and being drawn in Serious injury can result Dust from materials such as metals and sanding belt dust can be harmful to health Touching or inhaling the du...

Page 23: ...and replace if necessary Retain all safety notices and instructions for future use Keep your work area clean and well lit Cluttered or unlit work areas can lead to accidents Do not work with the power tool in an explosive environment in which there are flammable liquids gases or dust Power tools generate sparks that can ignite the dust or fumes Keep children and other people away while using the p...

Page 24: ...n place with a clamp or vice is more secure than a loosely set chainsaw Wait until the grinder has come to a standstill before you put it down The accessory tool can get stuck and lead to loss of control of the power tool Read all safety warnings and instructions Failure to follow the safety instructions and instructions can cause fire chronic illness and or serious injury Never use a grinding mac...

Page 25: ...elt with the knurled screw 9 Setting the angle displays to the desired grinding angle Chest angle roof angle The desired chest angle can be set using the elongated hole in the angle displays Sharpening angle The sharpening angle is set by removing the cover 14 using the wing nut 8 and placing it on the angle indicators The position is defined by the incorporated recesses The angle markings show th...

Page 26: ...rer s specifications Determine the size of the chain to be sharpened chain pitch Make sure that there are no easily flammable objects nearby and that components are not wetted with fuel Personal protective equipment Put on personal protective equipment Safety glasses Dust mask Work gloves Preparation Attention Read the operating instructions first before using the system Please take your time to f...

Page 27: ... The grinder is picked up with the right hand on the handle 1 The screwdriver is held with the left hand Applying the grinder to the saw tooth The grinder is to be guided into the saw tooth to be sharpened at a standstill The grinding shaft 7 must be placed under the top of the saw tooth Align the angular position of the grinder to the saw chain so that the respective angle indicator 15 is aligned...

Page 28: ...ge evenly over the entire width Check whether the angles of the saw tooth are shaped according to the saw chain manufacturer Adjust the depth limiter of the saw chain Note After sharpening the saw teeth the depth limiter of the saw chain must be set to the respective saw tooth This cannot be done using the sander Attention Incorrectly machined depth gauges can cause serious injuries considerably r...

Page 29: ...to jam Press the rear end of the sliding plate 2 The carrier tube 3 must be against a solid object Keep the sliding plate 2 pressed and turn the wing nut 13 clockwise until the sliding plate 2 is fixed Loosen the wing nut 8 You can then remove the cover 14 Pull the sanding shaft 6 out of the carrier tube now the old sanding belt can be pulled off to the rear Push the new sanding belt into the sand...

Page 30: ...er 14 Dismantle the sanding belt 7 Use a knife to cut the old adhesive tape residue from the return shaft 5 Take a suitable textile adhesive tape We recommend the adhesive tape for repairing forest tape measures available from BaSt Ing GmbH or from specialist dealers Cut 2 3 strips of the adhesive tape on the unwound length of the return shaft Stick the adhesive tape along the shaft on the return ...

Page 31: ...tally friendly manner Do not throw the grinder in the trash The grinder consists of high quality materials such as Steel shafts bearings sheet metal screw connections aluminum support tube sliding plate ABS plastic drive roller There are no questionable hazardous substances installed The built in materials can be disposed of in a recycling center Dispose of the components separately according to t...

Page 32: ...y or repair The grinder is made of high quality materials such as aluminum and stainless steel Use the grinder for as long as possible and repair the grinder if necessary to save resources The manufacturer BaSt Ing GmbH Weipertshausen 13 82541 Münsing Germany Phone 49 0 179 433 79 56 hereby declares that the following product Product name Schleiferl Built from 06 2019 complies with all relevant pr...

Page 33: ... 33 ...

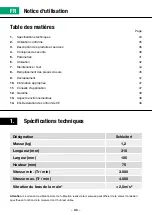
Page 34: ...Paramètres 41 6 Utilisation 42 7 Maintenance test 44 8 Remplacement des pièces d usure 45 9 Déclassement 47 10 Élimination appropriée 47 11 Conseils d application 47 12 Garantie 48 13 Aspects environnementaux 48 14 EG Déclaration de conformité CE 48 Table des matières 1 Spécifications techniques FR Notice d utilisation Attention L émission de vibrations lors de l utilisation réelle de la meuleuse ...

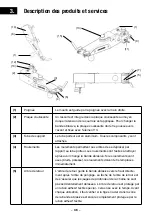
Page 35: ...onaux sont les meilleures Ceux ci sont disponibles auprès de divers fabricants Les appareils possibles sont Makita DTD153 Makita DTD171 Milwaukee M18 FID2 Milwaukee M18 BID DeWalt DCF887 Bosch GDR 18V 200 C La liste des tournevis possibles ne prétend pas être complète et ne donne pas de recommandation d achat La liste ne comprend que des exemples de dispositifs avec lesquels le broyeur peut être b...

Page 36: ...s à nettoyer après avoir changé la bande abrasive Si les roulements sont usés bruits paresse les roulements doivent être remplacés immédiatement 5 Arbre de retour L arbre de retour guide la bande abrasive vers le haut directe ment après l arbre de ponçage La tâche de l arbre de retour est de s assurer que les jauges de profondeur de la chaîne ne sont pas accidentellement abrasées L arbre de retour...

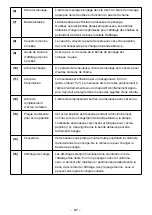
Page 37: ...embout 1 4 La meuleuse doit être reliée positivement à l arbre d entraînement avec un dispositif d entraînement appro prié Ceci doit être réglé dans le sens des aiguilles d une montre 12 Arbre de remplacement d écrou à oreilles L arbre de remplacement est fixé à la meuleuse avec cet écrou 13 Plaque coulissante pour écrou papillon Cet écrou papillon est desserré pendant le fonctionnement normal Lor...

Page 38: ...e fumée ou même de brouillard En plus d un danger pour la santé cela peut également inclure un risque d explosion Portez toujours un équipement de protection complet lors du meulage Gants de protection Lunettes de sécurité Masque de protection respiratoire avec filtre classe FFP2 Évitez que les cheveux longs les vêtements amples et les bijoux n entrent en contact avec la machine et ne soient aspir...

Page 39: ...rêtes vives Évitez les sollicitations excessives et la surchauffe de la bande abrasive en raison d une pression de ponçage excessive Vérifiez régulièrement les bandes abrasives pour déceler une usure excessive et des dommages par exemple des fissures sur les bords des points de rupture ou des signes d usure graves dans la zone du point de connexion et remplacez les si nécessaire Conservez tous les...

Page 40: ...t blesser quelqu un Évitez l accumulation de poussière sur le lieu de travail La poussière peut facilement s enflammer Tenez fermement l outil dans vos mains pendant que vous travaillez et assurez vous que vous vous tenez fermement Fixez la tronçonneuse Une scie maintenue en place avec une pince ou un étau est plus sûre qu une scie à chaîne mal réglée Attendez que le moulin soit à l arrêt avant de...

Page 41: ...s moletée 9 Réglage des affichages d angle sur l angle de meulage souhaité Angle de poitrine angle de toit l angle de poitrine souhaité peut être réglé à l aide du trou allongé dans les affichages d angle Angle d affûtage L angle d affûtage se règle en retirant le couvercle 14 à l aide de l écrou papillon 8 et en le plaçant sur les indicateurs d angle La position est définie par les évidements inc...

Page 42: ... taille de la chaîne à affûter pas de chaîne Assurez vous qu il n y a pas d objets facilement inflammables à proximité et que les composants ne sont pas mouillés avec du carburant Équipement de protection individuelle Mettez un équipement de protection individuelle Lunettes de protection Masque anti poussière Gants de travail Préparation Attention Lisez le mode d emploi avant d utiliser le système...

Page 43: ...in droite sur la poignée 1 Le tournevis est tenu de la main gauche Application de la meuleuse sur la dent de scie La meuleuse doit être guidée dans la dent de scie à affûter à l arrêt L arbre de meulage 7 doit être placé sous le sommet de la dent de scie Alignez la position angulaire de la meuleuse sur la chaîne de scie de sorte que l indicateur d angle respectif 15 soit aligné parallèlement à la ...

Page 44: ...ez si les angles de la dent de scie sont formés selon le fabricant de la chaîne de scie Ajuster le limiteur de profondeur de la chaîne de scie Remarque Après l affûtage des dents de scie le limiteur de profondeur de la chaîne de scie doit être réglé sur la dent de scie correspondante Cela ne peut pas être fait en utilisant le Schleiferl Attention Des jauges de profondeur mal usinées peuvent causer...

Page 45: ...le blocage de la plaque coulissante Appuyez sur l extrémité arrière de la plaque coulissante 2 Le tube porteur 3 doit être contre un objet solide Maintenez la plaque coulissante 2 enfoncée et tournez l écrou papillon 13 dans le sens des aiguilles d une montre jusqu à ce que la plaque coulissante 2 soit fixée Desserrez l écrou papillon 8 Vous pouvez ensuite retirer le couvercle 14 Retirez l arbre d...

Page 46: ...a bande abrasive 7 À l aide d un couteau coupez l ancien résidu de ruban adhésif de l arbre de retour 5 Prenez un ruban adhésif textile approprié Nous recommandons le ruban adhésif pour la réparation des rubans forestiers disponible auprès de BaSt Ing GmbH ou auprès de revendeurs spécialisés Coupez 2 à 3 bandes de ruban adhésif sur la longueur déroulée de l arbre de retour Collez le ruban adhésif ...

Page 47: ...clés de manière écologique Ne jetez pas le Schleiferl dans les ordures ménagères Le Schleiferl est composé de matériaux de haute qualité tels que l acier arbres roulements tôle raccords à vis aluminium tube de support et plaque de glissement plastique ABS rouleau d entraînement Il n y a pas de substances dangereuses douteuses installées Les matériaux intégrés peuvent être éliminés dans un centre d...

Page 48: ...ompose de matériaux de haute qualité tels que l aluminium et l acier inoxydable Utilisez le Schleiferl aussi longtemps que possible et réparez le Schleiferl si nécessaire pour économiser les ressources Le fabricant BaSt Ing GmbH Weipertshausen 13 82541 Münsing Allemagne Tél 49 0 179 433 79 56 déclare par la présente que le produit suivant Désignation du produit Schleiferl Année de construction à p...

Reviews: