


BE1-25 Maintenance
6-3
Assembling Adapter to Test Plug
1.
Remove top and bottom covers of Test Plug Adapter by removing the four retaining screws.
2.
Remove the 10 black thumb nuts from test plug.
3.
Note that the studs of the test plug may be entered into the 10 matching holes of the adapter. Before
assembling the test plug to the adapter, it is necessary to correctly orient the two units to each other
by holding the black side of the test plug UP as it engages the adapter. (The adapter itself is held top-
side UP; i.e., the front panel letters are upright.)
4.
Replace the 10 black thumb nuts. Firmly hand-tighten each thumb nut.
5.
Replace top and bottom covers; replace the four retaining screws.
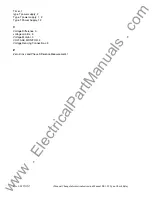
If Test Plug Adapter is Unavailable
In the event that the proper adapter is not on hand, a test setup may be improvised by inserting the proper
resistors in series with terminals 12, 13, 16 and 17 as indicated in Figure 6-2.
TEST PLUG
TERMINALS
MOMENTARY
SWITCHES
R1
R2
R3
R4
1
1
1
1
1
TO CONTACT SENSING POWER SOURCE.
THIS IS TERMINAL 15 FOR ISOLATED
CONTACT SENSING (OPTION 1-5).
NO RESISTOR REQUIRED FOR 24 V
POWER SOURCE.
POWER SUPPLY
VOLTAGE
RESISTOR
VALUE
48 V
125 V
230 V
17
13
12
16
D474-005
2-18-92
750, 10 W
5K, 10 W
10K, 25W
Figure 6-2. Improvised Test Setup
www
. ElectricalPartManuals
. com


