


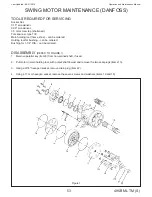


Operation and Maintenance Manual
495B ML TM (S)
51
Last Updated - 08/31/2016
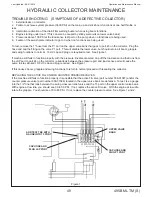
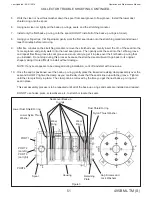
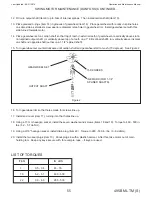
COLLECTOR TROUBLE SHOOTING CONTINUED...
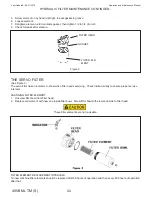
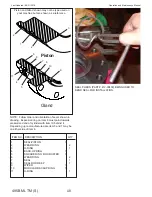
5. Walk the clean or new thrust washer down the spool from seal groove to flow groove. Install the lower dust
shield o-ring onto the spool.
6. Using new clean oil, lightly oil the back-up o-rings, seals, and the stretching mandrel.
7. Install only the first back-up o-ring onto the spool (DO NOT install all of the back-up o-rings at once!).
8. Using your finger tips, (not fingernails) gently work the first seal down onto the stretching mandrel and allow at
least 5 minutes before removing.
9. After five minutes on the stretching mandrel, remove the stretched seal. Gently insert the I.D. of the seal into the
1st seal groove and gently walk it into the next seal groove. Then gently work the seal into the 1st flow groove
and repeat from flow groove to seal groove and so on until you get it in place over the first back-up o-ring that
you installed. Do not stop during this process because the stretched seal will want to go back to its original
shape making it more difficult to install without damage.
NOTE: If any seal appears to be damaged during installation, cut it off and start with a new one.
10. Once the seal is positioned over the back-up o-ring, gently place the loosened resizing clamp assembly over the
seal and SLOWLY tighten the clamp as you continually check that the seal is lined up with the groove. Tighten
until the clamp is firmly in place. The clamp can be removed by the time you get the next back-up o-ring and
seal in place.
This seal assembly process is to be repeated until all of the back-up o-rings and seals are installed and resized.
DO NOT use hooks, picks, screwdrivers, etc. to stretch or locate the seals.
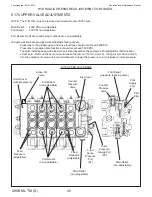
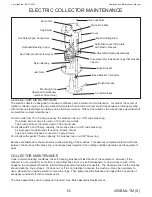
Figure 3
Housing
Cap Screws and
Lock Washers
Seals over Back-up
O-rings
Dust Shield O-ring
Spool
Retaining
Plate
Nylon Thrust Washer
PORT 1
PORT 2
(on left)
PORT 3
(on right)
PORT 4
1
2
3
4
1
2
3
4
3
4
1
Wear
Ring
Wear
Ring
Lower Nylon Thrust
Washer
Lower Dust Shield O-ring
Summary of Contents for 495B SD
Page 3: ...Introduction...
Page 7: ......
Page 16: ...Maintenance...
Page 19: ...Operation and Maintenance Manual 495B ML TM S 19 Last Updated 08 31 2016 SERVICE SCHEDULE...
Page 29: ...Hydraulic...
Page 57: ...Electrical...
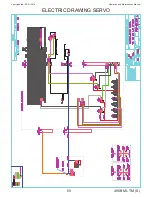
Page 58: ...Operation and Maintenance Manual Last Updated 08 31 2016 495B ML TM S 58 ELECTRICAL SCHEMATIC...
Page 78: ...Maintenance...
Page 88: ...Operation and Maintenance Manual Last Updated 08 31 2016 495B ML TM S 88 Structural...
Page 95: ...Trouble Shooting...


