background image

Manual 2100-671 

Page 

30 of 44

To set the minimum position value:
1.  Press MENU key to go to the Main Menu screen.
2.  Press UP or DOWN keys and ENTER key to enter 

USER password 2000.

3.  Press UP or DOWN keys to scroll to 

System Config

press ENTER key.

4.  Press UP or DOWN keys to scroll to 

Economizer 

Setup A2

.

5.  Press ENTER key to scroll to 

Min Position 

(see 

Figure 40 on page 28).

6.  Press UP or DOWN keys to change to the desired 

value.

Miscellaneous Components

Supply Temperature Sensor

The unit is equipped with a supply air temperature 
sensor to monitor the leaving air temperature of the 
unit. The temperature is measured with a 10k ohm 
NTC thermistor.
The supply air temperature can be verified by:
1.  Press MENU key to go to the Main Menu screen.
2.  Press UP or DOWN keys and ENTER key to enter 

TECHNICIAN password 1313.

3.  Press UP or DOWN keys to scroll to 

I/O Config

press ENTER key.

4.  Press UP or DOWN keys to scroll to 

Analog Inputs

press ENTER key.

5.  Press UP or DOWN keys to scroll to 

Analog Ins 

2/19

.

6.  Reference the 

Value

 to see the input of the sensor 

(see Figure 44).

7.  To apply an offset, press ENTER key to scroll to 

Offset

.

8.  Press UP or DOWN keys to change to the desired 

value.

9.  Press ENTER key to save the value.

Supply Temperature Sensor Failure Alarm

When the sensor reads a value that is outside of the 
acceptable -41.0 to 303.0° range, an alarm will be 
generated indicating the sensor has failed.
This alarm is fixed and cannot be adjusted.

Emergency Cooling Mode

If the shelter temperature is above the high temperature 
alarm setpoint on the LC, the unit will be commanded 
into emergency cooling mode. In this mode, the 
unit will operate the economizer regardless of the 
economizer setup, as long as the outdoor temperature is 
below the indoor temperature. This will stay active until 
the LC returns the unit to normal operation. 

Emergency Cooling − Orphan Mode

When the unit is not connected to the LC6000 and 
operating in orphan mode, the unit still has the 
capability to operate in emergency cooling mode. By 
default this feature is not enabled.
To enable emergency cooling in orphan mode:
1.  Press MENU key to go to the Main Menu screen.
2.  Press UP or DOWN keys and ENTER key to enter 

TECHNICIAN password 1313.

3.  Press UP or DOWN keys to scroll to 

Adv System 

Config

; press ENTER key.

4.  Press UP or DOWN keys to scroll to 

Emer. Cool B5

.

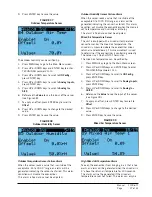
5.  Press ENTER key to scroll to 

Use emergency cool 

in Orphan Mode?

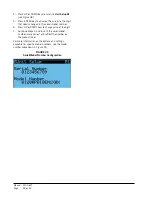
 (see Figure 45).

6.  Press UP or DOWN keys to change the value.

When this feature is used instead of using the zone 
sensor, an alarm will be triggered by the high return air 
temperature alarm.
To adjust the return air temperature settings:
1.  Press MENU key to go to the Main Menu screen.
2.  Press UP or DOWN keys and ENTER key to enter 

USER password 2000.

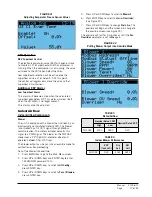
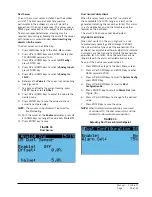
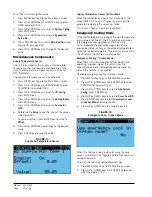
FIGURE 44

Supply Air Temperature Sensor

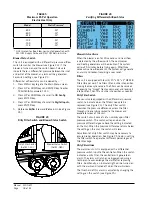
FIGURE 45

Emergency Cool – Orphan Mode

Summary of Contents for MEGA-TEC W120AP

Page 1: ...pany Inc Bryan Ohio 43506 www bardhvac com Manual 2100 671 Supersedes NEW Date 12 17 18 SERVICE INSTRUCTIONS MEGA TECTM WALL MOUNT AIR CONDITIONER Model W120AP NOTE LC6000 controller is required for o...

Page 2: ...6 Evaporator Freeze Condition Alarm 16 EEV Operation 17 EEV Superheat Control 17 Additional EEV Alarms 17 Low Superheat Alarm 17 Indoor Airflow 17 Indoor Airflow Components 17 Blower 17 Blower Status...

Page 3: ...ressure Suction Pressure Transducer 16 Figure 20 Adjusting Suction Temperature Sensor Values 16 Figure 21 Adjusting Evaporator Freeze Sensor Values 17 Figure 22 Putting Blower Output into Override Mod...

Page 4: ...ications for information on codes and standards Sizing of systems for proposed installation should be based on heat loss and heat gain calculations made according to methods of Air Conditioning Contra...

Page 5: ...s to be limited to the most extreme situations DANGER signs should not be used for property damage hazards unless personal injury risk appropriate to these levels is also involved WARNING Indicate s a...

Page 6: ...setpoints and their ranges are easily viewed and adjusted from the TEC EYE display The program and operating parameters are permanently stored on FLASH MEMORY in case of power failure The TEC EYE con...

Page 7: ...1 for wall mount unit status messages The Quick Menu is accessible from the main Status screen Setpoints Information and Alarm Log are available through the Quick Menu Pressing the UP or Message Descr...

Page 8: ...heating setpoints will be replaced with the communicated cooling and heating setpoints If at any time the wall mount unit s loses communication with the LC6000 controller the wall mount unit s will go...

Page 9: ...00 B Adv Sys Config B1 B4 Technician 1313 C I O Config Technician 1313 D On Off User 2000 E Alarm Logs User 1313 F Settings Date Time Technician 1313 Language User 2000 Serial Ports Technician 1313 Pa...

Page 10: ...nter TECHNICIAN password 1313 3 Press UP or DOWN keys to scroll to Sys Config press ENTER key 4 Press UP or DOWN keys to scroll to Run Test A9 screen 5 Press ENTER key to scroll to Enable parameter se...

Page 11: ...m condition may also be enunciated by an audible alarm signal An alarm is acknowledged by pressing the ALARM key This calls up alarm display screen s that provide a text message detailing the alarm co...

Page 12: ...ss UP or DOWN keys to adjust the offset 9 The update will not take effect until the cursor is moved out of the Offset parameter 10 Once adjusted press the ESCAPE key several times to return to Main Me...

Page 13: ...first of the Bard wall mount units is installed and powered on it will operate in orphan mode keeping the climate inside the shelter stable and the installers comfortable while the remainder of the o...

Page 14: ...Press MENU key to go to the Main Menu screen 2 Press UP or DOWN keys and ENTER key to enter TECHNICIAN password 1313 3 Press UP or DOWN keys to scroll to I O Config press ENTER key 4 Press UP or DOWN...

Page 15: ...Pressure Transducer The unit has pressure transducers installed on the suction line between the evaporator coil and compressor one on refrigerant circuit 1 and one on refrigerant circuit 2 The transdu...

Page 16: ...nsor value is out of range 41 0 to 303 0 F the controller will generate a sensor failure alarm to indicate the sensor is not working properly This alarm cannot be adjusted Evaporator Freeze Condition...

Page 17: ...will clear itself when the condition is no longer present This alarm cannot be adjusted Indoor Airflow Indoor Airflow Components Blower The unit is equipped with a blower that is driven by an electro...

Page 18: ...with a differential pressure switch to indicate when the filter s needs to be replaced see Figure 23 The dirty filter switch measures the pressure difference across the filter through silicone tubing...

Page 19: ...omatically switch to the required speed for each mode High sensible mode and dehumidification mode are both communicated separately from the LC For more information on the high sensible command from L...

Page 20: ...CAPE key several times to return to Main Menu screen FIGURE 26 Enabling Fan Override FIGURE 27 Adjusting Discharge Liquid Transducer Pressure Values FIGURE 28 Voltage to Pressure Discharge Liquid Pres...

Page 21: ...eration if the sensor is not enabled or failed When the liquid pressure transducer is not enabled or considered failed by the controller a nominal speed of 74 will be used during a compressor call Com...

Page 22: ...If the switch closes it will then restart the compressor after the delay on break setting has expired on the device If the switch trips again during the same Y call the compressor will be de energized...

Page 23: ...ith slower transfer switches the time delay between the utility power and generator power didn t cause a problem The units lost power shut off and came back on line normally With the introduction of a...

Page 24: ...mper 2 is powered by a 90 in lb actuator All dampers are spring return and will close the damper if power is lost To verify the output from the controller to the actuator 1 Press MENU key to go to the...

Page 25: ...r press UP or DOWN keys to change the value from On to Off 11 Press ENTER key to save Dust Sensor Failure Alarm When the sensor reads a value that is outside of the acceptable 0 to 100 range an alarm...

Page 26: ...n damper switch Damper Failed to Open Alarm When the controller commands the economizer damper actuator to a position other than 0 and the damper switch indicates the damper is not open after a delay...

Page 27: ...er when the mode is set to temperature and humidity or enthalpy This alarm is fixed and cannot be adjusted Mixed Air Temperature Sensor The unit is equipped with a mixed air temperature sensor to moni...

Page 28: ...value and scroll to the next parameter NOTE The following parameters are for the temperature consideration for economizer use Applies to Dry Bulb TempHum and Enthalpy type 8 The cursor should now be...

Page 29: ...test revision of LC6000 Service Instructions 2100 669 In addition to dehum mode the economizer may be disabled for 5 minutes adjustable if the dust sensor indicates the outdoor air may cause particula...

Page 30: ...acceptable 41 0 to 303 0 range an alarm will be generated indicating the sensor has failed This alarm is fixed and cannot be adjusted Emergency Cooling Mode If the shelter temperature is above the hig...

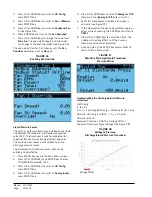
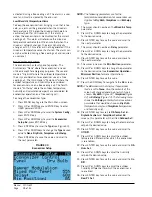
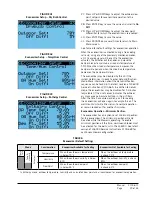
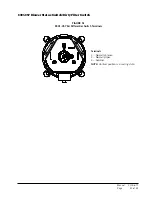
Page 31: ...n a call for heat This call can be generated by the LC or the wall mount unit operating in orphan mode FIGURE 46 Adjusting Return Air Alarm Settings Unit Disable Option The unit is equipped with an in...

Page 32: ...in the serial model number 6 Press UP or DOWN keys to change value of the digit 7 Continue Steps 5 and 6 until the serial model number s are correct and reflect the number on the product label For mor...

Page 33: ...isposable P MERV8 2 Pleated N MERV13 2 Pleated COLOR AND CABINET FINISH 1 White Baked Enamel Finish OUTLET X Future Use COIL AND UNIT COATING OPTIONS X Copper Aluminum Evaporator Coil Copper Aluminum...

Page 34: ...avoid any fractionation and to insure optimal system performance Refer to instructions for the cylinder that is being utilized for proper method of liquid extraction Safety Practices 1 Never mix R 410...

Page 35: ...146 147 67 WB High Side 320 343 366 389 413 438 463 488 514 540 567 85 DB Low Side 139 140 141 142 143 144 146 147 149 151 152 72 WB High Side 331 355 379 403 427 453 479 505 532 559 587 W120AP Stage...

Page 36: ...are not recycling the air to one another Adjust supply louvers if necessary to direct discharge air away from any direct route to the return grille 9 Re assemble wall mount unit remembering to fasten...

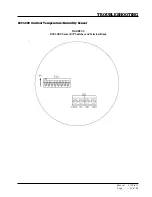
Page 37: ...Manual 2100 671 Page 37 of 44 TROUBLESHOOTING 8301 089 Outdoor Temperature Humidity Sensor FIGURE 50 8301 089 Sensor DIP Switches and Terminal Block...

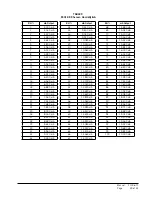
Page 38: ...3 466 62 42 5 6 22 886 87 43 6 1 22 323 22 44 6 7 21 775 16 45 7 2 21 242 23 46 7 8 20 723 96 47 8 3 20 219 91 48 8 9 19 729 65 49 9 4 19 252 76 50 10 0 18 788 84 Temperature Resistance F C 51 10 6 18...

Page 39: ...8 16 480 mA 79 16 640 mA 80 16 800 mA 81 16 960 mA 82 17 120 mA 83 17 280 mA 84 17 440 mA 85 17 600 mA 86 17 760 mA 87 17 920 mA 88 18 080 mA 89 18 240 mA 90 18 400 mA 91 18 560 mA 92 18 720 mA 93 18...

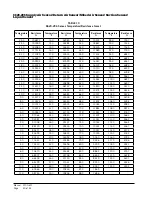
Page 40: ...0 126219 26 0 38757 64 0 13820 102 0 5570 11 0 122089 27 0 37652 65 0 13474 103 0 5446 10 0 118108 28 0 36583 66 0 13137 104 0 5326 9 0 114272 29 0 35548 67 0 12810 105 0 5208 8 0 110575 30 0 34545 6...

Page 41: ...1 Page 41 of 44 8301 057 Blower Status Switch Dirty Filter Switch FIGURE 51 8301 057 Air Differential Switch Terminals Terminals 1 Normally Closed 2 Normally Open 3 Common NOTE Contact position is in...

Page 42: ...Circuit 1 Suction Pressure Sensor Alarm 35 Circuit 2 Suction Pressure Sensor Alarm 36 Circuit 1 Low Pressure 37 Circuit 2 Low Pressure 38 Circuit 1 High Pressure 39 Circuit 2 High Pressure 40 Circuit...

Page 43: ...Error 90 Circuit 2 Service Position Percent 91 Circuit 2 Valve ID 92 Th Tune Device Offline 93 Th Tune Temperature Probe Alarm 94 Th Tune Humidity Probe Alarm 95 Th Tune Clock Board Alarm 96 c pCOe O...

Page 44: ...inal High Sensible Enhanced Latent Free Cooling 57 N A N A Cooling Stage 1 42 48 5 32 6 Cooling Stage 2 57 63 43 8 Cooling Stage 3 57 63 43 8 Heating Stage 1 57 N A N A Heating Stage 2 57 N A N A Emer...

Reviews: