


Manual
2100-560
Page
5 of 8
Scheduling:
(continued)
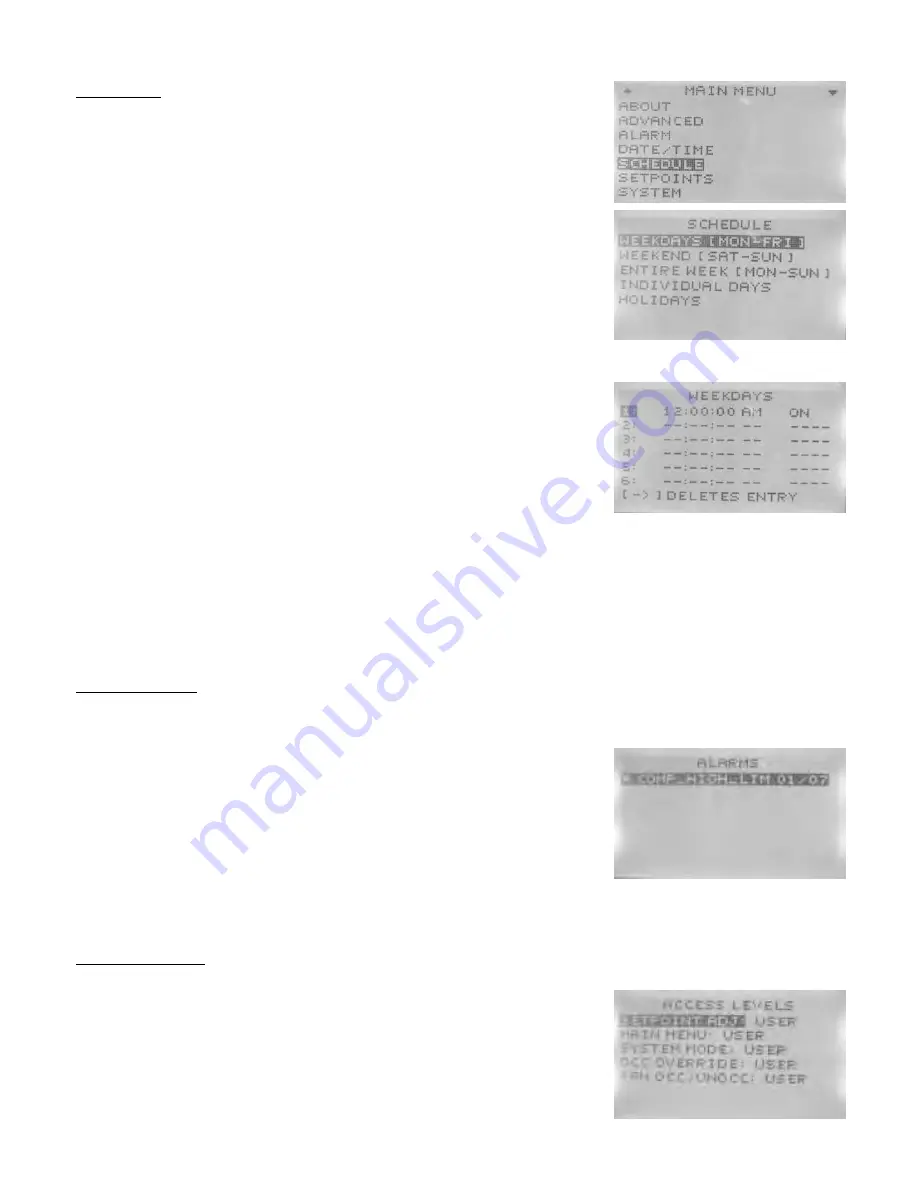
To access scheduling from the Home Screen,
press:
1.
Right
button to access
Main Menu
Screen
2.
Down
button through entries to highlight
Schedule
3.
Enter
button to select
Schedule
and enter
Schedule
Screen
- Use the Up/Down buttons to scroll through schedule options
Weekdays
and
Weekend
for a “5+2” style of scheduling
*Up to six (6) separate Occ/Unocc periods/day*
Entire Week
for a “7-Day” style of scheduling
*Up to six (6) separate Occ/Unocc periods/day*
Individual Days
for specific day-customization scheduling
*Up to six (6) separate Occ/Unocc periods/day*
Holidays
for up to twelve (12) holiday exceptions to the main scheduling
*
Holidays
will override to setback temperatures for that specific date
4.
Enter
button to select specific
Schedule
Option
5.
Enter
button to select specific period of Occ/Unocc
6.
Right
button to access hours/minutes/seconds
- Adjust as necessary with Up/Down buttons
7.
Right
button to access period status
- Adjust as necessary with Up/Down buttons
choice of ON (occupied), OFF (unoccupied), or NULL (do not program this value)
“NULL” is used in certain Commercial Control platforms, and is not suitable for
use in a stand-alone ECU-Controller configuration.
8.
Enter
button to save scheduling programming
9. Repeat steps 3-8 as necessary to complete Scheduling time periods.
10.
Left
button to navigate back to
Main Menu
Screen
11.
Left
button to navigate back to
Home Page
Alarms Feature:
High pressure, low pressure, high temperature, and low temperature anomalies will be
recorded within an internal page. Alarms may be viewed and deleted as necessary for serviceability.
To view/delete internal Alarms,
press:
1.
Right
button to access
Main Menu
Screen
2.
Down
button through entries to highlight
Alarm
3.
Enter
button to select
Alarm
and enter
Alarm Screen
- Logged alarms with show brief description/date
4.
Enter
button to show more detailed descriptions of
Alarm
5.
Enter
button to be given
delete
choice
6.
Enter
button to delete alarm
7.
Left
button to navigate back to
Main Menu
8.
Left
button to navigate back to
Home Screen
Security Settings:
There are five (5) separate areas that can be controlled by passwords, and four (4)
individual levels of security.
To access/program areas of security from Home Screen,
press:
1.
Right
button to access
Main Menu
Screen
2.
Down
button through entries to highlight
Advanced
3.
Enter
button to select
Advanced
and enter
Advanced Screen
4.
Down
button through entries to highlight
Security
5.
Enter
button to select
Security
and enter
Security Screen
6. Controller will ask for
Admin Level Password
Factory Default
Admin Level Password: BARD


