


Manual 2100-560
Page
4 of 8
Adjusting Temporary Override time length
(continued)
4.
Down
button through entries to highlight
Occ Override (Hrs)
5.
Enter
button to select
Occ Override (Hrs)
6.
Up/Down
button(s) to adjust time
(1/2 hour increments, Max. 12 hours)
7.
Enter
button to select new override time limit
8.
Left
button to navigate back to
Main Menu
9.
Left
button to navigate back to
Home Screen
Indoor Blower Settings:
The indoor blower can be set to
always
run at 100% capacity regardless of call,
and also to run in either continuous or auto mode during occupied (always) periods.
To access/change Blower Settings from the Home Screen,
press:
1.
Left
button to highlight
Current Operation Status Line
2.
Down
button to highlight
Fan Status Line
3.
Enter
button to select
Fan Status Line
and enter
Fan Modes Screen
4.
Down
button through selections, adjust as necessary.
-
Always 100%:
“YES”
= system blower always runs 100% speed regardless of compressor
modulation or stages of heating,
“NO”
= system blower modulates to specific speeds engineered
by factory for best efficiency
(Factory Default)
-
Unocc:
Since scheduling is not active on this controller, this setting has no effect on fan operation.
-
Occ:
“ON”
= system fan will run continuously during all operational modes
(Factory
Default)
,
“Auto”
= system fan will operate during call for cooling or heating, but will cycle off
when no compressor or no heating is needed.
5.
Enter
button to save changes to Fan Modes Selections
- Repeat steps 4 through 5 for all changes to Fan Modes Selections
6.
Left
button to return to Home Screen
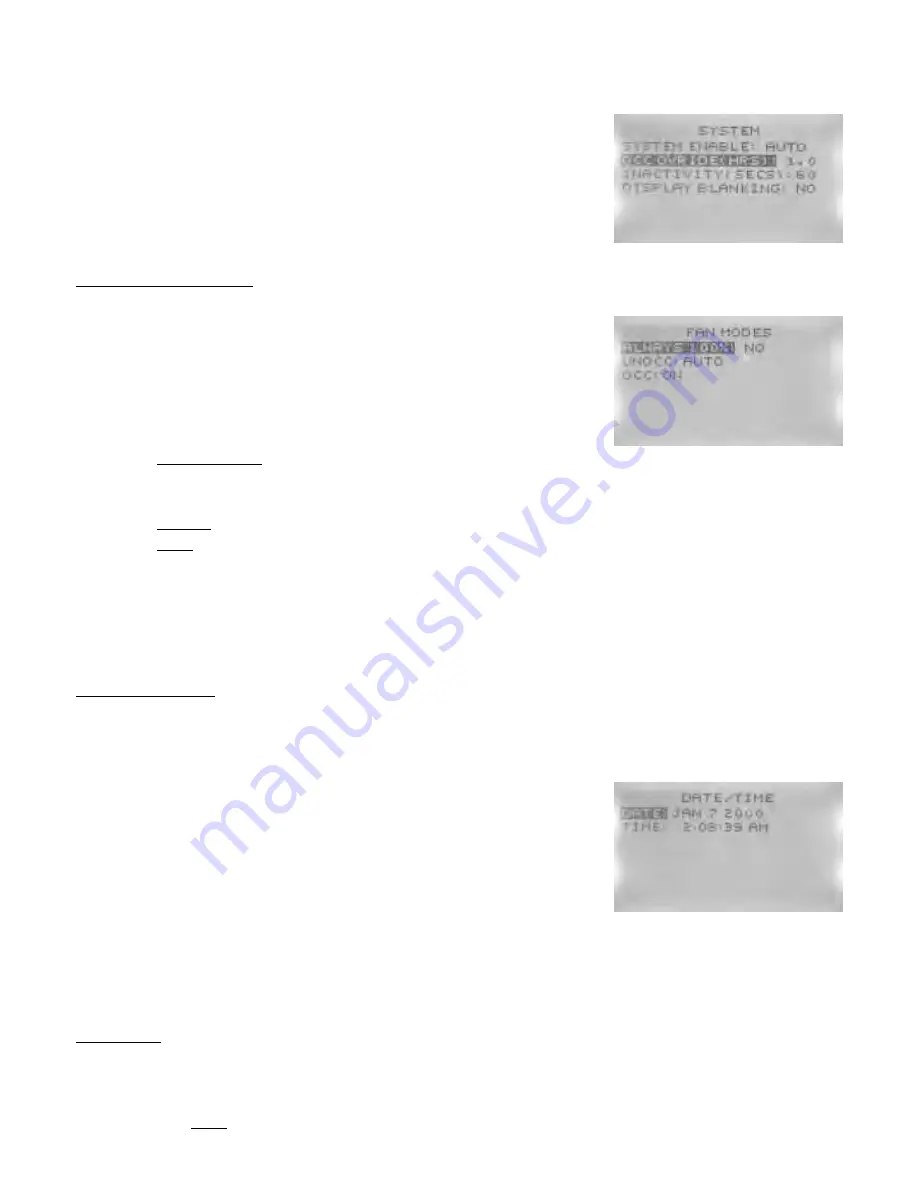
Setting Date/Time:
Unless scheduling is desired, the absolute date and time are not necessary, and only
used for alarm reporting reference points. Not entering a date/time will have no operational effect upon
the controller.
To enter the current date and time from the Home Screen,
press:
1.
Right
button to access
Main Menu
Screen
2.
Down
button through entries to highlight
Date/Time
3.
Enter
button to select
Date/Time
and enter
Date/Time Screen
4.
Enter
button to select
Date:
5.
Up/Down
button(s) to adjust existing
Month, Day, Year
6.
Enter
button to select new entry
7.
Down
button to highlight
Time:
8.
Up/Down
button(s) to adjust existing
Hours, Minutes, Seconds
9.
Enter
button to select new entry
10.
Left
button to navigate back to
Main Menu
11.
Left
button to navigate back to
Home Screen
Scheduling:
Scheduling is not a necessary part of the initial programming. It is an optional function
meant to allow for
setback
temperatures during
unoccupied
periods. From the factory, the controller has
no scheduling and will only allow
occupied
setpoints unless otherwise scheduled. If scheduling is
desired, current
Date/Time
will be necessary (see above).
*Note:
Scheduling is NOT available for
CCVC
or
CCFC
system operation.


