background image

 MatrixPRO- II 


          19

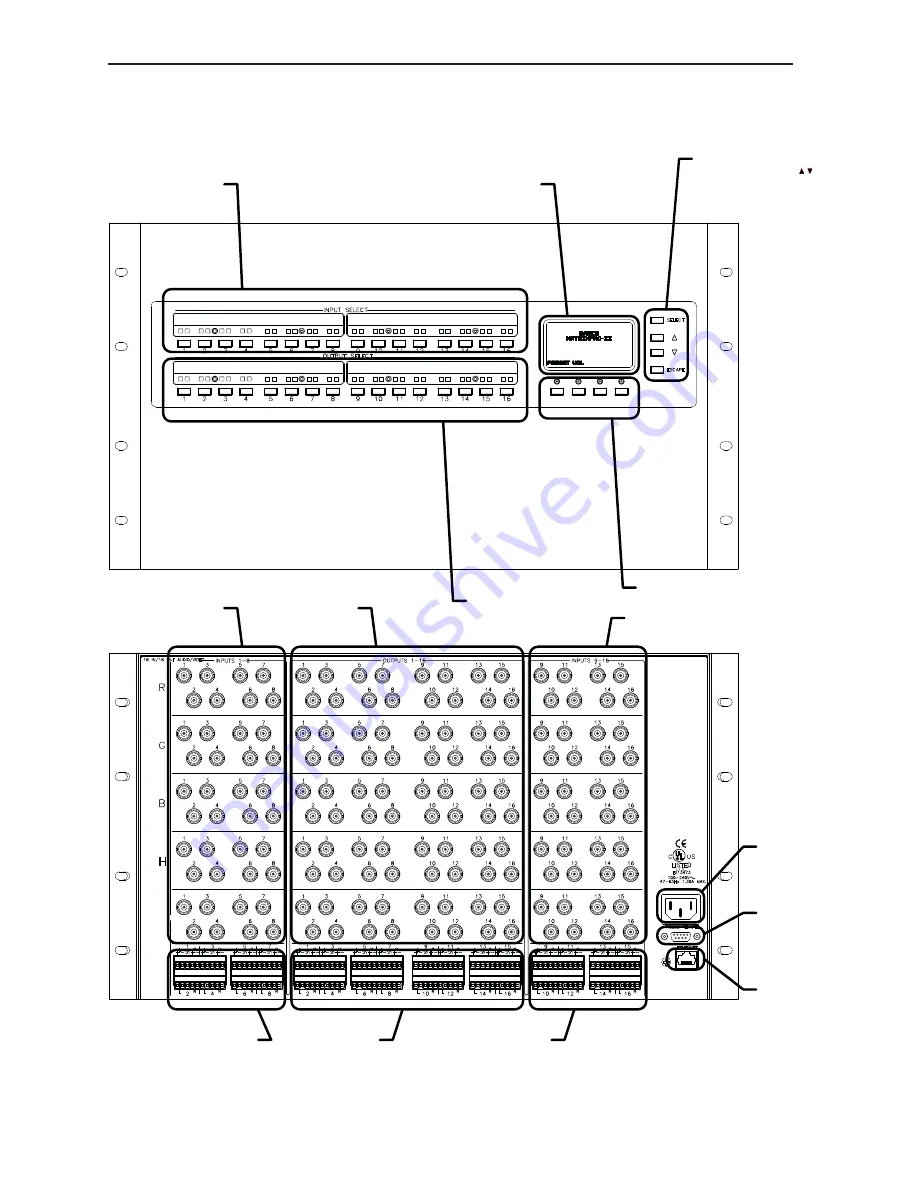
FRONT AND REAR PANEL VIEWS

INPUT SELECT

LCD DISPLAY

LCD FUNCTION  BUTTONS

SOURCE SELECT
BUTTONS - PUSH
SIMULTANEOUSLY
TO ENTER PROGRAM
MODE

BARCO MSRF-1616 SHOWN

VIDEO INPUT

(1 THRU 8)

AUDIO INPUT

(1 THRU 8)

AUDIO INPUT

(9 THRU 16)

VIDEO OUTPUT

(1 THRU 16)

AUDIO OUTPUT

(1 THRU 16)

AC POWER

INPUT

RS-232
REMOTE
OR SERIAL
CONTROL
PORT 0

RJ45 LAN
INTERFACE

VIDEO INPUT

(9 THRU 16)

OUTPUT SELECT

Summary of Contents for MatrixPRO- II

Page 1: ...6 0903105 00 Barco Inc 11101 A Trade Center Drive Rancho Cordova California 95670 6119 USA 1 916 859 2500 MATRIX SWITCHER SERIES USER S GUIDE COVERS MatrixPRO II 12X8 THROUGH 32X32 MODELS MatrixPRO II...

Page 2: ...2 MatrixPRO II...

Page 3: ...Authorization RMA In the unlikely event that a product is required to return for repair please call the following number and ask for a Sales Engineer to receive a Return Merchandise Authorization numb...

Page 4: ...writing of any complaints The period of guarantee begins on the date of transfer of risks in the case of special systems and software on the date of commissioning at latest 30 days after the transfer...

Page 5: ...alifornia 95670 USA Phone 916 859 2500 Fax 916 859 2515 Website www barco com Barco N V Noordlaan 5 8520 Kuurne BELGIUM Phone 32 56 36 82 11 Fax 32 56 35 16 51 Technical Support Customer Service Porta...

Page 6: ...n Grounding the Product This product is grounded through the grounding conductor of the power cord To avoid electrical shock plug the power cord into a properly wired receptacle before connecting to t...

Page 7: ...o alert the user to the presence of important operating and maintenance servicing instructions in the literature accompanying the appliance AVERTISSEMENT Le point d exclamation dans un triangle equila...

Page 8: ...8 MatrixPRO II Change History Rev Date ECP Description Approved By 00 00 4 1 10 577375 Initial Release R Pellicano...

Page 9: ...E 11 RGB DELAY SWITCHING 11 PRESETS AND I O GROUPS 11 SPLIT MODE 11 STEREO AUDIO 11 SERIAL AND IP CONTROL 12 FEATURES 12 APPLICATIONS 12 APPLICATION EXAMPLES 13 NATIVE MODE APPLICATION 13 SPLIT MODE A...

Page 10: ...ENU PAGE 28 OPERATING MODE 31 MAIN OPERATING PAGE 31 VOLUME HANDLING PAGE 33 EXECUTING PRESETS 34 FACTORY RESET 35 SCREENPRO II SCREENPRO II CONTROLLER SETUP 36 CONFIGURING THE SCREENPRO II 36 SETTING...

Page 11: ...ines This allows downstream equipment to lock into the new signal before anything is visible on the screen After the preset interval the RGB signal is then restored making the switch appear as clean a...

Page 12: ...ES Very High and Very Flat Bandwidth 600MHz of Bandwidth to 3dB 1 0 dB to 300MHz Sizes to Fit the Install 12x8 16x16 and 32x32 sizes available Composite S Video Component and RGBHV configurable HD Com...

Page 13: ...MatrixPRO II 13 APPLICATION EXAMPLES i SPLIT MODE APPLICATION NATIVE MODE APPLICATION...

Page 14: ...n then be con nected to the Matrix rack unit All terminations should have ID cable markers to aid in cabling and troubleshooting In installing the Matrix rack unit in a suitable manner the following i...

Page 15: ...2 SHIELD SIGNAL FLOW U T P U T O L L SH R R SIGNAL FLOW INSTALL JUMPER TO A MONO BALANCED PREAMP INPUT SHIELD MatrixPRO IIAUDIO INPUT CONNECTOR WIRING L L SH R R FROM A STEREO UNBALANCED SOURCE SHIEL...

Page 16: ...9F communication port that connects the host PC to the Rack Unit allowing control and configuration Cable Type Straight through DB 9 Male To mate with Female on Rack Unit to DB 9 Male to mate with DB...

Page 17: ...UT TRIM VIDEO TYPE CABLE LENGTH OUTPUT NUMBER VIDEO TYPE RGB DELAY SYNC EQ ON OFF AUTO CABLE LENGTH 0 150 TECH SUPPORT SET TIME DATE 866 VERSION INFO SET TIME DATE LCD SETUP SET CONTRAST BRIGHTNESS DE...

Page 18: ...CT PUSHBUTTONS 4 used to select page menu items that are located above the individual push buttons on the LCD screen Functions will vary and are dependant on page status In the example below the two l...

Page 19: ...ELECT BUTTONS PUSH SIMULTANEOUSLY TO ENTER PROGRAM MODE BARCO MSRF 1616 SHOWN VIDEO INPUT 1 THRU 8 AUDIO INPUT 1 THRU 8 AUDIO INPUT 9 THRU 16 VIDEO OUTPUT 1 THRU 16 AUDIO OUTPUT 1 THRU 16 AC POWER INP...

Page 20: ...20 MatrixPRO II PRINT LABEL STRIP FROM CD ROM FILE NAME MATRIX LABEL DOT INSTALLING THE LEGEND LABELASSEMBLY...

Page 21: ...e adjusted The up and down arrow buttons are then used to make the actual setting adjustment When satisfied with the setting pressing the select button will save the selection Pressing ESCAPE a second...

Page 22: ...lity to configure inputs for not only the default configuration but will be able to split the port An RGB matrix port can be configured as an RGB port Component video or a S Video and a composite or t...

Page 23: ...llowing screen shows the final result ESCAPE SELECT SPLIT SETUP A SVIDEO B SVIDEO C COMPOSITE SAVE When the user is finished with input setups pressing the SELECT button will save the new input setup...

Page 24: ...isplay can sync up to the new sources sync signals before switching in the new source video RGB DELAY is only for the RGB matrix and can be set as ON or OFF will be shown as DIS disabled or omitted fr...

Page 25: ...d Composite RGB can only be on A video cards S Video can only be selected on cards A B or B C but is never allowed on cards A C The following screen shows that the user has set video cards A B as S Vi...

Page 26: ...n unit loader versions It will have the Barco 866 number as the tech support number Pressing the ESCAPE or BACK button will return to the system setup menu SET TIME DATE SET TIME DATE sets the real ti...

Page 27: ...e SELECT button which would change the display as follows ESCAPE SELECT SET TIME DATE TIME DATE SAVE 01 01 01 01 00 am 00 The user can set the current minutes month day and year in the same fashion as...

Page 28: ...set the delay time to the correct seconds and tenths of seconds Pressing the SELECT button then sets and stores the delay time setting PRESET SETUP MENU PAGE All MatrixPRO II models have 32 presets P...

Page 29: ...that are to be included in the preset If the output is not split the user will have the option of selecting VIDEO AUDIO or both by pressing the VIDEO and AUDIO buttons The following screen will be di...

Page 30: ...01 CVD C NC SVD B 02 SVD A 02 AUD NC In this example output 7 is setup as a S Video input on A and B and a Composite video on C The front panel also shows which input is currently connected to each c...

Page 31: ...RESET button allows the user to select a preset to execute Main operating page without audio option ESCAPE SELECT PRESET MATRIXPRO II BARCO The main screen is used to select the connection type and wh...

Page 32: ...in on and will be marked for connection when the SELECT button is pushed If the input is split the following screen will appear ESCAPE SELECT 01 CVD C SVD B SVD A AUD INPUT NUMBER A V CONNECTIONS This...

Page 33: ...d will look something like this ESCAPE SELECT AUDIO LEVEL OUTPUT 01 OUTPUT LEVEL OUTPUT 20dB NOT MUTED The user will be able to use the output select buttons or the UP DOWN and SELECT buttons to choos...

Page 34: ...ute the preset and bring up the executing preset confirmation message ESCAPE SELECT PRESET HANDLER PRESET NUMBER 01 REVIEW EXECUTING PRESET If the user tries to execute an unused preset number the fol...

Page 35: ...ill bring up the following screen ESCAPE SELECT RESET MATRIX PRESSING SELECT WILL RETURN THE MATRIX TO FACTORY SETTINGS PRESS ESCAPE TO RETURN TO SETUPS Pressing SELECT will bring up the confirmation...

Page 36: ...her configuration is necessary Setting Up the ScreenPRO II Controller To set up the Controller to recognize the ScreenPRO II the user starts at the main controller screen and will select SYSTEM The ma...

Page 37: ...tary encoder to change the matrix protocol to MatrixPRO II As you scroll through the choices the Name line will change automatically After choosing MatrixPRO II scroll down using the top rotary encode...

Page 38: ...EST COMM button to establish communications between the controller and the ScreenPRO II A popup window will come up with the configuration of the ScreenPRO II The last step is to enable external routi...

Page 39: ...he BACK button until the Home Screen is displayed It ll look like this Press SAVE to save the configuration Once pressed the Touch Screen menu reads Saving System Configuration If you cycle power the...

Page 40: ...40 MatrixPRO II...

Page 41: ...l Output Level TTL 2 4V into 75 Ohm Load Impedance 75 Ohm Polarity Same as Input Audio Optional Input and Output Matches Video Matrix Type Balanced Connector 5 Position Pluggable Captive Screw Termina...

Page 42: ...42 MatrixPRO II...

Page 43: ...through DB 9 to DB 9 serial cable Downloading Software Two different methods can be used to download MatrixPRO II software Via FTP Site Via Web Site Via FTP Site Barco Folsom s FTP site address is ftp...

Page 44: ...e Barco s web site address is http www barco com To download software from the web site Create a target folder on your PC e g MatrixPROII Analog and ensure that your PC is connected to the internet On...

Page 45: ...sion of software has been properly downloaded from the website or the FTP site If not refer to the Downloading Software section for instructions On your PC or laptop double click on the Barco MatrixPR...

Page 46: ...46 MatrixPRO II Click on Next to bring up this screen Click on install to bring up this screen and start the Loader installation A progress bar will monitor the installation status...

Page 47: ...the following screen will appear Check the box if you wish to launch the program and click finish The loader program creates a desktop icon Click on the icon to begin the MatrixPRO II updates The prog...

Page 48: ...II Use the pulldown menu shown below to select an available Comm Port and begin the update The error pop up window below usually indicates a bad serial cable wrong cable type or an improperly configur...

Page 49: ...versions of MatrixPRO II firmware and the allow selection of the latest versions available Select the most recent version of the Front Panel application and click on the Click to load Front Panel butt...

Page 50: ...ndow below appears click OK to complete the Front Panel update installation Select the most recent version of the Main Processor application and click on the Click to load Main Processor button to upd...

Page 51: ...MatrixPRO II 51 When the pop up window below appears click OK to confirm and launch the Main Processor update A progress bar with appear to indicate update status...

Page 52: ...52 MatrixPRO II Click OK to complete the Main Processor update installation Updates are complete and the MatrixPRO II can be returned to service...

Page 53: ...MatrixPRO II 53...

Page 54: ......

Reviews: