4. Lenses & Lens selection
Scheimp
fl
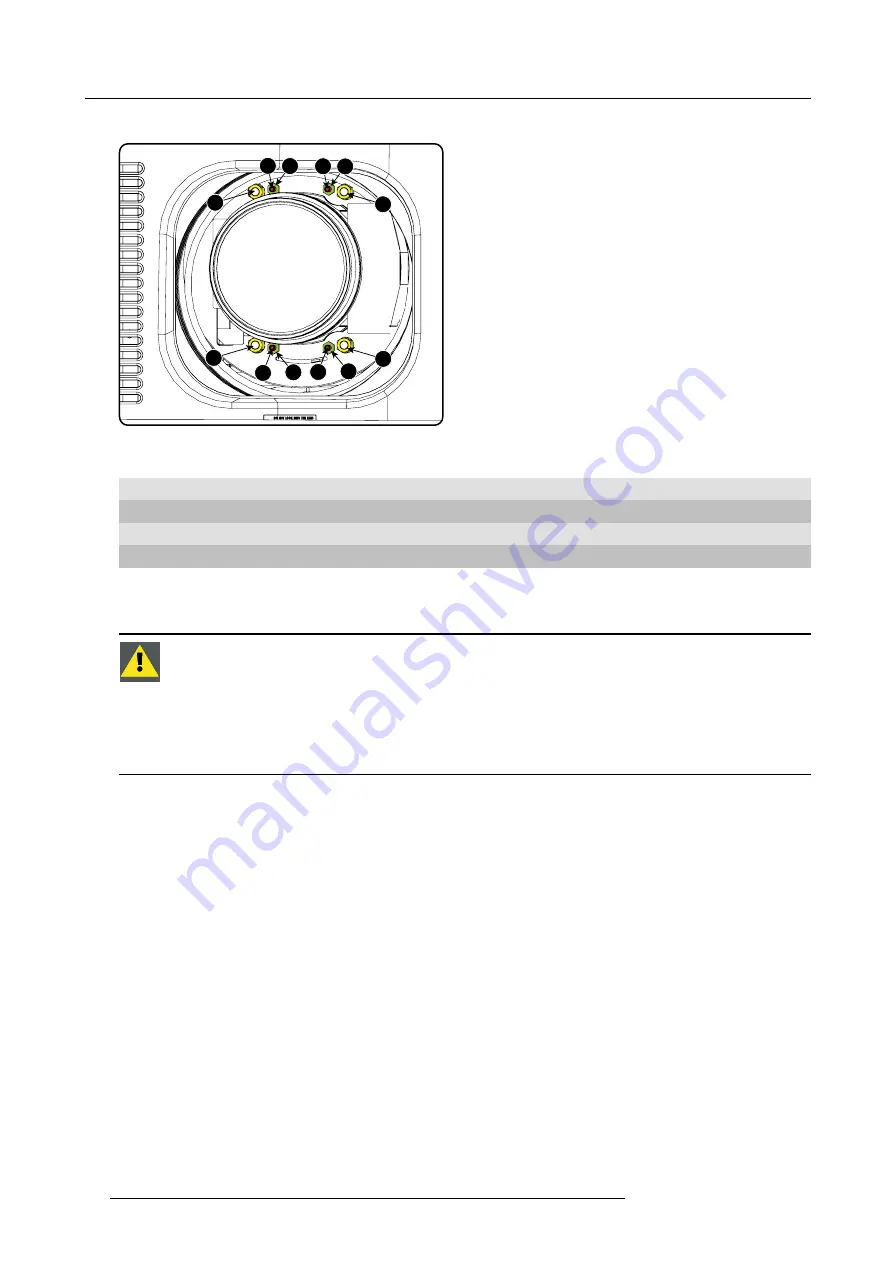
ug adjustment points
4
1
2
3
d
D
c
C
A
a
B
b
Image 4-19
Scheimp
fl
ug adjustments
Indication on drawing
Function
4
Locking nut
1, 2 and 3
Scheimp
fl
ug adjustment nuts
A, B, C and D
Set screws
a, b, c and d
lock nuts
1, 2 and 3 are adjustment points.
4 is a locking point and NOT used during Scheimp
fl
ug adjustment.
C
AUTION
:
In the HDX 4K, the Scheimp
fl
ug mechanism is positioned close to the actuator, which helps pro-
vide the 4k UHD images. To avoid damaging the actuator during Scheimp
fl
ug adjustment, it is important to
have the projector be in 4k UHD mode during the adjustment. This because the actuator will vibrate while in
4k UHD mode.
If one of the Scheimphlug nuts would touch the vibrating actuator during adjustment, you will hear a loud
rattling noise. If heard, immediately turn the nut counterclockwise until you can no longer hear the noise.
Remember and mark this position, as this will be the innermost position this Scheimp
fl
ug nut will be able to
achieve without damaging the actuator.
Necessary tools
•
Allen key 3 mm
•
Nut driver 13 mm
•
Nut driver 10 mm
How to adjust
1. Project a green focus pattern in 4K UHD.
36
R5906070 HDX 4K 23/09/2016
Summary of Contents for HDX 4K
Page 1: ...HDX 4K User guide R5906070 00 23 09 2016 ...
Page 4: ......
Page 24: ...2 Installation preparations 20 R5906070 HDX 4K 23 09 2016 ...
Page 44: ...4 Lenses Lens selection 40 R5906070 HDX 4K 23 09 2016 ...
Page 50: ...5 Input Communication 46 R5906070 HDX 4K 23 09 2016 ...
Page 60: ...7 Graphic User Interface GUI 56 R5906070 HDX 4K 23 09 2016 ...
Page 62: ...8 GUI Source 58 R5906070 HDX 4K 23 09 2016 ...
Page 66: ...9 GUI Image 62 R5906070 HDX 4K 23 09 2016 ...
Page 72: ...10 GUI Installation 68 R5906070 HDX 4K 23 09 2016 ...
Page 78: ...12 Maintenance 74 R5906070 HDX 4K 23 09 2016 ...
Page 90: ...13 Servicing 86 R5906070 HDX 4K 23 09 2016 ...
Page 94: ...A Specifications 90 R5906070 HDX 4K 23 09 2016 ...


