4. Lamp & Lamp House
6. Gently remove the xenon lamp together with the anode socket out of the Lamp House. Do not use excessive force upon the
xenon lamp. Normally the xenon lamp will easily slide out the cathode socket of the Lamp House.
Warning:
Supporting the xenon lamp with one hand while pulling it out with other hand prevents it from bumping against the
chassis of the Lamp House.
Image 4-11
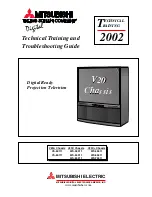
7. Place the xenon lamp in its protective container or wrap the xenon lamp in a protective cloth and secure with two binders.
Image 4-12
Left: Xenon lamp wrapped in a protective cloth. Right: Xenon lamp captured in a protective container.
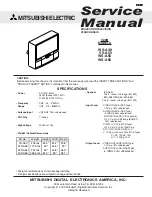
8. Remove the anode wire lug (reference 6 image 4-13) from the anode socket as illustrated. Use a 8mm Allen wrench.
Tip:
Place the
fl
at washer and bolt (reference 7 & 8 image 4-13) back on its place after the lug is removed.
6
7
8
Image 4-13
R5905067 DPXK-19B/23B/P 17/09/2012
33
Summary of Contents for DP2K-19B
Page 6: ......
Page 14: ...1 Safety 8 R5905067 DPXK 19B 23B P 17 09 2012...
Page 22: ...2 General 16 R5905067 DPXK 19B 23B P 17 09 2012...
Page 32: ...3 Physical installation 26 R5905067 DPXK 19B 23B P 17 09 2012...
Page 62: ...5 Lenses lens holder 56 R5905067 DPXK 19B 23B P 17 09 2012...
Page 76: ...7 Communicator Touch Panel Image 7 8 Connections 70 R5905067 DPXK 19B 23B P 17 09 2012...
Page 78: ...8 Starting up 72 R5905067 DPXK 19B 23B P 17 09 2012...
Page 100: ...10 Removal and installation of the projector covers 94 R5905067 DPXK 19B 23B P 17 09 2012...
Page 120: ...A Specifications 114 R5905067 DPXK 19B 23B P 17 09 2012...
Page 124: ...B Pin configurations 118 R5905067 DPXK 19B 23B P 17 09 2012...