


47
R5900103 /02
C-10, C-5
not turned off, is visible and can be connected to by anyone. Mobile users are limited to the experience
described in the standalone setup. For Miracast, the Base Unit will have to be configured for Miracast to offer
a Wi-Fi direct connection.
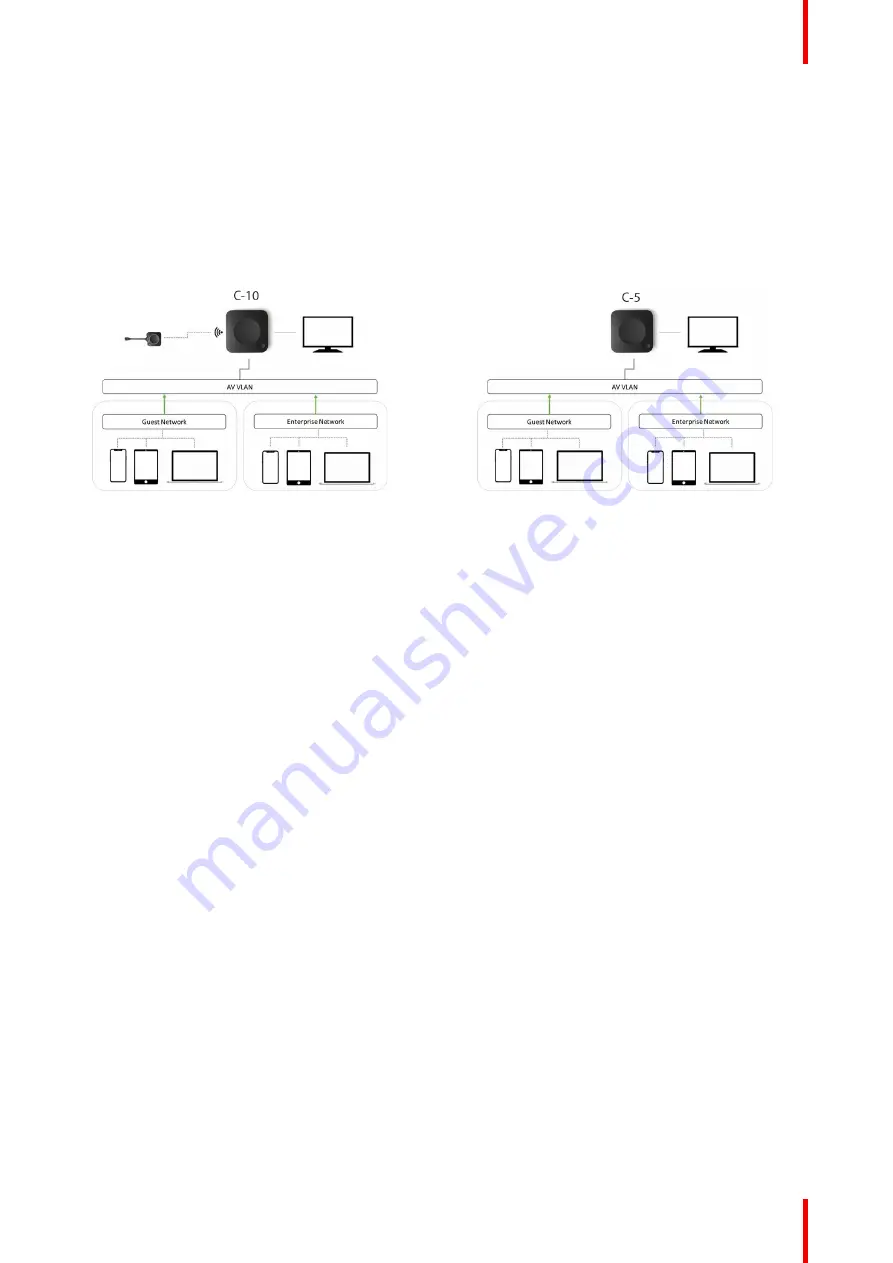
Connecting the Base Unit to the Enterprise network opens the possibility for using the eXperience
Management Suite (XMS) for central management and/or using the auto-update functionality to keep your
installed base up to date.
A Base Unit which is connected to the network, can be monitored through SNMP, can be controlled and
monitored by other 3rd party systems such as Overture or Crestron or can be interfaced through the
ClickShare REST API.
Image 4
–
8
Image 4
–
9
How to setup via the Configurator
1.
Connect the Base Unit and browse to the
ClickShare Configurator
and log in.
2.
Select
Button
in the
System
menu and click
Edit settings
.
Select
External Access Point
from the drop down menu and select the preferred authentication mode and
fill out the details.
Click
Save Changes
. For more information, see
“
”
, page 108
3.
Pair the Button again with the Base Unit.
4.
Optionally the Base Unit
’
s WiFi can be set to Access Point or can be set to Off. For more info, see
“
”
, page 86
Setup via XMS
1.
Log in to XMS and go to the
Base Units
tab.
2.
In the device list select the Unit(s) for deploying network integration mode.
3.
Open the
Configure
dropdown list and choose
Network integration
.
4.
Select one of the authentication modes for network integration mode and fill out the details.
5.
Re-pair the ClickShare Button with the updated Base Unit(s) to apply the new configuration
For more detailed information on how to use XMS, consult the XMS user guide.
4.8 Video signal connections to the Base Unit
About Video signal connection
A single screen can be connected to the Base Unit.
To connect a display, an HDMI connection should be made between the Base Unit and the display.
To connect
1.
Connect the Base Unit to the display using a display cable.
Summary of Contents for C-10
Page 1: ...ENABLING BRIGHT OUTCOMES Installation manual C 10 C 5...
Page 22: ......
Page 25: ...25 R5900103 02 C 10 C 5...
Page 26: ...R5900103 02 C 10 C 5 26...
Page 29: ...29 R5900103 02 C 10 C 5 C 10 C 5 Specifications 2...
Page 40: ...R5900103 02 C 10 C 5 40 Getting started...
Page 62: ...R5900103 02 C 10 C 5 62 Image 4 38 C 10 C 5 Installation...
Page 68: ...R5900103 02 C 10 C 5 68 Preparing the Buttons...
Page 121: ...121 R5900103 02 C 10 C 5 Firmware updates 7...
Page 123: ...123 R5900103 02 C 10 C 5 Troubleshooting 8...
Page 130: ...R5900103 02 C 10 C 5 130 Index...
Page 131: ......


