


45
R5911705 /02
Bragi
3.10 Scheimpflug (Boresight) adjustment
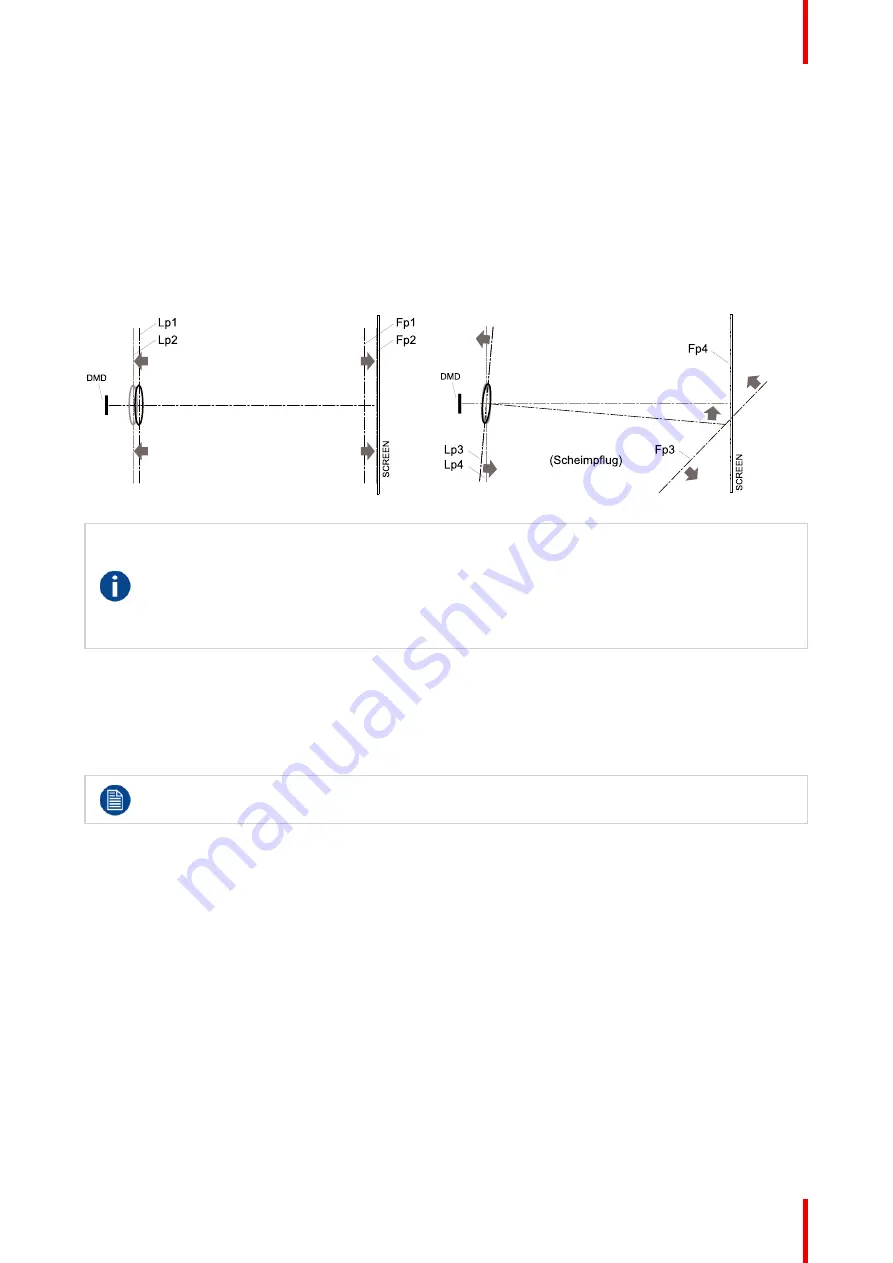
What is Scheimpflug?
The lens holder has to be adjusted so that the
“
sharp focus plane
”
of the projected image falls together with
the plane of the screen (Fp1
→
Fp2). This is achieved by changing the distance between the DMD plane and
the lens plane (Lp1
→
Lp2). The closer the lens plane comes to the DMD plane the further the sharp focus
plane will be. It can occur that you won't be able to get a complete focused image on the screen due to a tilt (or
swing) of the lens plane with respect to the DMD plane. This is also known as Scheimpflug's law. To solve this
the lens plane must be placed parallel with the DMD plane. This can be achieved by turning the lens holder to
remove the tilt (or swing) between lens plane and DMD plane (Lp3
→
Lp4).
Image 3
–
8 Scheimpflug principle
Scheimpflug principle
The "plane of sharp focus" can be changed so that any plane can be brought into sharp focus.
When the DMD plane and lens plane are parallel, the plane of sharp focus will also be parallel to
these two planes. If, however, the lens plane is tilted with respect to the DMD plane, the plane of
sharp focus will also be tilted according to geometrical and optical properties. The DMD plane, the
principal lens plane and the sharp focus plane will intersect in a line below the projector for
downward lens tilt.
Scheimpflug adjustment points
Scheimpflug adjustment points are located on the lens mount. The projector has three (3) set screws and
three (3) adjustment screws.
When to apply Scheimpflug?
Scheimpflug correction procedures may only be carried out by suitably trained and experienced
technicians.
A Scheimpflug correction should only be applied when the overall focus of the projected image is not equally
sharp (for example, if the projector is
NOT in parallel
with the screen or as a result of a previously misaligned
Scheimpflug). Be aware that the consequence of applying Scheimpflug correction upon a screen not in
parallel with the projector is that the projected image differs from the rectangle shaped image. In other words
“
distortion
”
of the projected image occurs.
Masking
will be required to solve the distortion.
The disadvantage of Masking is loss of content. Therefore it is
strongly recommended
to place the projector
in parallel
with the projection screen and use the
SHIFT
functionality of the Lens Holder to match the
projected image with the projection screen. If the SHIFT range is not sufficient then the projector can be tilted
and Scheimpflug can be applied.
Summary of Contents for Bragi
Page 1: ...ENABLING BRIGHT OUTCOMES Installation Guide Bragi ...
Page 34: ...R5911705 02 Bragi 34 250mm 250mm Image 3 1 Physical installation ...
Page 48: ...R5911705 02 Bragi 48 Physical installation ...
Page 52: ...R5911705 02 Bragi 52 4 1 2 Connector Specifications Getting the projector started ...
Page 63: ...63 R5911705 02 Bragi 4 4 Power mode transitions Getting the projector started ...
Page 73: ...73 R5911705 02 Bragi 4 7 User interface Getting the projector started ...
Page 79: ...79 R5911705 02 Bragi Note You cannot change the EDID for SDI connectors Source menu ...
Page 88: ...R5911705 02 Bragi 88 6 6 Gamma Types Image menu ...
Page 93: ...93 R5911705 02 Bragi 6 8 Advanced image adjustments Image menu ...
Page 104: ...R5911705 02 Bragi 104 Image menu ...
Page 105: ...105 R5911705 02 Bragi Advanced picture adjustments 7 ...
Page 112: ...R5911705 02 Bragi 112 Advanced picture adjustments ...
Page 114: ...R5911705 02 Bragi 114 8 1 Lens Installation menu ...
Page 121: ...121 R5911705 02 Bragi Image 8 11 Installation menu ...
Page 122: ...R5911705 02 Bragi 122 8 4 Warping Installation menu ...
Page 128: ...R5911705 02 Bragi 128 Image 8 22 Installation menu ...
Page 137: ...137 R5911705 02 Bragi 8 5 Blending Installation menu ...
Page 154: ...R5911705 02 Bragi 154 Installation menu ...
Page 162: ...R5911705 02 Bragi 162 GUI Profiles ...
Page 165: ...165 R5911705 02 Bragi 10 2 IR control System settings menu ...
Page 180: ...R5911705 02 Bragi 180 System settings menu ...
Page 184: ...R5911705 02 Bragi 184 GUI Status menu ...
Page 186: ...R5911705 02 Bragi 186 3D ...
Page 190: ...R5911705 02 Bragi 190 Index ...
Page 191: ......


