


29
R5911705 /02
Bragi
2.3 Locking the lens position
About
The projector has the feature of mechanically lock the lens position in both horizontal and vertical position.
This is particularly important in moving platform applications in order to avoid that the lens comes out of
position during operation. This topic describes the procedure for this operation.
CAUTION:
It is of great importance to disable the Lens Shift function when the mechanically lens lock is
performed. If not, the shift mechanism will be possible destructed if lens shift accidentally is
performed from the remote control, keypad, and also via API command, when the mechanism is
mechanically locked.
Tools needed
•
Screwdriver Tx25
•
Wrench or Socket wrench 8mm, OR allen key 4mm
Lens lock screw
The lens lock screws has a special design that allows use of two different tools for tightening; 4mm Allen key
or 8mm wrench.
Image 2
–
4 Lens lock screw
Maximum tightening torque: 2.0 Nm.
Lens lock procedure.
1.
Move the lens to the optimal horizontal and vertical position.
2.
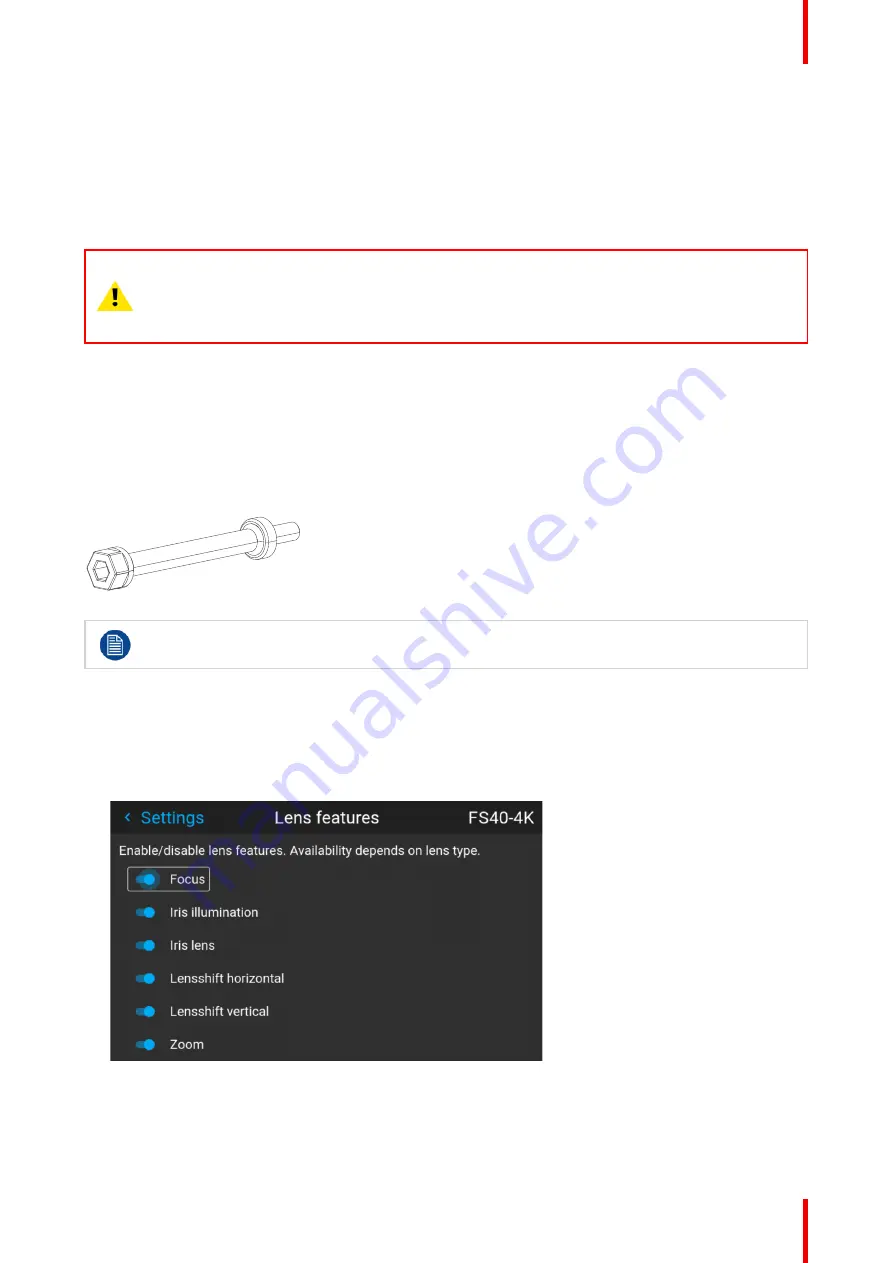
Disable the lens shift function by entering the menu
Home / System Settings / Service / Lens features
Select the function to disable by the arrow keys, and disable the function by pressing the OK button.
Image 2
–
5
3.
Release 8 screws in front of the projector indicated in the figure below.
Remove the front cover
Summary of Contents for Bragi
Page 1: ...ENABLING BRIGHT OUTCOMES Installation Guide Bragi ...
Page 34: ...R5911705 02 Bragi 34 250mm 250mm Image 3 1 Physical installation ...
Page 48: ...R5911705 02 Bragi 48 Physical installation ...
Page 52: ...R5911705 02 Bragi 52 4 1 2 Connector Specifications Getting the projector started ...
Page 63: ...63 R5911705 02 Bragi 4 4 Power mode transitions Getting the projector started ...
Page 73: ...73 R5911705 02 Bragi 4 7 User interface Getting the projector started ...
Page 79: ...79 R5911705 02 Bragi Note You cannot change the EDID for SDI connectors Source menu ...
Page 88: ...R5911705 02 Bragi 88 6 6 Gamma Types Image menu ...
Page 93: ...93 R5911705 02 Bragi 6 8 Advanced image adjustments Image menu ...
Page 104: ...R5911705 02 Bragi 104 Image menu ...
Page 105: ...105 R5911705 02 Bragi Advanced picture adjustments 7 ...
Page 112: ...R5911705 02 Bragi 112 Advanced picture adjustments ...
Page 114: ...R5911705 02 Bragi 114 8 1 Lens Installation menu ...
Page 121: ...121 R5911705 02 Bragi Image 8 11 Installation menu ...
Page 122: ...R5911705 02 Bragi 122 8 4 Warping Installation menu ...
Page 128: ...R5911705 02 Bragi 128 Image 8 22 Installation menu ...
Page 137: ...137 R5911705 02 Bragi 8 5 Blending Installation menu ...
Page 154: ...R5911705 02 Bragi 154 Installation menu ...
Page 162: ...R5911705 02 Bragi 162 GUI Profiles ...
Page 165: ...165 R5911705 02 Bragi 10 2 IR control System settings menu ...
Page 180: ...R5911705 02 Bragi 180 System settings menu ...
Page 184: ...R5911705 02 Bragi 184 GUI Status menu ...
Page 186: ...R5911705 02 Bragi 186 3D ...
Page 190: ...R5911705 02 Bragi 190 Index ...
Page 191: ......


