P/N 128185
Banner Engineering Corp.
•
Minneapolis, MN U.S.A.
www.bannerengineering.com • Tel: 763.544.3164
DX80 Quick Start Guide
9
GETTING STARTED – HOST NETWORK
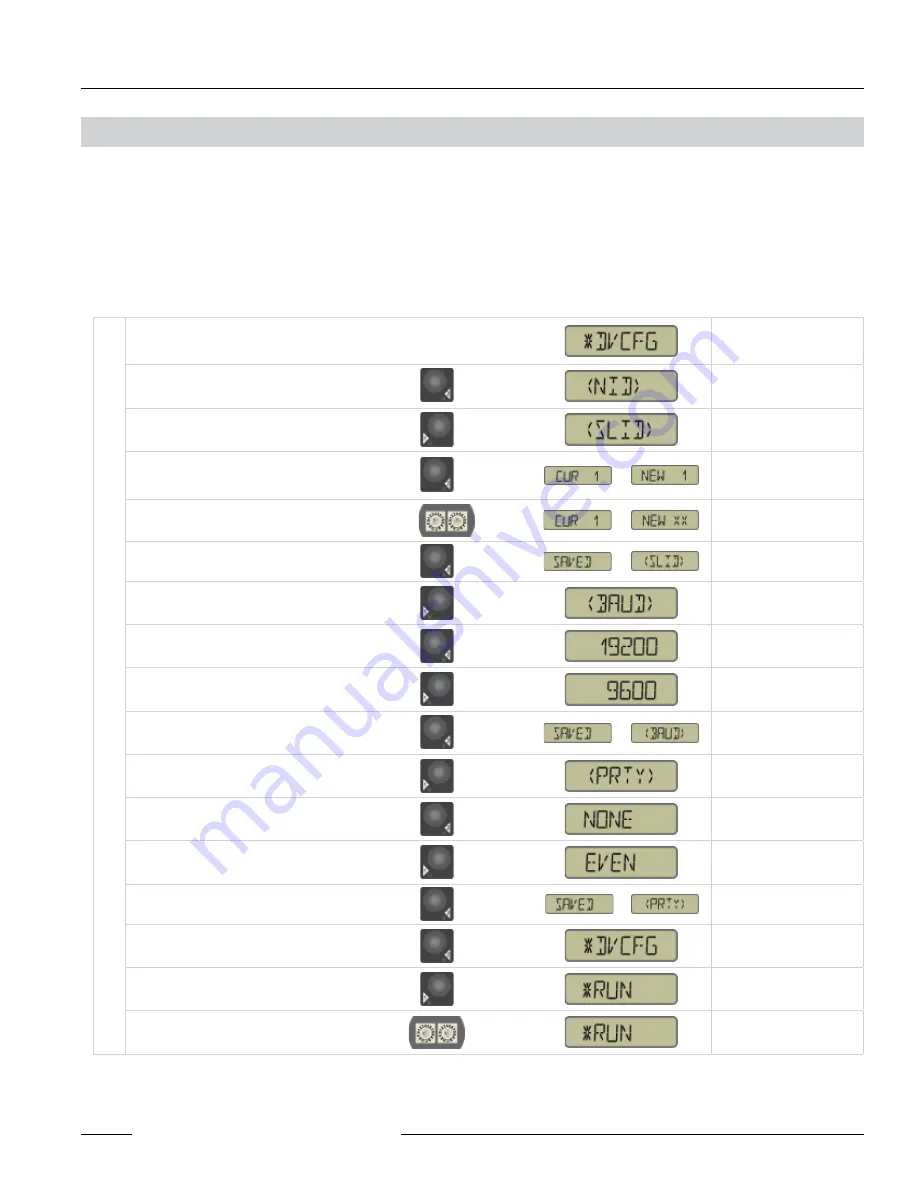
On the Gateway, move to the “Device Configuration” menu
To navigate to the *DVCFG
(Device Configuration)
menu, see page 12.
Single-click Gateway push button 2
Single-click Gateway push button 1
Moves to the Slave ID field,
default value is 1
Single-click Gateway push button 2
The new Slave ID is defined
by the current position of the
rotary switches.
Set rotary switches to the desired new Slave ID
Select between 01 to 99
Single-click Gateway push button 2
Slave ID is saved
Single-click Gateway push button 1
Moves to the BAUD rate
field
Single-click Gateway push button 2
Single-click Gateway push button 1
Options are 9600, 19200,
38400, default is 19200
Single-click Gateway push button 2
Baud rate is saved.
Single-click Gateway push button 1
Moves to the Parity field
Single-click Gateway push button 2
Single-click Gateway push button 1
Options are NONE, EVEN,
ODD, default is NONE
Single-click Gateway push button 2
Parity setting is saved.
Double-click Gateway push button 2
Returns to Device
Configuration menu
Click Gateway push button 1 through to *RUN
Adjust Left rotary switch back to NID value
SET
SLAVE
ID
User Action
Display/Status
Notes
Similar to Network ID, the Slave ID parameter can be changed in the Device Configuration (*DVCFG) system menu option. Follow the Top
Level System Menu through *DVCFG to the Slave ID (SLID) parameter. The LCD will display an alternating Current value and New value
for the parameter.
Setting the Slave ID
Host Network – Gateway (cont.)
SET
BAUD
RATE
SET
PARITY


