


3. Tighten all three screws.
4. Mount the iVu BCR and bracket to the machine or equipment at the desired location. Do not tighten the mounting screws at this time.
5. Check the iVu BCR alignment.
6. Tighten the mounting screws to secure the iVu BCR and the bracket in the aligned position.
Cable Connections
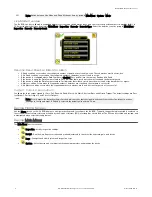
The cable connections on the iVu BCR are shown below, and power I/O connections (B) are defined in the Power I/O Connections table below.
A
B
C
D
Figure 3. iVu BCR Cable Connections—Micro Video Lens Model
A
Remote Display Connector (remote display models only)
B
Power and I/O Cable Connector
C
USB Connector
D
Ethernet Connector
Note: Micro video lens model shown, C-Mount model
connections are identical.
Table 1: Power I/O Connections
Pin #
Wire Color
Description
Direction
1
White
Output 1
Output
2
Brown
10 V dc to 30 V dc
Input
3
Green
Output 2
Output
4
Yellow
Strobe Out (5 V dc only)
Output
5
Gray
Remote Teach
Input
6
Pink
External Trigger
Input
7
Blue
Common (Signal Ground)
Input
8
Red
Ready
Output
9
Orange
Output 3
Output
10
Light Blue
RS-232 TX
Output
11
Black
RS-232 Signal Ground
Output
12
Violet
RS-232 Rx
Input
Install the Software
PC Requirements
Operating System
Microsoft
®
Windows
®
operating system version 7, 8, or 101
System Type
32-bit, 64-bit
Hard Drive Space
80 MB (plus up to 280 MB for Microsoft .NET 4.5, if not already installed)
Memory (RAM)
512 MB minimum, 1 GB+ recommended
Processor
1 GHz minimum, 2 GHz+ recommended
Screen Resolution
1024 × 768 full color minimum, 1650 × 1050 full color recommended
Third-Party Software
Microsoft .NET 4.5, PDF Viewer (such as Adobe Acrobat)
USB Port
USB 3.0, recommended if a USB to Ethernet adapter used to communicate with the
sensor
Important: Administrative rights are required to install the Vision Manager software.
1. Download the latest version of the software from
2. Navigate to and open the downloaded file.
3. Click Next to begin the installation process.
4. Confirm the software destination and availability for users and click Next.
5. Click Install to install the software.
6. Depending on your system settings, a popup window may appear prompting to allow Vision Manager to make changes to your computer.
Click Yes.
7. Click Close to exit the installer.
Connect to the Sensor
These instructions use Windows
®
operating system version 7, 8, or 10.
2
1 Microsoft and Windows are registered trademarks of Microsoft Corporation in the United States and/or other countries.
2
Windows is a registered trademark of Microsoft Corporation in the United States and/or other countries.
iVu Plus BCR Gen2 Series Sensor
2
www.bannerengineering.com - Tel: +1-763-544-3164
P/N 178443 Rev. C