background image

Control Module Configuration

20

Banner Engineering Corp. 

• 

Minneapolis, U.S.A.

www.bannerengineering.com  •  Tel: 763.544.3164

5.2.3 Blanking

If a machine fixture or other equipment will continuously block 

one or more beams, the affected beam channels may be blanked. 

The Blanking option causes the control module to ignore the 

status of blanked beams for measurement mode calculations. 

For example, if a machine fixture blocks one or more beams 

during System operation, the output data will be incorrect; if 

beams blocked by the fixture are blanked, the output data will be 

correct. Blanking may be configured using the push-button 

Alignment switch on the control module, or by using the system 

software and a computer.

Push-Button Blanking Setup Routine 

To specify blanking using the control module’s Alignment 

switch

, (see Figure 5.4) position the object or part to be ignored 

in the path of the beams before beginning the Alignment routine. 

Press the Alignment switch for 3 seconds; the Diagnostics 

Indicator will show the letter ‘

A

’. Press the Alignment switch 

again, but this time only momentarily (about 0.5 seconds max.). 

The Diagnostics Indicator will show the letter ‘

b

’ to indicate it is 

ready to “learn” the blanking pattern. Again, momentarily press 

the Alignment switch to set the blanking fields. Both the control 

module and the receiver will indicate a clear condition (green 

Align indicator ON) and the Diagnostics Indicator will show ‘

A.

’ 

(the period following the ‘A’ indicates that blanking is in use). 

The beams blocked during the routine are now blanked. To return 

to Run mode, again press the Alignment switch for 3 seconds. 

When the System is ready for operation and configured for beams 

to be blanked, the period on the Diagnostics Indicator will remain 

lit, showing ‘

—.

’ (see Figure 5-4).

System Software Blanking Setup Routine 

To specify blanking using the System software,

 the procedure 

is similar. Position the object to be blanked in the path of the 

beams (this can be done at any time before beginning the 

blanking routine). Perform the Ping routine to select the proper 

control module, then press 

F8

 or select the 

Alignment

 option 

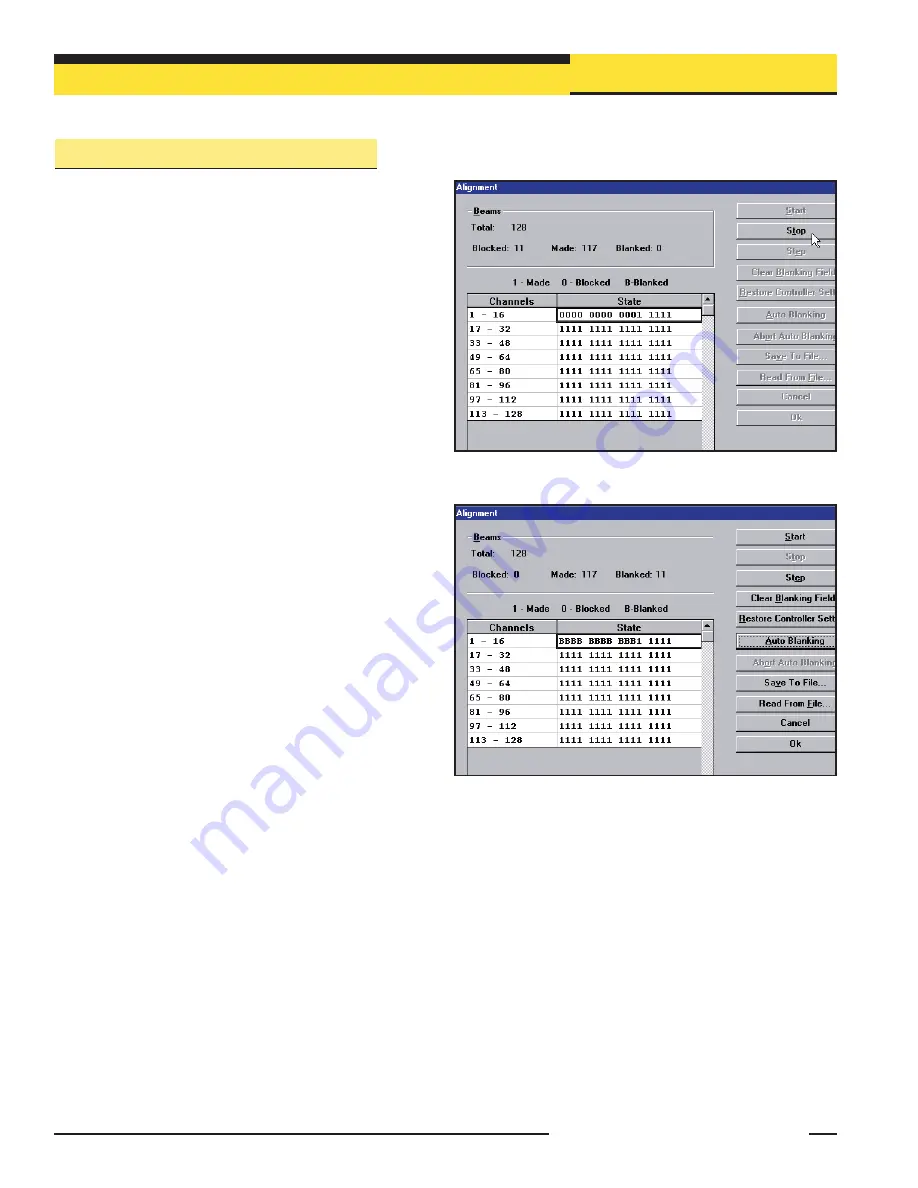
from the MINI-ARRAY menu. From the screen menu (Figure 5-6), 

select 

Stop

; the Diagnostics Indicator on the control module will 

show the letter ‘

A

’. Select 

Auto Blanking 

(Figure 5.7); the Diagnostics Indicator will show 

the letter ‘

b

’. Select 

Accept Auto Blanking

; both the control module and the receiver will 

indicate a clear condition (green Align indicator ON) and the Diagnostics Indicator will 

show ‘

A

.’ (the period following the ‘A’ indicates that blanking is in use).  The beams 

blocked during the routine are now blanked and appear as the letter ‘

B

’ on the grid instead 

of ‘

0

’; if you wish to blank additional beams, use the ‘

Edit

’ key to manually set additional 

blanking (see next page). To leave Alignment mode, select ‘

OK

’. When the System is ready 

for operation and configured for beams to be blanked, the period on the Diagnostics 

Indicator will remain lit, showing ‘

—.

’ (see Figure 5-4).

Scanning Mode Limitations for Blanking:


All blanking features are available with Continuous Scan mode. For single-and double-

edge scan, blanking is limited to four blanking fields. Other blanking features are ignored.

Figure 5-6.   Alignment screen, showing beams #1-11 blocked

Figure 5-7.   Alignment screen, showing beams #1-11 blanked

Summary of Contents for A-GAGE High-Resolution MINI-ARRAY MAHCIN-1

Page 1: ...Alignment routine equalizes gain of each beam for reliable 2 5 mm 0 10 object detection throughout the array Host computer or PLC may be used to initiate scans and or process scan data Unique addresse...

Page 2: ...P N 64118 rev B 2 Banner Engineering Corp Minneapolis U S A www bannerengineering com Tel 763 544 3164...

Page 3: ...8 5 2 2 Software Alignment Routine 19 5 2 3 Blanking 20 5 3 Programming Control Module Response 21 5 3 1 Selected Controller and Serial Connection 23 5 3 2 Control Mode Selection 23 5 3 3 Scanning Met...

Page 4: ...System configuration A host computer or PLC may be used to control and or receive input from the System Sensors are available in 12 array lengths from 163 mm to 1951 mm 6 4 to 76 8 in 163 mm 6 4 incre...

Page 5: ...2 256 320 384 448 512 576 704 Emitter and Receiver Models Cables Configure and monitor the System with the supplied software and any PC compatible computer running Windows XP Vista or 7 via an RS 232...

Page 6: ...ion 5 3 5 for more information on outputs Alarm output discrete output 2 conducting and gate signal received a green LED signals that the sensors are properly aligned A segmented LED Diagnostics Indic...

Page 7: ...patible computer running Windows The menu driven program walks the user through the many scanning and output options After the desired options are selected the user can save the combination of selecti...

Page 8: ...indicates sensors misaligned or one or more beam s blocked Connections Sensors connect to controller using two 5 conductor quick disconnect cables one each for emitter and receiver ordered separately...

Page 9: ...MAHR26A Receiver 724 mm 28 5 756 mm 29 7 MAHE32A Emitter MAHR32A Receiver 887 mm 34 9 918 mm 36 2 MAHE38A Emitter MAHR38A Receiver 1049 mm 41 3 MAHE45A Emitter MAHR45A Receiver 1215 mm 47 8 1246 mm 49...

Page 10: ...1V 10 mA and 1 5V 150 mA Serial Data Outputs RS 232 or RS 485 interface Up to 15 control modules may be given unique addresses on one RS 485 party line ASCII or binary data format 9600 19 2K or 38 4K...

Page 11: ...4118 rev B 81 0 mm 3 19 115 0 mm 4 53 106 0 mm 4 17 35 0 mm 1 38 DIN mounting slot Slot for M3 5 screws 2 5 5 mm 0 22 69 0 mm 2 72 5 0 mm 0 20 96 0 mm 3 78 Figure 2 2 Control module dimensions Specifi...

Page 12: ...vibration isolators and M4 Keps nuts all supplied See Figure 3 1 Standard M4 or 8 32 bolts may be substituted and the vibration isolators eliminated in situations where the emitter and receiver are no...

Page 13: ...st point in the same direction Measure from one or more reference planes e g the building floor to the same point s on the emitter and receiver to verify their mechanical alignment If the sensors are...

Page 14: ...x 0 10V ANALOG OUTPUT 2 25 mA max 0 10V ANALOG OUTPUT 1 DISCRETE OUTPUT 2 ALARM 150 mA max Figure 3 4 MAHCVP 1 hookup 30V dc max POWER 1 16 30V dc 1 A max 10 30V dc GATE SIGNAL 30V dc 2 3 4 5 6 7 8 9...

Page 15: ...e open collector output transistor of a dc sensing device The gate signal controls scanning when one of four Gate options is selected in the Control Mode Selection menu of the PSF configuration routin...

Page 16: ...engineering com as required 2 Insert the Software CD into the CD drive If the program does not auto start browse to your CD drive click Setup exe then select START then select RUN 2 The Welcome dialog...

Page 17: ...m supports serial communication via the COM1 COM20 port of the computer Highlight the desired serial port to select it a bullet will appear next to the selected option then select Save Settings on Exi...

Page 18: ...ervice the Diagnostics Indicator will show or see Figure 5 4 5 2 1 Push button Alignment Routine At installation or whenever the emitter and or receiver is moved the System should be re aligned Press...

Page 19: ...ore Control module Settings Auto Blanking Abort Auto Blanking Save to File Read From File Cancel OK and Edit To access any of these sub routines first press Stop then the selected option Start command...

Page 20: ...n to Run mode again press the Alignment switch for 3 seconds When the System is ready for operation and configured for beams to be blanked the period on the Diagnostics Indicator will remain lit showi...

Page 21: ...ed for beams to be blanked the period on the Diagnostics Indicator will remain lit showing see Figure 5 4 Figure 5 8 Edit channel blank state screen showing beam 22 and beams 35 42 blanked beams 65 80...

Page 22: ...ngle Edge scan requires the target object to block beam 1 closest to the sensors cabled ends then conducts a time saving binary search to hunt for the target s overall height one variable edge Double...

Page 23: ...an control method it is used in most analog output applications and whenever continuous updating of the outputs is acceptable Host Mode allows the control module to communicate with a host computer or...

Page 24: ...e Figure 5 13 4 This routine continues to narrow the field until the edge is found Note that the receiver always checks the bottom beam first and only if that beam is blocked does the binary search co...

Page 25: ...provide a solid obstruction the size of the object will determine the maximum step size Figure 5 14 Sensor response time is a function of sensor length and scanning method Typical scan times are show...

Page 26: ...ssigned to any one of the available outputs see Figure 5 18 Each output can be set for MEAS1 MEAS2 MEAS1 Inverted or MEAS2 Inverted 5 3 5 Analog Output Configuration Analysis Mode Assignment Analog ou...

Page 27: ...values will be at mid range 5 3 6 Zero Value Zero value is used to specify the analog output when the measurement mode value is zero The user can select an analog output of LAST NULL or SPAN LAST Outp...

Page 28: ...at each set point High and Low to cause the associated output to change state Hysteresis prevents unstable output conditions when the scan analysis value exactly matches one of the set points The defa...

Page 29: ...two Scan Analysis Mode selections can be active ALL Mode the status of each beam in the light screen array will be transmitted for each scan In ALL mode blanked channels are transmitted as unblocked...

Page 30: ...t transmission of the three byte identification string header string associated with either ASCII or Binary data formats The header string consists of two bytes at the start of the data and a terminat...

Page 31: ...ponse to the currently loaded PSF select Execute Figure 5 26 The Measurement Output screen will appear Figure 5 29 select Run The table will display the status for the selected measurement mode s incl...

Page 32: ...n Receiver DIN Rail Mountable Control Module HIGH RESOLUTION MINI ARRAY CONTROLLER ALIGNMENT SWITCH POWER POWER DIAGNOSTICS INDICATOR 2 TX 3 RX 5 COM RS 232 MAHCVP 1 OUTPUT ALARM GATE ALIGN 1 16 30V d...

Page 33: ...t array alignment is satisfactory To improve alignment adjust the position of the emitter and receiver until the green LED lights making sure that no unblanked beams are interrupted Then use one of th...

Page 34: ...ter A msg 2 83 assume initiation byte which is the ASCII letter S The host transmits this three byte message at the defined baud rate The format is one start bit one stop bit even parity and eight dat...

Page 35: ...the control module sends the status of a clear condition only on the first clear scan After that the control module will continue to scan but will not transmit data until the sensor is again blocked...

Page 36: ...Meas Mode causes the control module to retain the maximum measurement values for a given object These values are transmitted either immediately after the control module is cleared or when prompted by...

Page 37: ...37 Banner Engineering Corp Minneapolis U S A www bannerengineering com Tel 763 544 3164 P N 64118 rev B Banner Engineering Corp Minneapolis U S A www bannerengineering com Tel 763 544 3164...

Page 38: ...unobstructed from the emitter to the receiver same as a made or unblocked beam Excess Gain A measurement of the amount of light falling on the receiver from the emitter over and above the minimum amo...

Page 39: ...39 Banner Engineering Corp Minneapolis U S A www bannerengineering com Tel 763 544 3164 P N 64118 rev B Banner Engineering Corp Minneapolis U S A www bannerengineering com Tel 763 544 3164...

Page 40: ...ANTIES WHETHER EXPRESS OR IMPLIED INCLUDING WITHOUT LIMITATION ANY WARRANTY OF MERCHANTABILITY OR FITNESS FOR A PARTICULAR PURPOSE AND WHETHER ARISING UNDER COURSE OF PERFORMANCE COURSE OF DEALING OR...

Reviews: