6.3 Replacing the filter element
The
Aurora H2O
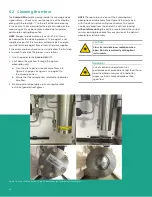
uses a membrane filter (see Figure 93
below) as the secondary filter. This filter is intended to
prevent liquid or particulate contamination from entering
the absorption cell. The Aurora should not be operated
without a filter train upstream of the unit. The membrane
filter is equipped with “flow block” which shuts off the flow
if the filter element is heavily loaded with contamination.
A spring loaded check valve closes the outlet flow of the
sample if the differential pressure across the filter element
exceeds a threshold limit. At any given time the flow through
the
Aurora H2O
can be checked by observing the rotameter.
If the “flow block” feature shuts off the flow, do not increase
the pressure. Replace the filter element and clean the filter.
Figure 93: Membrane filter
If the flow is being shut off too frequently, additional sample
condition schemes, or the combination of the following,
will have to be employed:
•
Bypass flow
- needed to sweep liquids or contamination
off the filter. A 10:1 bypass flow rate should be maintained.
• Additional upstream filtration
•
Heat
- Heat tracing of the sample line and sample
system components, sufficiently above both the water
and hydrocarbon dew point, will keep the sample in
the gas phase.
To replace the filter element, complete the following steps:
1. Close the inlet isolation needle valve and allow the
system to fully depressurize.
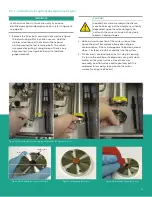
2. Turn the filter cap counter-clockwise (see Figure 94
below). You might need to use a channel-lock wrench
to assist in loosening the cap.
Figure 94: Removing the filter cap
3. Place the filter cap on a horizontal flat surface, filter
side up.
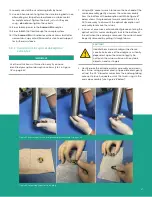
4. Carefully remove the large O-ring (see Figure 95 below).
NOTE:
Because the O-rings are reused, replacement o-rings
are not included in the maintenance kit.
Figure 95: Orient the filter cap and remove the large o-ring
5. Remove the white membrane filter element and the
membrane backing plate (see Figure 96 below).
Figure 96: Remove the white filter element and the backing plate
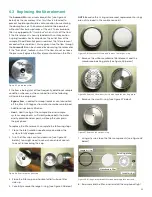
6. Remove the small O-ring (see Figure 97 below).
Figure 97: Remove the small o-ring
7. Using a tissue, clean the filter components (see Figure 98
below).
Large o-ring
Backing plate
Membrane filter
Small o-ring
Figure 98: O-rings, membrane filter and backing plate removed
8. Re-assemble the filter, and reinstall the cap hand-tight.
69
Summary of Contents for Panametrics Aurora H2O
Page 2: ...ii...
Page 4: ...no content intended for this page proceed to next page iv...
Page 20: ...no content intended for this page 10...
Page 32: ...no content intended for this page 22...
Page 71: ...Figure 74 Exporting a simplified image Figure 75 Selecting enhanced metafile 61...


