background image

© 2018 Baker Hughes, a GE company, LLC. All rights reserved.

84 | 

=

BHGE


ES-699 Rev AD 
Page 8 of 13 

7


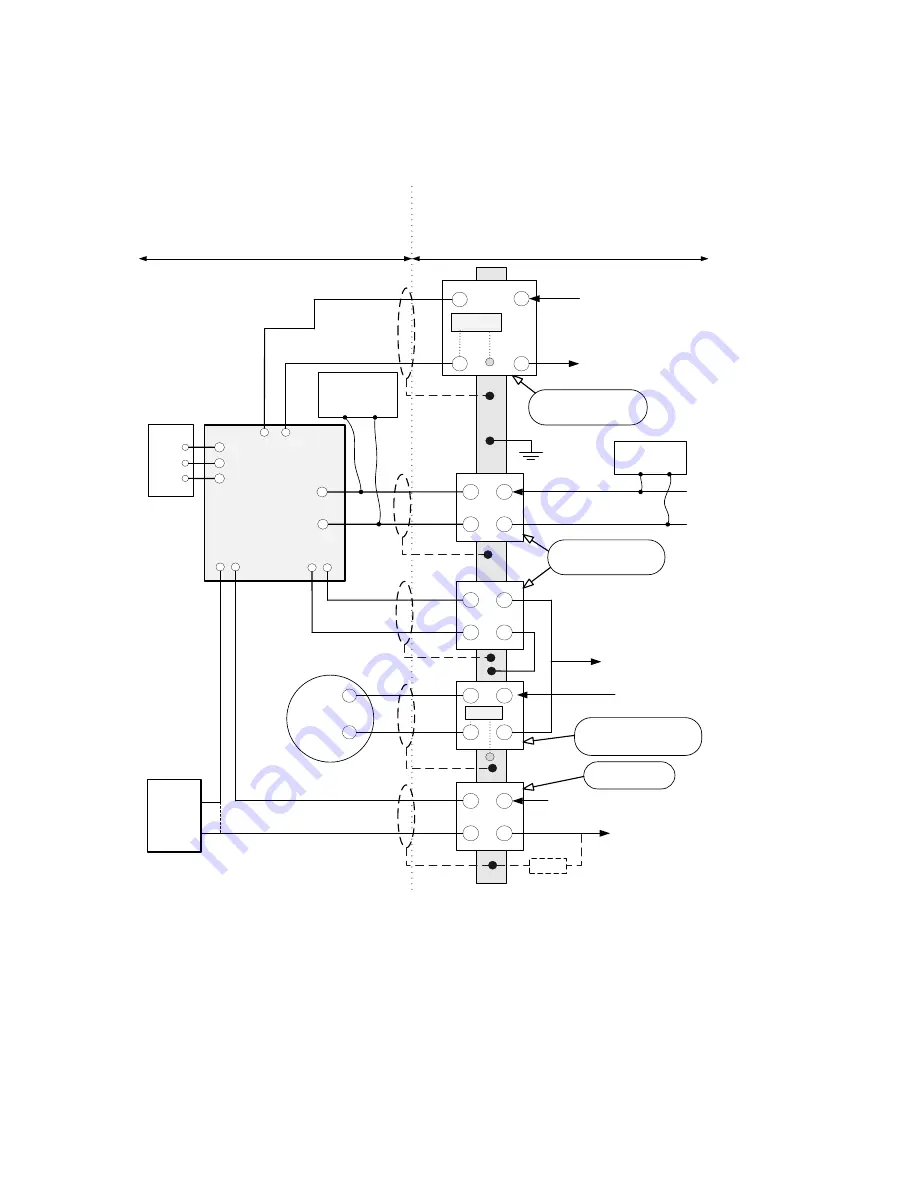
*Intrinsically Safe Installation Wiring Requirements 


Each intrinsically safe cable must include a grounded shield or be run in a separate 
metal conduit. 

TRANSMITTER

+

-

NON-HAZARDOUS LOCATION - UNSPECIFIED EXCEPT
THAT BARRIERS MUST NOT BE SUPPLIED FROM NOR
CONTAIN UNDER NORMAL OR ABNORMAL CONDITIONS
A SOURCE OF POTENTIAL WITH RESPECT TO EARTH IN
EXCESS OF 250 VOLTS RMS OR 250 VOLTS DC

HAZARDOUS LOCATION

SEE 8.1, 8.2

1

2

4

3

250

Ω

+

-

1

2
3

R
E

M

SVI-II
Remote
Mount

SVI-II AP

4-20 mA

IN

-

4-20 mA

OUT

SW

PV

1-5 VDC

OPTIONAL HAND

HELD

COMMUNICATOR

(SEE NOTE 8.9)

1

2

4

3

1

2

4

3

1

2

4

3

1

2

4

3

Transmitter Barrier Type with

interanl of external Sense

Resistor (SEE NOTE 8.4)

24 VDC from
Control System

1 to 5 Volts POSTION
FEEDBACK to Control
System

4-20 mA SETPOINT from
Control System

OPTIONAL HAND

HELD

COMMUNICATOR

Optional
Solendoid

SEE NOTE 8.6

+

+

-

-

SHUNT ZENER DIODE SAFETY

BARRIER Transmitter Type with

Internal or External Sensing Resistor

(SEE NOTE 8.5)

SHUNT ZENER DIODE

SAFETY BARRIER (SEE

NOTE 8.6)

SHUNT ZENER DIODE SAFETY

BARRIER Controller Output Type

(SEE NOTE 8.3 and 8.5)

24 VDC from
Control System

1 to 5 Volts to Control
System

24 VDC from
Control System

DI to Control
System

Optional Intrinsically Safe Process

Variable Transmitter

LOAD

The Optional 4-20mA Position
Output from the SVI-II AP must not
be connected in an Intrinsically Safe
Installation which requires FM or
CSA approval (SEE NOTE 8.4)

Optional 1-5 Volt

Process Variable

Input to SVI-II AP

250

Ω

Equi-

Potential

SEE NOTE 8.6


*

Applies to ‘ia’ and ‘ic’


Summary of Contents for Masoneilan SVI II AP

Page 1: ...Masoneilan SVI II AP Digital Positioner Advanced Performance Quick Start Guide Rev W BHGE Data Classification Public...

Page 2: ...ND REQUIREMENTS CREATED BY THE TYPE OF EQUIPMENT PROVIDED THESE INSTRUCTIONS ASSUME THAT OPERATORS ALREADY HAVE A GENERAL UNDERSTANDING OF THE REQUIREMENTS FOR SAFE OPERATION OF MECHANICAL AND ELECTRI...

Page 3: ...Requirements 21 ValVue and SV II AP DTM DTM Trial Version 21 Masoneilan Software Download 22 Mounting the SVI II AP 26 Necessary Precautions 26 Mounting the SVI II AP on Rotary Valves 27 Travel Sensor...

Page 4: ...urrent Source 52 Powering Up the SVI II AP 52 Configuration 54 Configuration with Pushbuttons 56 Viewing Status Messages 58 VIEW DATA Settings 58 Calibration 59 Check out with a HART Handheld Communic...

Page 5: ...n a natural gas environment Update the ES 699 to Rev AB Added instructions for wiring Position Retransmit Changed references to ValVue software to reflect ValVue 3 Added Device Identification informat...

Page 6: ...This page intentionally left blank...

Page 7: ...defines the documentation symbols Safety Symbols Indicates a potentially hazardous situation which if not avoided could result in serious injury or death Indicates a potentially hazardous situation wh...

Page 8: ...tools or equipment during installation Under normal operation compressed supply gas is vented from the SVI II AP to the surrounding area and may require additional precautions or specialized installa...

Page 9: ...ring and testing to verify the need for engineering or administrative controls to eliminate or reduce hazardous noise levels Installation in poorly ventilated confined areas with any potential of gase...

Page 10: ...This page intentionally left blank...

Page 11: ...teel wetted parts for durability Intrinsically Safe Flameproof and Explosion proof designs are offered as standard The High Flow version is capable of 2 2 Cv air throughput Some of the SVI II AP optio...

Page 12: ...gure 2 SVI II AP Components Figure 3 SVI II AP High Flow Components SVI II AP Cover SVI II AP Assembled Electronics Module Pneumatic Train and Cover I P Module Relay Manifold Pneumatic Relay I P SVI I...

Page 13: ...Control System on page 103 The steps necessary to complete the SVI II AP installation and software setup are outlined in Table 1 Table 1 SVI II AP Installation Steps Step No Procedure Reference 1 Atta...

Page 14: ...maintenance tasks associated with this instrument READ THE INSTRUCTIONS CAREFULLY Refer to Hazardous Location Installation on page 76 of this guide for detailed instructions 8 Configure calibrate usi...

Page 15: ...output on top supply port on bottom are located on the front of the pneu matic block The supply and output connections for the SVI II AP High Flow Figure 5 on page 16 located on bottom and leftside of...

Page 16: ...gh Flow Air Ports on Single Acting Positioner Double Acting Positioner Connect Output 1 labeled I to the inlet port of the actuator and Output 2 labeled II to the opposing actuator port see Figure 6 F...

Page 17: ...en commissioning or checking a control valve with SVI II AP fully installed the following steps are recommended Change mode to Manual mode Examine and adjust all CONFIGuration items Enter Calibration...

Page 18: ...company LLC All rights reserved 18 BHGE NOTE When an exclamation point appears in the SVI II AP display window it indicates that there is instrument status available Figure 7 SVI II AP Display Pushbut...

Page 19: ...ushbuttons so that the SVI II AP parameters cannot be inadvertently changed by the buttons Several levels of pushbutton locks are provided Table 2 Pushbutton Lock Security Level Level Access Security...

Page 20: ...onnections to Electronics Module via Terminal Board NOTE The PV Process Variable is not used for the SVI II AP The Digital Input DI is activated using SMARTs Assistant which is downloaded at https www...

Page 21: ...install to configure and use the SVI II AP For the most recent software visit our SVI II AP web site at https www geoilandgas com file download search The SVI II AP DTM software and the Valve software...

Page 22: ...alVue software refer to the ValVue User s Guide Contact the fac tory or your local representative to obtain licensing information Masoneilan Software Download Download and Install ValVue3 1 Go to the...

Page 23: ...OTE For fastest installation save the download file to your laptop PC Don t install from the website 4 Open Windows Explorer and click the Windows Downloads folder NOTE If you have a previous install...

Page 24: ...Go to the Resource Library https www geoilandgas com file download search and enter SVI II AP DTM in the search field red arrow in Figure 11 Figure 11 Download Center Search for SVI II AP DTM The resu...

Page 25: ...to the Windows Downloads folder NOTE For fastest installation save the download file to your laptop PC Don t install from the website 4 Open Windows Explorer and click the Windows Downloads folder NO...

Page 26: ...ositioner on a con trol valve ensure that If the valve is located in a hazardous area make sure the area has been certified as safe or that all electrical power to the area has been disconnected befor...

Page 27: ...hen facing the actuator for any position of the valve and actuator 2 Bolt the extension shaft to the valve position take off shaft using a 1 4 28 UNF socket flathead screw Secure the machine screw hol...

Page 28: ...is is vertical when the valve is in the closed position 7 Align the end of the magnet holder flush with the end of the mounting bracket Secure the magnet holder with two M6 set screws 8 Slide the V Se...

Page 29: ...Travel Sensor Alignment Rotary Mounting System Stroke Direction Magnet Orientation Valve Position SensorCounts Rotary 60 Rotation Clockwise or counter clockwise rotation 0 Closed 0 0 1000 60 Rotation...

Page 30: ...nting the unit on the actuator that is attached to the valve This section describes the procedure for mounting the SVI II AP on Reciprocating Valves using Masoneilan s 87 88 Multi Spring actuators as...

Page 31: ...or air to extend this requires using air pressure in the actuator to fully stroke the actuator For air to retract actuators vent the actuator of air pressure 5 Thread the take off rod to the actuator...

Page 32: ...k nuts Refer to Figure 15 12 For reciprocating valves the adjustable link turnbuckle must be parallel to the valve stem To ensure linearity in positioning verify that the hole in the lever aligns with...

Page 33: ...m 23 0 5 0 8 12 7 20 32 mm B A 5 25 133 35 mm 23 0 8 1 5 20 32 41 5 mm C B 5 25 133 35 mm 23 1 5 2 5 41 5 63 5 mm D C 5 25 133 35 mm 2018 Baker Hughes a GE company LLC All rights reserved Masoneilan S...

Page 34: ...re are two methods of checking the SVI II AP magnet Perform a visual inspection Use ValVue to check the magnet Performing a Visual Inspection To perform a visual inspection refer to Table 3 on page 29...

Page 35: ...85 86 kit for double acting valve po sitioner configurations To mount the kit 1 Set valve to the closed position 2 Install the mounting assembly to the yoke Figure 18 using helical spring washer 5 16...

Page 36: ...are as in Figure 19 Figure 19 Stroke Settings 4 Mount take off bracket to stem block at angle which keeps turnbuckle assembly parallel to stem Figure 20 using a For top two plain 5 16 flat washers hel...

Page 37: ...e in the valve closed position Figure 21 and connect to take off bracket Figure 21 Magnet Position with Valve Closed 6 Verify lever is in correct position with valve closed Adjust rod ends if necessar...

Page 38: ...es SVI II AP Installation and Maintenance Manual for further discussion on installing an SVI II AP in a natural gas environ ment Installing remote actuator vent gas piping does not capture all gas emi...

Page 39: ...EXPLOSION HAZARD A missing or improperly installed conduit seal cable seal or cable gland could leak natural gas into the conduit cable system and or into any area where the conduit cabling system is...

Page 40: ...1034 kPa Minimum tubing diameter 1 4 6 mm x 4 mm NOTE The SVI II AP Digital Valve Positioner is designed to operate with clean dry oil free instrument grade air to ANSI ISA 57 3 1975 R1981 or ISA S7 3...

Page 41: ...r actuator instruction manual Wiring the SVI II AP In order for the SVI II AP to communicate the positioner data the SVI II AP positioner must be phys ically connected to a HART communication The proc...

Page 42: ...her end of the cable to the SVI II AP There are two threaded openings on the positioner Use the opening with the red plastic insert 4 Maintain polarity and respectively Wiring a Position Retransmit CA...

Page 43: ...anywhere on the signaling circuit Cabling must be shielded to prevent electrical noise that would interfere with the HART tones with the shield grounded Shield must be properly grounded in only one p...

Page 44: ...II AP If the SVI II AP is located in a haz ardous area with Intrinsically Safe protection a barrier is not required for a flameproof installa tion Alternatively the system can be installed as Explosi...

Page 45: ...lower range values must be 4 mA to 14 mA Use the following procedure to ensure that the SVI II AP is properly powered 1 Connect a DC voltmeter across the input terminals For an input current between...

Page 46: ...served 46 BHGE Figure 23 General Purpose and Explosion Proof Installation Figure 24 Intrinsically Safe Installation Hazardous Area Non Hazardous Area Power Supply 220 Ohms HART compliant control syste...

Page 47: ...is section before putting the SVI II AP into operation Check Out Procedures SVI II AP checkout consists of physical and operational checkout procedures The physical check out procedures include Inspec...

Page 48: ...two methods of checking the SVI II AP magnet Perform a visual inspection Use ValVue to check the magnet Performing a Visual Inspection You must remove the positioner from the bracket to visually insp...

Page 49: ...et up with a HART Modem in a HART compliant communications loop if required install ValVue on the computer that is connected to the HART modem b Run ValVue c Select the installed positioner from the l...

Page 50: ...flon tape can shred into particles that are harmful to the pneumatic components Checking the Electronic Module Connections WARNING Do not remove the instrument cover or connect to an electrical circui...

Page 51: ...Process Variable is not used for the SVI II AP The Digital Input DI is activated using SMARTs Assistant which is downloaded at https www geoilandgas com file download search Solid State Switch 1 and...

Page 52: ...with local display use Val Vue and a PC with a HART modem or a HART Handheld Communicator NOTE When an SVI II AP is turned on it is advisable to apply the air supply before applying the electrical inp...

Page 53: ...rameters installed at the factory The positioner cycles through the NORMAL cycle menu and LCD displays the following values PRES Pressure unit of measurement and value SIGNAL POS Position An exclamati...

Page 54: ...ng be sure the valve is isolated from the process Keep hands clear from moving parts NOTE All calibration and configuration procedures are described using an SVI II AP with pushbuttons and display and...

Page 55: ...iveness is 0 for control valves without volume boosters In applications with volume boosters and or quick exhaust valves are used the Aggressiveness Level is not as influential For Auto tuning it is u...

Page 56: ...valve to several values 8 Verify the action is as desired 9 Press to move to the SETUP menu 10 In the SETUP menu press the button to access the CONFIGuration menu 11 In the CONFIG menu set the config...

Page 57: ...2018 Baker Hughes a GE company LLC All rights reserved Masoneilan SVI II AP Digital Positioner Quick Start Guide 57 Figure 28 CONFIGure Menu...

Page 58: ...itioner was powered without air a Position Error or POSERR can appear 3 Press to view all faults 4 Press to return to MANual menu 5 Press until CLR ERR appears 6 Press CLR ERR WAIT appears for a secon...

Page 59: ...I II AP 1 Observe the display following power up The SVI II AP powers up in the previously active mode either MANUAL or NORMAL operating mode In NORMAL mode the display alternates between POS and SIGN...

Page 60: ...e 29 provides access to all the calibration functions for the SVI II AP If a change is made in the Air To Open Air To Close configuration option or if you move the SVI II AP to a different valve or ma...

Page 61: ...st positioning response WARNING DO NOT perform STOPS while the valve is controlling the process DO NOT perform Auto Tune while the valve is controlling the process To auto tune the SVI II AP 1 Press t...

Page 62: ...es Normal Cycling Menu Normal Manual View Data View ERR CLR ERR Manual Mode Cycling Menu View Data Menu View Errors Menu Instant Action Normal Manual View Data View ERR CLR ERR Manual Setup MAN POS va...

Page 63: ...1 SVI II AP HART Communicator Connections Be sure that the configuration lock jumper is in the unlock position When the jumper is in the lock position shorting the two pin header the handheld is not p...

Page 64: ...e 6 EXAMINE press 8 Scroll down to 5 read status 9 Read message 10 Press OK 11 Repeat OK to read all messages until the display returns to read status 12 Scroll down to 6 clear status press 13 If clea...

Page 65: ...ea unless the power is disconnected If natural gas is supplied natural gas may escape from the SVI II AP on removal of the cover or components Repair Replacement of the Pneumatic Relay I P and cover w...

Page 66: ...ith a solid cover and would like to upgrade to a display cover follow the instructions below for removal and installation Removing the SVI II AP Display Cover To remove the SVI II AP display cover 1 U...

Page 67: ...the SVI II AP housing 3 Connect the cable from the display into the LCD connector on the terminal board 4 Ensure that the gasket is in its groove in the housing 5 Place the cover over the screw mounts...

Page 68: ...This page intentionally left blank...

Page 69: ...y Effect Less than 0 2 after 2 days at 104 F 40 C 95 Relative Humidity Insulation Resistance Greater than 10 G Ohms at 50 RH MTBF 49 years based on MIL handbook calculation for electronic parts and fi...

Page 70: ...ing symmetry for exhaust and fill time constants dead zone and magni tude characterization parameters Auto Tune is opti mized for 5 step changes with negligible overshoot After the Auto Tune process i...

Page 71: ...at 15 C Push Buttons External Three Explosion Proof Flameproof push buttons 2018 Baker Hughes a GE company LLC All rights reserved Masoneilan SVI II AP Digital Positioner Quick Start Guide 71 Table 1...

Page 72: ...ails to atmosphere Some overshoot may occur when air pressure returns after a period without air supply pressure Always set control set point to 0 and put the process control system in manual for smoo...

Page 73: ...flow coefficient Loading CV 2 2 Venting CV 2 8 Air Consumption 0 28 scf min 8 0 L min at 30 psi 2 1 bar supply 0 35 scf min 10 5 L min at 45 psi 3 1bar supply Air Supply Failure Single Acting Relay On...

Page 74: ...upply Air Capacity flow coefficient Loading CV 0 39 Venting CV 0 33 Air Consumption for Double Acting 0 4 scf min 11 3 L min at 30 psi 2 1 bar supply 0 85 scf min 24 1 L min at 80 psi 5 52 bar supply...

Page 75: ...n 1 2 1 Single Acting 2 Double Acting c Pneumatics 1 Standard flow d Display 1 2 3 4 1 No Display and Pushbuttons 2 With Display and Pushbuttons 3 No Display and Pushbuttons Marine 4 With Display and...

Page 76: ...Hazardous Location Installation The following pages provide the agency approved installation procedure for hazardous locations NOTE The installation procedure is accurate at time of print For further...

Page 77: ...e process are beyond the scope of this manual For mounting instructions on specific valves refer to the mounting instructions supplied with the mounting kit Mounting does not affect the suitability of...

Page 78: ...and the integrity of the flameproof enclosure 2 If the Installation is Intrinsically Safe then check that the proper barriers are installed and the field wiring meets local and national codes for an I...

Page 79: ...ommunication Option Hazardous Certification 1 The SVI II AP may be up graded in the field by the addition of a display and buttons 2 Not available on SVI2 abcdefg0 3 Retransmit without digital output...

Page 80: ...mospheres Do not use dry cloth or any solvents 5 INTRINSICALLY SAFE REQUIREMENTS 5 1 Div 2 WARNING EXPLOSION HAZARD DO NOT DISCONNECT EQUIPMENT UNLESS POWER HAS BEEN SWITCHED OFF OR THE AREA IS KNOW T...

Page 81: ...A LLATI ONS C ONDUIT SEA L RE QUIR ED WITHI N18 INCHES OF ENCLOSUR E ENTR ANCE FM PER MA NENTLY MA RK THE PROTEC TION TYPE C HOSE N ONCE T HE TYPE IS MAR KED IT C ANNOT BE CHA NGED SUBS TITUTIONOF C O...

Page 82: ...ecial Protection Certifying Agency CL I DIV 1 GP B C D Explosionproof gas CL II DIV 1 GP E F G Explosionproof dust CL III DIV 1 Explosionproof fiber IS CL I DIV 1 GP A B C D Intrinsically Safe gas IS...

Page 83: ...6 3 2 Voltage 30 Volts 6 3 3 Pressure 150 psig 1 03MPa 6 3 4 Current 4 20mA 6 4 Enclosure Type Type 4X IP66 6 5 Temperature Code T6 Ta 60 C T5 Ta 75 C T4 Ta 85 C 6 6 Notes Related to Explosionproof R...

Page 84: ...with interanl of external Sense Resistor SEE NOTE 8 4 24 VDC from Control System 1 to 5 Volts POSTION FEEDBACK to Control System 4 20 mA SETPOINT from Control System OPTIONAL HAND HELD COMMUNICATOR O...

Page 85: ...ision 2 installations must be installed per the Canadian Electrical Code Division 2 Wiring Methods See also note 4 ATEX requirements EU Intrinsically safe installations must be installed per EN60079 1...

Page 86: ...SW 1 and SW 2 The switches are polarity sensitive that is conventional current flows INTO the plus terminal An examples of suitable barriers are MTL 707 MTL 787 and MTL 787S Entity NIFW parameters Vma...

Page 87: ...related components in the device making the device unsuitable for use in an intrinsically safe system 9 REPAIR THE FLAMEPATHS OF THE EQUIPMENT ARE NOT INTENDED TO BE REPAIRED CONSULT THE MANUFACTURER...

Page 88: ...that The wire is not damaged when feeding it through the housing A single O ring is in place on the wire sleeve and is not damaged The four retaining screws are snug Inserting the wire sleeve through...

Page 89: ...mp was 20 C FM CSA no Analog Out 27 SEP 05 C PDev DR 0208 10 12 05 D PDev DR 0225 11 28 05 E ADR 002909 5 8 06 F ADR 002948 9 6 06 G ADR 002987 12 FEB 07 H ADR 003099 28MAY08 J ADR 003318 2FEB10 K ADR...

Page 90: ...2018 Baker Hughes a GE company LLC All rights reserved 90 BHGE Spare Parts...

Page 91: ...2018 Baker Hughes a GE company LLC All rights reserved Masoneilan SVI II AP Digital Positioner Quick Start Guide 91...

Page 92: ...2018 Baker Hughes a GE company LLC All rights reserved 92 BHGE...

Page 93: ...Item No Part Number Description Quantity 1 720017771 265 0000 SCR HEX SHCS M4 X 0 7 X 60 MICROSPHERES 593 PATCH 5 2 971886015 681 0000 O RING ID 9 19 0 362 WIDTH 2 62 0 103 REF NO 2 110 3 3 971886124...

Page 94: ...This page intentionally left blank...

Page 95: ...s of switch state If the switch is connected directly across the power source the current will be limited only by the capacity of the power source and the switch can be damaged This section discusses...

Page 96: ...ter the digital switch is in the open state Under open circuit conditions the switch current will be less than 0 200 mA The switch maximum current rating is 1 A When the switch is ON the typical switc...

Page 97: ...onfiguration Figure 35 Simplified Switch Installation Drawing Correct Configuration SVI II AP Switch Output 1 V with switch ON External Voltage Source LOAD Load is designed to limit current through th...

Page 98: ...ee Wiring Option 1 If IS barrier is a combination of fuse resistor and Zener diode then the connection is shown in Option 2 The barrier must have adequate resistance to limit inrush current as the fus...

Page 99: ...ries Tri Loop by Rose mount Turning on Burst mode in cases where it is not required affects the communication bandwidth Burst mode is not available for SVI II AP in HART 7 To see how the Burst mode is...

Page 100: ...and 5 1 X in HART 7 1 P1 P2 Actuator pressure if single acting Differential pressure if double acting psi 2 Supply Pres sure Supply pressure psi 3 P2 Pressure on port 2 for double acting psi 4 Setpoi...

Page 101: ...alog Output Counts 15 I P Current Current to pressure trans ducer current mA Available for firmware 5 1 X in HART 7 only 16 Friction Static valve friction psi 17 Position Error Band Allowed position d...

Page 102: ...This page intentionally left blank...

Page 103: ...e positioner self regulates voltage as current flows through it Additionally it also doesn t confirm what system voltage is available under load conditions Therefore if com pliance testing needs to be...

Page 104: ...DC This is the available system voltage at the maximum output Table 17 lists some compliance voltage readings at positioner terminals at several currents Table 17 Expected Voltage Range at Positioner...

Page 105: ...This page intentionally left blank...

Page 106: ...This page intentionally left blank...

Page 107: ...This page intentionally left blank...

Page 108: ...A Mumbai Phone 91 22 8354790 Fax 88 91 22 8354791 SAUDI ARABIA Phone 966 3 341 0278 Fax 88 966 3 341 7624 Houston Texas Phone 1 281 671 1640 Fax 88 1 281 671 1735 New Delhi Phone 91 11 2 6164175 Fax 8...

Reviews:

Related manuals for Masoneilan SVI II AP