background image

SEWING THE STITCHES

92

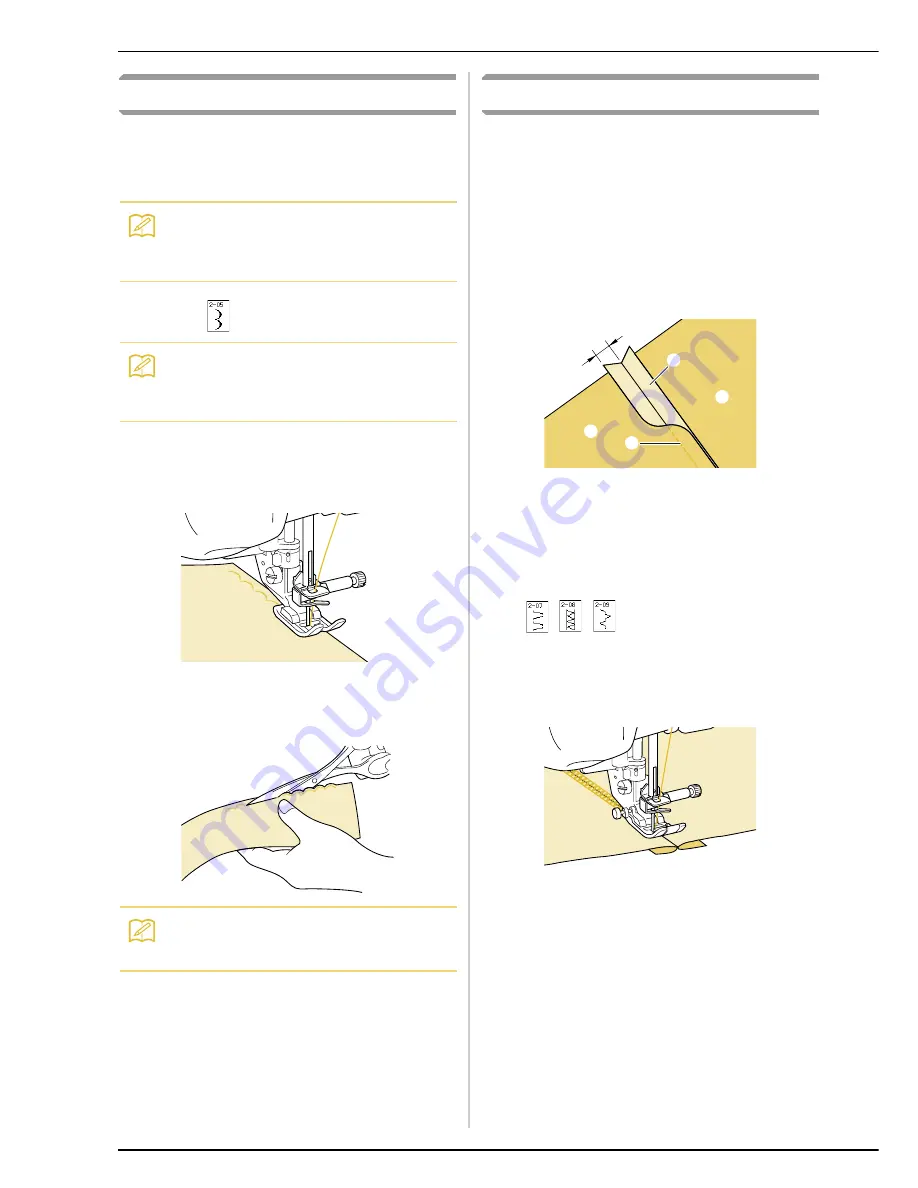
Scallop Stitches 

This wave-shaped satin stitch is called the scallop 
stitch. Use this stitch to decorate the edges of 
blouse collars and handkerchiefs or use it as a hem 
accent. 

a

Select .

b

Attach presser foot “N”. Sew scallop 
stitches along the edge of the fabric.

*

Do not sew directly on the edge of the fabric.

c

Trim along the seam, making sure not to cut 
the stitches.

Top Stitching

For a decorative look called “Crazy Quilting”, the 
following stitches can be sewn on top of a pressed 
seam allowance. 

a

Select a straight stitch and attach presser 
foot “J”.

b

With the right sides facing each other, sew 
two pieces of fabric together, and then 
press open the seam allowance.

a

Straight stitch 

b

Seam margins 

c

6.5 mm (approx. 1/4 inch) 

d

Wrong side 

c

Select a stitch for top stitching.


d

Place the fabric right side up in the 
machine, and center the presser foot over 
the seam when sewing.

a

Right side of fabric 

Memo

A temporary spray adhesive may be 
necessary for lightweight fabrics. Test sew the 
fabric before sewing a project. 

Memo

For details on each stitch, refer to the 
“STITCH SETTING CHART” at the end of this 
manual.

Memo

Use a seam sealant to secure the edges of the 
scallop stitches.

c

b

a

d

d

Summary of Contents for Ellegante2 BLG2-NZ

Page 1: ......

Page 2: ......

Page 3: ...disconnect turn the main switch to the symbol position which represents off then remove plug from outlet 9 Do not unplug by pulling on cord To unplug grasp the plug not the cord 10 Keep fingers away f...

Page 4: ...2 i e carrying the mark rating as marked on plug Always replace the fuse cover never use plugs with the fuse cover omitted WARNING DO NOT CONNECT EITHER WIRE TO THE EARTH TERMINAL WHICH IS MARKED WITH...

Page 5: ...no guarantee that interference will not occur in a particular installation If this equipment does cause harmful interference to radio or television reception which can be determined by turning the eq...

Page 6: ...r mechanical adjustment 7 The sewing machine plastic bag should be kept out of the reach of children or disposed of Never allow children to play with plastic bags due to the danger of suffocation 8 Do...

Page 7: ...v...

Page 8: ...To learn the operation of the principal parts and the screens Pre programmed with more than 100 frequently used stitches To learn how to prepare for sewing and basic sewing operations The variety of...

Page 9: ...Chapter 6 Embroidery Edit for an explanation about the convenient embroidery edit functions In the screens that appear in the step by step directions the parts that are used for the operation are show...

Page 10: ...ng Your Stitch Settings 60 Using the Sewing Type Selection Key 61 SEWING THE STITCHES 63 Straight Stitches 63 Dart Seam 67 Gathering 68 Flat Fell Seam 69 Pintuck 69 Zigzag Stitches 71 Elastic Zigzag S...

Page 11: ...age 183 Changing the Density Alphabet Character and Frame Patterns Only 183 Changing the Colors of Alphabet Character Patterns 184 USING THE MEMORY FUNCTION 185 Embroidery Data Precautions 185 Saving...

Page 12: ...Contents x...

Page 13: ...ew with the twin needle n Thread guide for bobbin winding Pass the thread around this thread guide when winding the bobbin thread o Pretension disk Pass the thread around the pretension disk when wind...

Page 14: ...thread guides h Needle plate The needle plate is marked with guides to help sew straight seams i Presser foot holder screw Use the presser foot holder screw to hold the presser foot holder in place j...

Page 15: ...sew reverse stitches at low speed only while holding down the Reverse Reinforcement Stitch button the stitches are sewn in the opposite direction c Needle Position button Use this button when changing...

Page 16: ...r foot storage space Included Accessories 35 38 are contained in the embroidery unit carrying case To open the embroidery unit carrying case raise the lock and move the latch out of position To re hoo...

Page 17: ...33 34 35 36 37 38 39 40 41 42 43 44 45 46 47 48 49 50 51 52 53 54 55 56 57 See Additional Accessories Guide for presser foot instruction Included Accessories 35 38 are contained in the embroidery uni...

Page 18: ...W 2 1 2 inches EF73 Frame EF77 Embroidery sheet 36 Embroidery frame set medium H 10 cm W 10 cm H 4 inches W 4 inches EF74 Frame EF78 Embroidery sheet 37 Embroidery frame set large H 18 cm W 13 cm H 7...

Page 19: ...7 Spool stand BLG TS 8 Embroidery frame set extra large H 26 cm x W 16 cm 10 1 4 inches H x 6 1 4 inches W EF81 Frame EF86 Embroidery sheet 9 2 thread spool stand BLG STS Memo All specifications are c...

Page 20: ...ver a Insert the tabs at the bottom of the LCD cover into the grooves at the bottom of the LCD a Tabs b Grooves b While pressing the latch at the top of the LCD cover insert the tabs at the top of the...

Page 21: ...HREADING 23 Winding the Bobbin 23 Using the Supplemental Spool Pin 23 Using the Spool Pin 25 Setting the Bobbin 26 Pulling Up the Bobbin Thread 28 UPPER THREADING 29 Threading Using the Automatic Thre...

Page 22: ...ay result Do not touch the plug with wet hands Electric shock may result When unplugging the machine always turn the main power to OFF first Always grasp the plug to remove it from the outlet Pulling...

Page 23: ...in this display before sewing c Shows the name and code number of the selected stitch d Shows a preview of the selected stitch e Shows the stitch patterns f Shows additional pages that can be display...

Page 24: ...sewing mode The presser foot is raised to a height appropriate for free motion quilting 83 f Sewing type selection key Press this key when you need help selecting the appropriate stitch pattern for th...

Page 25: ...between single needle mode and twin needle mode each time you press the key If the key display is light gray the selected stitch pattern cannot be sewn in twin needle mode 34 p Reset key Press this k...

Page 26: ...mouse to position the pointer over the desired key and then click the left mouse button a Pointer Note Some mouse types cannot be used to operate the machine For details on the USB mouse types that ar...

Page 27: ...se wheel to switch through the tabs of the pattern selection screens Memo If for additional pages is displayed rotate the mouse wheel to display the next page In the or click the left mouse button wit...

Page 28: ...the pressure will be Set the pressure at 3 for normal sewing e Change the initial position of the needle when utility stitch is selected Choose left or middle position f Change the height of the pres...

Page 29: ...display ON OFF f Use when running an application g Change the display language see page 20 h Display the service count of embroidery stitches The service count is a reminder to take your machine in fo...

Page 30: ...e thread number 123 is selected select among six thread brands see page 177 d Adjust the maximum embroidery speed setting see page 176 e Adjust the thread tension for embroidering f Select the height...

Page 31: ...screen This is normal and is not a sign of malfunction Adjust the screen if it is difficult to read The screen may be dark immediately after turning on the power This is a function of the LCD back li...

Page 32: ...screen appears b Press The General settings screen appears c Use and to choose the display language Choose from the following languages ENGLISH GERMAN FRENCH ITALIAN DUTCH SPANISH JAPANESE DANISH NORW...

Page 33: ...rmation displays information about the main parts of the machine and their functions This is the first screen displayed when you press displays information about the operation buttons displays informa...

Page 34: ...ions Press to see a video of the displayed instructions Press to view the next page e Press to return to the original screen Using the Pattern Explanation Key If you want to know more about the uses o...

Page 35: ...spring on the bobbin winder shaft and set the bobbin on the shaft a Groove of the bobbin b Spring on the shaft c Set the supplemental spool pin in the up position a Supplemental spool pin d Place the...

Page 36: ...If the thread spool and or spool cap are set incorrectly the thread may tangle on the spool pin the thread will wind uneven on the bobbin and eventually cause damage to the machine Use the spool cap...

Page 37: ...obbin with the spring on the bobbin winder shaft and set the bobbin on the shaft a Groove of the bobbin b Spring on the shaft c Pivot the spool pin so that it angles upward Set the thread spool on the...

Page 38: ...deo example of the operation on the LCD see page 22 Follow the steps explained below to complete the operation a Press the Presser Foot Lifter button to raise the presser foot a a a b c CAUTION Use a...

Page 39: ...Pass the thread through the guide and then pull the thread out towards the front a Cutter The cutter cuts the thread h Insert the tab in the lower left corner of the bobbin cover 1 and then lightly pr...

Page 40: ...thread press the needle position button to lower the needle a Needle position button c Press the Needle Position button to raise the needle d Gently pull the upper thread and a loop of the bobbin thr...

Page 41: ...achine attach the accessory to the machine after threading the machine Memo The automatic threading function can be used with sewing machine needles 75 11 through 100 16 Thread such as transparent nyl...

Page 42: ...e needle The upper threading is finished Memo When sewing with fine cross wound thread use the small spool cap and leave a small space between the cap and the thread spool a Spool cap small b Thread s...

Page 43: ...are using an incorrect needle and thread combination the hook may sometimes get caught in the needle If this happens remove the hook from the needle as described below CAUTION The needle thread carrie...

Page 44: ...the threading path cover then pass it along the thread path as shown in the illustration Be sure to pass the thread along the right side of the thread path guide a Threading path cover b Thread path...

Page 45: ...ver m Holding the thread with both hands pass the thread through both the upper and lower needle bar thread guides a Needle bar thread guide upper b Needle bar thread guide lower n Pass the thread thr...

Page 46: ...in needles made for this machine part code X59296 151 Other needles could break resulting in damage Be sure to set the twin needle mode when using the twin needle Using the twin needle while the machi...

Page 47: ...Spool cap c Thread spool f Hold the thread from the spool with both hands and place the thread in the thread guide Do not place the thread in the bobbin winding thread guide a Thread guide g Pass the...

Page 48: ...onto the bobbin winder shaft b Install the spool felt and the thread spool in that order and then thread the upper thread Note If the key is light gray after selecting the stitch the selected stitch c...

Page 49: ...he presser foot lever so that the presser foot pin snaps into the notch in the holder a Notch b Pin b Press to unlock all keys and buttons c Raise the presser foot lever CAUTION Always press on the sc...

Page 50: ...king foot on the presser foot bar a Operation lever b Needle clamp screw c Fork d Presser foot bar d Lower the presser foot lever Insert the screw and tighten the screw securely with the screwdriver N...

Page 51: ...button is pressed accidentally the machine will start and injury may result Use only sewing machine needles made for home use type 130 705H needle Other needles may bend or break and may cause injury...

Page 52: ...y tighten the needle clamp screw a Needle stopper b Hole for setting the needle c Flat side of needle e Press to unlock all keys and buttons CAUTION Be sure to push in the needle until it touches the...

Page 53: ...ome sewing machine needle 75 11 is inserted in the sewing machine Fabric Thread Needle Combinations The following table provides information concerning the appropriate thread and needle for various fa...

Page 54: ...CHANGING THE NEEDLE 42...

Page 55: ...7 If the Fabric does not Feed 47 Sewing Lightweight Fabrics 48 Sewing Stretch Fabrics 48 STITCH SETTINGS 49 Setting the Stitch Width 49 Setting the Stitch Length 49 Setting the Thread Tension 50 Prope...

Page 56: ...ecial attention to the needle while the machine is in operation Keep your hands away from moving parts while the machine is in operation Do not stretch or pull the fabric during sewing Doing so may le...

Page 57: ...ton when there is no fabric set in the machine or during machine operation The thread may tangle possibly resulting in damage Note When cutting thread thicker than 30 nylon thread or other decorative...

Page 58: ...curve Changing Sewing Direction Stop the machine Leave the needle in the fabric and press the Presser Foot Lifter button to raise the presser foot Using the needle as a pivot turn the fabric so that...

Page 59: ...side of presser foot J a Raise the presser foot b While keeping the black button on the left side of presser foot J pressed in press the Presser Foot Lifter button to lower the presser foot c Release...

Page 60: ...r the stabilizer after sewing a Thin paper Sewing Stretch Fabrics First baste together the pieces of fabric and then sew without stretching the fabric In addition a better result can be achieved by us...

Page 61: ...Follow the steps below when you want to change the stitch pattern length Note Settings for some stitches cannot be changed refer to the STITCH SETTING CHART at the end of this manual If you turn off...

Page 62: ...e b Surface c Upper thread d Bobbin thread Upper Thread is Too Tight If the bobbin thread can be seen on the surface of the fabric press a Bobbin thread b Upper thread c Surface d Locks appear on surf...

Page 63: ...machine will automatically sew reverse stitches or reinforcement stitches and then continue sewing d Press the Reverse Reinforcement Stitch button a Reverse stitches or reinforcement stitches The mac...

Page 64: ...et the fabric in the start position and start sewing a Reverse stitches or reinforcement stitches The machine will automatically sew reverse stitches or reinforcement stitches and then continue sewing...

Page 65: ...l for stopping the machine to rotate the fabric Note If the knee lifter is not pushed into the mounting slot as far as possible it may come out during use CAUTION Be sure to keep your knee away from t...

Page 66: ...e pivot function to be used When NEEDLE POSITION is set in the raised position appears as light gray and cannot be used When the setting is selected the pivot function can only be used with stitches w...

Page 67: ...re starting to sew the various settings such as the stitch width and stitch length are locked and cannot be changed This prevents screen settings from accidentally being changed or the machine from be...

Page 68: ...USEFUL FUNCTIONS 56...

Page 69: ...asting Using Presser Foot J 75 Overcasting Using the Optional Side Cutter 76 When Sewing Straight Stitches While Using the Side Cutter 78 Quilting 79 Piecing 80 Quilting 80 Appliqu 81 Quilting with Sa...

Page 70: ...Selection Screens There are 5 categories of Utility Stitches indicates that there is more than one stitch selection screen for that category Straight Overcasting Quilting Stitches Decorative Stitches...

Page 71: ...you select you may be able to sew a horizontal mirror image of the stitch If is lit when you select a stitch it will be possible to make a mirror image of the stitch Press to create a horizontal mirro...

Page 72: ...d tension automatic thread cutting automatic reinforcement stitching etc are preset in the machine for each stitch However if you have specific settings that you wish to reuse later for a stitch you c...

Page 73: ...you want to sew overcasting but you do not know which stitch to use or how to sew the stitch you can use this screen to get advice We recommend that beginners use this method to select stitches Memo...

Page 74: ...turn to the original screen The upper part of the screen displays a selection of overcasting stitches with explanations c Read the explanations and select the appropriate stitch Press or to scroll the...

Page 75: ...intuck etc Reinforcement stitch is sewn while pressing Reverse Reinforcement Stitch button 3 5 1 8 0 0 7 0 0 1 4 2 5 3 32 0 2 5 0 1 64 3 16 OK J Triple stretch stitch General sewing for reinforcement...

Page 76: ...d hold the Reverse Reinforcement Stitch button to sew 3 4 reverse stitches or reinforcement stitches at the end of the seam g After sewing press the Thread Cutter button to trim the threads a a CAUTIO...

Page 77: ...hes with a left needle position d Left needle position on the needle plate inch e Left needle position on the needle plate cm f Middle center needle position on the bobbin cover inch g Left needle pos...

Page 78: ...fter sewing make sure to remove the straight stitch needle plate and the straight stitch foot and reinstall the regular needle plate the needle plate cover and the presser foot J Note Align the two sc...

Page 79: ...ng is preset a reinforcement stitch will automatically be sewn at the beginning of sewing a Basting c Cut the thread at the end leaving 50 mm approx 1 15 16 inches and then tie both ends together Do n...

Page 80: ...hread tension will be automatically set to 2 0 c Pull the bobbin and upper threads out by 50 mm approx 1 15 16 inches see page 28 a Upper thread b Bobbin thread c About 50 mm approx 1 15 16 inches d S...

Page 81: ...ng of sewing Press the Reverse Reinforcement Stitch button to sew a reinforcement stitch and trim the thread automatically at the end of sewing a About 12 mm approx 1 2 inch b Wrong side c Spread the...

Page 82: ...matic reinforcement stitching are preset reinforcement stitches will be sewn automatically at the beginning of sewing Press the Reverse Reinforcement Stitch button to sew a reinforcement stitch and tr...

Page 83: ...osition Appliqu Using a Zigzag Stitch Attach the appliqu material using a temporary spray adhesive or basting and then sew it Sew a zigzag stitch while positioning the right hand side needle drop poin...

Page 84: ...7 b Thread gimp thread through the hole in the cord guide bobbin cover from top to bottom Position the thread in the notch at the back of the cord guide bobbin cover a Notch b Gimp thread c Hole c Sna...

Page 85: ...sitioning the right hand side needle drop point just outside the edge of the fabric Stitch Stitch name Presser foot Applications Stitch width mm inch Stitch length mm inch Twin needle Auto Manual Auto...

Page 86: ...ch Twin needle Auto Manual Auto Manual Overcasting stitch Reinforcing of light and medium weight fabrics 3 5 1 8 2 5 5 0 3 32 3 16 2 0 1 16 1 0 4 0 1 16 3 16 NO Overcasting stitch Reinforcing of heavy...

Page 87: ...1 32 3 16 OK J Overcasting stitch Reinforcing of medium stretch fabric and heavyweight fabric decorative stitching 5 0 3 16 0 0 7 0 0 9 32 2 5 3 32 0 5 4 0 1 32 3 16 OK J Overcasting stitch Reinforcem...

Page 88: ...edle using the Automatic Threading button Stitch Stitch name Presser foot Applications Stitch width mm inch Stitch length mm inch Twin needle Auto Manual Auto Manual With side cutter Straight stitch w...

Page 89: ...the left side of the cut is underneath the presser foot a Guide plate lower knife b Presser foot g Thread the needle manually and pull out a long section of the upper thread Pass it below the presser...

Page 90: ...not be cut if the whole fabric is simply spread out underneath the presser foot guide plate Set the fabric as explained in step f from the previous section and then start sewing One layer of 13 oz de...

Page 91: ...mm approx 1 4 inch right seam allowance 5 5 7 32 0 0 7 0 0 1 4 2 0 1 16 0 2 5 0 1 64 3 16 NO Piecing stitch Middle Piecework patchwork 2 0 1 16 0 2 5 0 1 64 3 16 NO Piecing stitch Left Piecework patc...

Page 92: ...d backing is called quilting You can sew the quilt with the walking foot to keep the quilt top batting and backing from sliding The walking foot has a set of feed dogs that move together with the feed...

Page 93: ...n necessary c Turn the appliqu over and attach the thick paper with basting pins or a basting stitch d Select and attach presser foot J e Use the quilting appliqu stitch to attach the appliqu Sew arou...

Page 94: ...screen g Start sewing You can adjust the stitch width during sewing by moving the sewing speed controller Slide the lever to the left and the stitch width becomes narrower Slide it to the right the s...

Page 95: ...ontrol the feeding speed of the fabric to match the sewing speed If the fabric is moved faster than the sewing speed the needle may break or other damage may result When using free motion quilting foo...

Page 96: ...motion quilting foot C at the front with the presser foot holder screw aligned with the notch in the quilting foot a Presser foot holder screw b Notch f Hold the quilting foot in place with your right...

Page 97: ...lines on fabric with an uneven thickness Various stitches can be sewn using free motion open toe quilting foot O For details on the stitches that can be used refer to the Stitch Setting Chart at the...

Page 98: ...ress to cancel the free motion sewing mode Echo Quilting Using the Free motion Echo Quilting Foot E Sewing quilting lines at equal distances around a motif is called echo quilting The quilting lines w...

Page 99: ...CAUTION With free motion quilting control the feeding speed of the fabric to match the sewing speed If the fabric is moved faster than the sewing speed the needle may break or other damage may result...

Page 100: ...on the quilting foot as a guide sew around the motif a 6 4 mm approx 1 4 inch Finished project h Press to cancel the free motion sewing mode CAUTION Be sure to securely tighten the screws with the in...

Page 101: ...ting stitches d Attach blind hem stitch foot R and lower the presser foot Position the fabric so the folded edge touches the guide of the presser foot a Guide b Fold e Sew the fabric keeping the folde...

Page 102: ...ppliqu b Fabric glue b Select or Adjust the stitch length and width to correspond to the appliqu shape size and quality of material see page 49 c Attach presser foot J Check that the needle drops slig...

Page 103: ...rows of shell tuck stitches fold the fabric in half along the bias d Attach presser foot J Set the needle drop point slightly off the edge of the fabric and start sewing a Needle drop position e Unfo...

Page 104: ...eam allowance a Select a straight stitch and attach presser foot J b With the right sides facing each other sew two pieces of fabric together and then press open the seam allowance a Straight stitch b...

Page 105: ...l the bobbin threads to obtain the desired amount of gather and then smooth the gathers by ironing them f Select or g Sew the spaces between the straight seams h Pull out the straight stitch threads F...

Page 106: ...Place the tape over the gather and hold it in place with basting pins a Tape e Select or f Sew over the tape or elastic g Pull out the straight stitch threads Memo Use a thick thread Memo Be sure that...

Page 107: ...the open area Memo Use a light to medium weight homespun fabric with a little stiffness CAUTION The Automatic Threading button cannot be used Thread the wing needle by hand from front to back Refer t...

Page 108: ...t four threads leave five threads and then pull out four threads The width of five threads is approximately 4 mm approx 3 16 inch or less a Approx 4 mm approx 3 16 inch or less b Four threads pull out...

Page 109: ...4 0 2 1 0 1 64 1 16 NO Narrow squared buttonhole Buttonholes for light to medium weight fabrics 5 0 3 16 3 0 5 0 1 8 3 16 0 4 1 64 0 2 1 0 1 64 1 16 NO Wide squared buttonhole Buttonholes with extra s...

Page 110: ...of the buttonhole on the fabric c Pull out the button holder plate on the presser foot and insert the button that will be put through the buttonhole Then tighten the button holder plate around the bu...

Page 111: ...towards the pin a Basting pin b Seam ripper Note Pass the thread underneath the presser foot Slide the outside frame of the buttonhole foot backward as far as possible as shown in the illustration ma...

Page 112: ...nd then set the plate at the calculated value a Presser foot scale b Button holder plate c Completed measurement of diameter thickness d 5 mm approx 3 16 inch Memo For keyhole buttonholes use the eyel...

Page 113: ...e Note When changing the stitch settings for the left side of the buttonhole make sure that all setting should be changed to match Stitch Stitch name Presser foot Applications Stitch width mm inch Sti...

Page 114: ...titch to sew up the right side of the buttonhole and press the Start Stop button to begin sewing g Sew the right side of the buttonhole and press the Start Stop button again Sew the right side of the...

Page 115: ...sser foot making sure the upper thread passes underneath the buttonhole foot Stitch Stitch name Presser foot Applications Stitch width mm inch Stitch length mm inch Twin needle Auto Manual Auto Manual...

Page 116: ...and then press the Start Stop button to start the machine Once sewing is completed the machine automatically sews reinforcement stitches and then stops Memo If automatic thread cutting is turned on b...

Page 117: ...ot Applications Stitch width mm inch Stitch length mm inch Twin needle Auto Manual Auto Manual Bar tack Reinforcement at opening of pocket etc 2 0 1 16 1 0 3 0 1 16 1 8 0 4 1 64 0 3 1 0 1 64 1 16 NO M...

Page 118: ...nd stop automatically Bar Tacks on Thick Fabrics Place a piece of folded fabric or cardboard beside the fabric being sewn to level the buttonhole foot and allow for easier feeding a Presser foot b Thi...

Page 119: ...Gently hold the end of the upper thread and start sewing The machine stops automatically when sewing is finished g From the wrong side of the fabric pull the end of the bobbin thread to pull the uppe...

Page 120: ...lever toward you before sewing a Shank lever b Pull the two ends of the upper thread between the button and the fabric wind them around the shank and then tie them firmly together c Tie the ends of t...

Page 121: ...tion d Lower the presser foot and start sewing When sewing is finished the machine sews reinforcement stitches and stops automatically e Use the eyelet punch to make a hole in the center of the stitch...

Page 122: ...sew seam 1 as shown a Start Point d Select and sew seam 2 as shown The fabric will move sideways so guide the fabric by hand to keep sewing straight e Select and sew seam 3 as shown The fabric feeds f...

Page 123: ...ove presser foot J Align the right side of the pin in zipper foot I with the presser foot holder and attach the zipper foot a Right b Left c Needle drop position e Topstitch 7 to 10 mm approx 1 4 to 3...

Page 124: ...r opening e 3 mm approx 1 8 inch d Remove presser foot J e Align the right side of the pin in zipper foot I with the presser foot holder and attach the presser foot a Right b Left c Needle drop positi...

Page 125: ...ser foot holder When sewing the left side of the zipper the needle should drop on the right side of the presser foot When sewing the right side of the zipper the needle should drop on the left side of...

Page 126: ...SEWING THE STITCHES 114...

Page 127: ...Checking the Image 127 COMBINING STITCH PATTERNS 128 Before Combining 128 Combining Various Stitch Patterns 128 Combining Large and Small Stitch Patterns 130 Combining Horizontal Mirror Image Stitch...

Page 128: ...ch length and width e Cross stitch f Utility decorative stitch patterns g Alphabet characters gothic font h Alphabet characters handwriting font i Alphabet characters outline j Patterns saved in the m...

Page 129: ...patterns indicates that there is more than one stitch selection screen for that category Decorative Stitch Patterns 7mm Decorative Stitch Patterns Satin Stitch Patterns 7mm Satin Stitch Patterns Cros...

Page 130: ...the next page Press to view the previous page To select a different stitch pattern press When the current stitch pattern is erased select the new stitch pattern The selected pattern is displayed Alph...

Page 131: ...PATTERNS Character Decorative Stitches 119 4 Deleting Characters a Press to delete the last character b Select the correct character Memo Characters are deleted individually starting with the last ch...

Page 132: ...ching of stitches so be sure to attach a stabilizer material Guide the fabric with your hand to keep the fabric feeding straight and even during sewing Fabric When sewing on stretch fabrics lightweigh...

Page 133: ...e pattern c Compare the finished pattern to the illustration of the correct pattern below Memo If the fabric is pulled or pushed during sewing the pattern may not turn out correctly Also depending on...

Page 134: ...shorten If the pattern is skewed to the left Press in the FINE ADJUST HORIZ display The displayed value increases each time the button is pressed and the pattern will slide to the right If the pattern...

Page 135: ...inning key When sewing is stopped press this key to return to the beginning of the pattern 126 d Screen lock key Press this key to lock the screen When the screen is locked the various settings such a...

Page 136: ...he thread density of the pattern 126 m Delete key When you make a mistake selecting a stitch pattern use this key to delete the mistake When you make a mistake in combining stitch patterns use this ke...

Page 137: ...Creating a Vertical Mirror Image To create a vertical mirror image select a stitch pattern then press Creating a Horizontal Mirror Image To create a horizontal mirror image select a stitch pattern th...

Page 138: ...returns to the beginning of the selected pattern W from the point where sewing was stopped CAUTION If the stitches bunch when thread density is changed to return the thread density to If you continue...

Page 139: ...e screen a Press An image of the selected pattern is displayed b Press to change the thread color in the image The color changes every time you press the button c Press to display the enlarged image d...

Page 140: ...Single stitch sewing is automatically selected for sewing combined patterns If you want to sew the pattern continuously press after finishing the stitch pattern combination When changing sizes creatin...

Page 141: ...c Press The display returns to the stitch selection screen d Press e Select f Press to sew the pattern continuously Press to view the completed pattern see page 127 g Press Memo Patterns are deleted i...

Page 142: ...ns Example a Press The large size stitch will be selected b Press again then press to select the small size The pattern is displayed in a smaller size c Press to sew continuously The entered pattern i...

Page 143: ...ss again then press The pattern is flipped horizontally c Press The entered pattern is repeated Combining Stitch Patterns of Different Length Example a Press then press once The length of the image is...

Page 144: ...eate a step effect Stitch patterns sewn so that they create a step effect are called step stitch patterns Press to move the stitch pattern a distance equal to half of the stitch pattern s size to the...

Page 145: ...COMBINING STITCH PATTERNS Character Decorative Stitches 133 4 d Press The next stitch pattern will move to the left e Press The entered pattern is repeated More Examples Press Press Press Press...

Page 146: ...models IBM PC with a USB port as standard equipment IBM PC compatible computer equipped with a USB port as standard equipment Compatible operating systems Microsoft Windows 98SE Me 2000 XP Windows 98S...

Page 147: ...indows are registered trademarks or trademarks of Microsoft Corporation Each company whose software title is mentioned in this manual has a Software License Agreement specific to its proprietary progr...

Page 148: ...screen automatically If the Memory is Full If this screen appears while you are trying to save a pattern on the machine s memory the memory is too full to hold the currently selected stitch pattern To...

Page 149: ...ern saved in that pocket appears Press if you decide not to delete the stitch pattern a Pockets holding saved stitch patterns c Press A confirmation message appears d Press If you decide not to delete...

Page 150: ...ess b Insert the USB media into the USB port connector on the machine a USB port connector for media b USB media c Press Press to return to the original screen without saving The Saving screen is disp...

Page 151: ...for computer b USB cable connector The Removable Disk icon will appear in My Computer on the computer b Press c Press Press to return to the original screen without saving The stitch pattern will be...

Page 152: ...b Choose a stitch pattern to retrieve Press so the pattern saved in that pocket appears Press to return to the original screen without saving a Pockets holding saved stitch patterns c Press Press to...

Page 153: ...o sort two or more stitch patterns to USB media the stitch pattern in the subfolder is displayed Press to return to the original screen without recalling a Folder name b Stitch patterns in a folder sh...

Page 154: ...the original screen without recalling f Press Press to delete the stitch pattern The pattern will be deleted from the Removable Disk folder in your computer The selected stitch pattern is recalled an...

Page 155: ...Sewing 171 Restarting from the Beginning 171 Automatically Resuming Embroidery When the Power Goes Off 172 Manually Resuming Embroidery After Turning Off the Power 173 MAKING EMBROIDERY ADJUSTMENTS 1...

Page 156: ...in the embroidery frame 157 6 Pattern selection Turn the main power to ON and select an embroidery pattern 149 7 Embroidery frame attachment Attach the embroidery frame to the embroidery unit 162 8 Ch...

Page 157: ...remove the presser foot holder a Screwdriver b Presser foot holder c Presser foot holder screw Remove the presser foot holder f Position embroidery foot W on the presser foot bar so that the arm of e...

Page 158: ...r hands and foreign objects away from the embroidery carriage and frame when the machine is embroidering Otherwise injury may result If the embroidery unit could not be initialized correctly a buzzer...

Page 159: ...broidery patterns will not embroider with the correct registration Do not push on the carriage when installing the embroidery unit onto the machine Moving the carriage may damage the embroidery unit B...

Page 160: ...tton and pull the embroidery unit away from the machine a Release button CAUTION Do not carry the embroidery unit by holding the release button compartment Be sure to close the cover of the connection...

Page 161: ...he machine s memory You can also use patterns from the embroidery cards sold separately Once the machine has finished the initialization and the carriage has moved to the start position the pattern ty...

Page 162: ...his machine indicates that there is more than one pattern selection screen for that category Embroidery patterns Alphabet characters Floral alphabet patterns Frame patterns Baby Lock Exclusive Embroid...

Page 163: ...oider Press to view the next page Press to view the previous page The selected pattern is displayed c Press to create a mirror image of the pattern as needed If you make a mistake selecting the patter...

Page 164: ...character select the character and then press to change the size The size changes each time you press the key from large to medium to small If you make a mistake press to erase the mistake If the pat...

Page 165: ...s a Press b Press the key of the frame shape you want to embroider in the top part of the screen a Frame shapes b Frame patterns Various frame patterns are displayed at the bottom part of the screen c...

Page 166: ...le a Insert the card completely into the slot on the right side of the machine Insert the embroidery card so that the end with a printed arrow is facing the front b Press The patterns on the embroider...

Page 167: ...stitches are in the selected pattern and how many stitches have been sewn so far g Shows the time necessary to sew the pattern and the time already spent sewing the pattern not including time for cha...

Page 168: ...etter when sewing alphabet character patterns 184 t Memory key Saves a pattern in the machine s memory USB media or a computer 187 190 u Return key Press this key to return to the pattern type selecti...

Page 169: ...er batting etc you can sew more attractive embroidery by adjusting the embroidery presser foot height in the embroidery settings screen see below In the case of thick terry cloth towels we recommend t...

Page 170: ...Can embroider an area 2 cm 6 cm approx 1 inch 2 1 2 inches Use when embroidering connected or combined characters or patterns or when embroidering large patterns Use when embroidering patterns betwee...

Page 171: ...screw to keep the fabric from loosening after stretching After stretching the fabric make sure the fabric is taut Make sure the inside and outside frames are even before you start embroidering a Oute...

Page 172: ...frame d Remove the embroidery sheet Embroidering Small Fabrics or Fabric Edges Use an embroidery stabilizer to provide extra support After embroidering remove the stabilizer carefully Attach the stabi...

Page 173: ...PREPARING THE FABRIC Embroidery 161 5 Embroidering Ribbons or Tape Secure with double sided tape or a temporary spray adhesive a Ribbon or tape b Stabilizer a b...

Page 174: ...roidery frame s with the holder s a Arrow mark d Lower the frame securing lever to be level with the frame to secure the embroidery frame in the embroidery frame holder a Frame securing lever Removing...

Page 175: ...tion Watch the frame closely to make sure the pattern will be sewn in the right place a Press The following screen is displayed b From press the key for the position that you want to check a Selected...

Page 176: ...ed appears b Press to select the frame used in the preview Frames displayed in light gray cannot be selected Press to see a full screen preview The pattern can be sewn as it appears in the following d...

Page 177: ...cotton embroidery thread is recommended for use with this machine Other embroidery threads may not yield optimum results Bobbin thread Use embroidery bobbin thread intended for use with this machine W...

Page 178: ...thread d Press the Start Stop button to start embroidering When the first color is completely sewn the machine will automatically trim the threads and stop The presser foot will then automatically be...

Page 179: ...ress the Start Stop button again to restart the machine e Repeat steps d and e from the previous section Memo The Thread Trimming Function is originally set to trim excess thread jumps threads linking...

Page 180: ...will sew around the outline of the appliqu pieces and will then stop c Remove the appliqu material from the embroidery frame and then cut carefully along the stitching After cutting remove all of the...

Page 181: ...he appliqu material is a lightweight fabric you may want to use a fusible web on the back to stabilize the fabric and for appliqu placement Fuse appliqu in place with an iron Do not remove fabric from...

Page 182: ...ter the thread is automatically cut the carriage will move b Unlock the frame securing lever and remove the embroidery frame Be careful not to apply strong force to the fabric at this time Otherwise t...

Page 183: ...fore the spot where the thread broke If you cannot move back to the spot where the thread broke press to select the color and move to the beginning position of that color then use or to move ahead to...

Page 184: ...me The following message will appear c Attach the embroidery frame and press The previous sewing screen displayed before the machine was turned off appears d Press the Start Stop button to continue em...

Page 185: ...to the original screen e Press the Presser Foot Lifter button to lower the presser foot and press the Start Stop button to start sewing Note To continue a pattern that has had its position changed se...

Page 186: ...abric a Press b Press to weaken the upper thread tension The tension number will decrease c Press Upper Thread is Too Loose The tension of the upper thread is too loose resulting in a loose upper thre...

Page 187: ...ff press TENSION CUT key and then END COLOR TRIM b Press to turn off END COLOR TRIM The key will display as When one color thread is sewn the machine will stop without cutting the thread Note When thi...

Page 188: ...y b In the MAX EMBROIDERY SPEED display use to change the maximum embroidery speed You can choose from 3 different speed levels c Press Note If design has many trims it is recommended to select a high...

Page 189: ...to display the name of the thread colors the time or the embroidery thread number d When the thread number is displayed use to select from six embroidery thread brands pictured below e Press Memo Colo...

Page 190: ...Press c In the FRAME DISPLAY use to change the embroidery frame display mode There are 10 choices a Extra large frame embroidering area b Center line c Large frame embroidering area d Medium frame em...

Page 191: ...ttern can also be dragged by selecting it directly in the screen with your finger or the touch pen CAUTION When you have revised the pattern check the display of available embroidery frames and use an...

Page 192: ...REVISING THE PATTERN 180 Aligning the Pattern and the Needle Example Aligning the lower left side of a pattern and the needle a Mark the embroidery start position on the fabric as shown b Press ABC...

Page 193: ...tern proportionately Press to shrink the pattern proportionately Press to stretch the pattern horizontally Press to compact the pattern horizontally Press to stretch the pattern vertically Press to co...

Page 194: ...otate the pattern 90 degrees to the right Press to rotate the pattern 10 degrees to the left Press to rotate the pattern 10 degrees to the right Press to rotate the pattern 1 degree to the left Press...

Page 195: ...horizontal mirror image of the selected pattern Press again to return the pattern to normal Changing the Density Alphabet Character and Frame Patterns Only The thread density for some alphabet charac...

Page 196: ...return to the pattern selection screen Changing the Colors of Alphabet Character Patterns Combined alphabet character patterns can be sewn with each letter in a different color If MULTI COLOR is set t...

Page 197: ...Digital SD Card CompactFlash Memory Stick Smart Media Multi Media Card MMC XD Picture Card CAUTION When using embroidery data other than our original patterns the thread or needle may break when sewin...

Page 198: ...it is not attached the machine will manage embroidery data Tajima dst Embroidery Data dst data is displayed in the pattern list screen by file name the actual image cannot be displayed Only the first...

Page 199: ...the pattern is saved the display returns to the original screen automatically If the Memory is Full If the screen below displays either the maximum number of patterns have been saved or the pattern yo...

Page 200: ...ginal screen automatically a b Note Do not turn the main power to OFF while the Saving screen is displayed You will lose the pattern you are saving Memo If there is enough memory available after delet...

Page 201: ...n you want to save is in the sewing screen b Insert the USB media into the USB port connector on the machine a USB port connector for media b USB media c Press Press to return to the original screen w...

Page 202: ...My Computer on the computer b Press when the pattern you want to save is in the sewing screen c Press Press to return to the original screen without saving The pattern will be temporarily saved to Re...

Page 203: ...n to the original screen c Press The sewing screen is displayed Recalling from USB Media You can recall a specific embroidery pattern from either direct USB media or a folder in the USB media If the p...

Page 204: ...he current folder at the top of the list Embroidery patterns and subfolders within a folder are displayed Press to return to the previous folder d Press the key of the pattern you want to retrieve Pre...

Page 205: ...emovable Disk is written to the machine d Press The patterns in the computer are displayed on the selection screen e Press the key of the pattern you want to recall Press to return to the original scr...

Page 206: ...atly around the outside of the shape b Embroider the same pattern from step a onto the base fabric c Apply a thin layer of fabric glue or a temporary spray adhesive to the rear of the appliqu created...

Page 207: ...pattern embroidered in step a Be sure that the appliqu fabric completely covers the seam c Embroider the same pattern on the appliqu fabric d Remove the embroidery frame from the embroidery unit and...

Page 208: ...EMBROIDERY APPLICATIONS 196...

Page 209: ...Changing Alphabet Character Spacing 207 Reducing Character Spacing 208 Changing the Color of Each Alphabet Character in a Pattern 209 Changing the Thread Color 209 Creating a Custom Thread Table 210 A...

Page 210: ...the position on the LCD Rotate Patterns You can rotate patterns one degree ten degrees or ninety degrees at a time Enlarge or Reduce Patterns You can make patterns larger or smaller This function is n...

Page 211: ...f Patterns saved in the machine s memory see page 191 g Patterns saved in USB media see page 191 h Patterns saved on the computer see page 192 i Baby Lock Exclusive Embroidery Designs Memo See page 1...

Page 212: ...1 and 153 for more information on selecting patterns The pattern is displayed in the top part of the screen c Press The pattern selected for editing is outlined in red on the embroidery edit display d...

Page 213: ...ers c Press to change the layout of the pattern If the characters are too small to see press to view a display of all entered characters d Select the layout Example When selecting an arc use and to ch...

Page 214: ...PATTERNS TO EDIT 202 e Press to return to the original screen f After you finish your selections press The embroidery edit screen will appear g Proceed to see EDITING PATTERNS on page 203 to edit the...

Page 215: ...he size of the pattern currently selected c Shows the distance from the center of the frame d Shows the number of colors in the pattern currently selected e Shows the degree of rotation for the patter...

Page 216: ...or reduced 206 g Density key Press this key to change the density of frame patterns or character patterns 183 h Horizontal mirror image key Press this key to make a horizontal mirror image of the sele...

Page 217: ...le by which the pattern is rotated Press to rotate the pattern 90 degrees to the left Press to rotate the pattern 90 degrees to the right Press to rotate the pattern 10 degrees to the left Press to ro...

Page 218: ...pattern proportionately Press to shrink the pattern proportionately Press to stretch the pattern horizontally Press to compact the pattern horizontally Press to stretch the pattern vertically Press to...

Page 219: ...ern from the screen Changing the Configuration of Alphabet Character Patterns a Press b Press the key of the layout you want to embroider See page 201 for more information about layout types The displ...

Page 220: ...turn to the original screen Reducing Character Spacing The spacing between characters can be reduced to 50 of the narrowest character in the group Note It is not recommended to edit data and transfer...

Page 221: ...nt color Press to change the colors in the sewing order see page 209 a Color for each character Changing the Thread Color You can change the thread color by moving the color to be changed to the top o...

Page 222: ...nine different thread brands You can select any color and move the color to your custom thread table a Press and then press Press to display P 5 b Use to select where to add or change a color on the...

Page 223: ...ad color is set in the custom thread table f Repeat the previous steps until all desired thread colors are specified To delete a specified color from the palette select the color and press g Press to...

Page 224: ...nal screen Choosing a Color from the Custom Thread Table You can select a color from the up to 300 thread colors you have set in the custom thread table a Press The thread color palette screen display...

Page 225: ...the custom thread table by directly touching the screen with the touch pen a Custom thread b Custom thread table The display shows the changed colors e Press Designing Repeated Patterns Sewing Repeat...

Page 226: ...attern To widen spacing press To tighten spacing press f Complete repeated patterns by repeating steps c through e g Press to finish repeating a b c d Memo You can only adjust the spacing of patterns...

Page 227: ...allows you to design complex repeated patterns a Choose the direction in which the repeated pattern will be cut Press to cut horizontally Press to cut vertically The pattern direction indicator will c...

Page 228: ...al thread When sewing a series of patterns use the point of this arrow for positioning the following designs to be sewn a Press b Press Note Once you have cut a repeated pattern into separate elements...

Page 229: ...creen Press to return to the embroidery edit screen To combine the pattern with other patterns select the next pattern from this screen see page 219 See page 165 for more information about sewing patt...

Page 230: ...ing without repeatedly changing the upper thread or changing the sewing order manually Memo In combined stitch patterns that contain two or more border patterns or other patterns combined with border...

Page 231: ...mbroidery Edit 219 6 COMBINING PATTERNS Editing Combined Patterns Example Combining alphabet characters with an embroidery pattern and editing a Press to select an embroidery pattern b Use to view P 4...

Page 232: ...r Sewing After selecting press to change the character size to M then enter the remaining characters The characters you enter will be displayed in the center of the display g Press h Use to move the c...

Page 233: ...to change the color of the characters See page 209 for more information about changing the color Press to enlarge the preview of the embroidery pattern Use to view any part of the pattern that extends...

Page 234: ...finger or touch pen Sewing Combined Patterns Combined patterns will be embroidered in the order they were entered In this example the embroidery order will be as follows a Embroider by following the...

Page 235: ...d retrieve edited embroidery patterns to and from the machine s memory a personal computer or USB media Refer to the relevant sections in Chapter 5 on saving and retrieving embroidery patterns and fol...

Page 236: ...USING THE MEMORY FUNCTION 224...

Page 237: ...e Race 226 Cleaning the Bobbin Case 227 ADJUSTING THE SCREEN 228 Screen Visibility is Low 228 Touch Panel is Malfunctioning 228 TROUBLESHOOTING 230 ERROR MESSAGES 233 Alarm Sounds 238 SPECIFICATIONS 2...

Page 238: ...machine clean for best results a Press the Needle Position button to raise the needle b Turn the main power to OFF c Remove the needle and the presser foot holder see pages 37 through 39 d Remove the...

Page 239: ...per behind the notch of the spring to remove any dirt or dust a Tension plate base b Notch c Paper e g business card type d Tension spring e Bobbin case projection stopper c Use the included cleaning...

Page 240: ...reen until you can see it easily c Turn the main power to OFF and back to ON Touch Panel is Malfunctioning If the screen does not respond correctly when you touch a key the machine does not perform th...

Page 241: ...as an error In this case repeat the steps above d Turn the main power to OFF then turn it back to ON Note Only use the included touch pen to touch the screen Do not use a mechanical pencil pin or othe...

Page 242: ...ace etc Skipped stitches Machine is threaded incorrectly Check the steps for threading the machine and rethread it correctly 29 Using improper needle or thread for the selected fabric Check the Fabric...

Page 243: ...ectly 159 Stabilizing material was not attached Always use stabilizing material especially with stretch fabrics lightweight fabrics fabrics with a coarse weave or fabrics that often cause pattern shri...

Page 244: ...Start Stop button 3 Main power switch is not turned on Turn the main power to ON 10 Presser foot is not lowered Lower the presser foot 3 Start Stop button was pushed with the foot controller attached...

Page 245: ...This message is displayed when the motor locks due to tangled thread or for other reasons related to thread delivery This message is displayed if the is touched when an unusable embroidery card is ins...

Page 246: ...yed when the Start Stop button is pushed while the machine is in embroidery edit mode and a pattern is being edited This message is displayed when there are too many characters and the curved characte...

Page 247: ...yed when with the machine in embroidery mode and the small embroidery frame medium embroidery frame or large embroidery frame attached the selected pattern is larger than the embroidery area of the la...

Page 248: ...o use an editing function when the pattern is not completely within the red outline This message is displayed when is pressed when changing thread colors This message is displayed when you try to save...

Page 249: ...essage is displayed when the Presser Foot Lifter button is pushed while the presser foot lever is raised the needle is lowered This message is displayed when you attempt to select a pattern after the...

Page 250: ...essage is displayed when you try to use incompatible USB media This message is displayed when it seems that the upper thread has not been threaded correctly This message is displayed when is pressed t...

Page 251: ...inches W 12 1 2 inches H 11 1 8 inches D Weight 12 kg 27 lb with case 14 3 kg 32 lb Sewing speed 70 to 1000 stitches per minute Needles Home sewing machine needles HA 130 Embroidery Unit Dimensions 4...

Page 252: ...e LCD b Press c Insert the USB media into the USB port connector on the machine making sure the media only contains the upgrade file d Press The message Saving the upgrade file Do not turn main power...

Page 253: ...nnectors for the computer and for the machine Removable Disk will appear in My Computer d Copy the upgrade file to Removable Disk The Connected to PC Do not disconnect the USB cable message will appea...

Page 254: ...UPGRADING YOUR MACHINE S SOFTWARE 242...

Page 255: ...7 0 0 1 4 2 5 3 32 1 5 4 0 1 16 3 16 OK J Stem stitch Reinforced stitching sewing and decorative applications 1 0 1 16 1 0 3 0 1 16 1 8 2 5 3 32 1 0 4 0 1 16 3 16 OK J Decorative stitch Decorative sti...

Page 256: ...1 16 1 0 4 0 1 16 3 16 OK J With side cutter Straight stitch while cutting fabrics 0 0 0 0 0 2 5 0 3 32 2 5 3 32 0 2 5 0 1 64 3 16 NO With side cutter Zigzag stitch while cutting fabrics 3 5 1 8 3 5 5...

Page 257: ...0 1 16 0 0 7 0 0 1 4 1 2 1 16 0 2 4 0 1 64 1 16 OK J Patchwork double overlock stitch Patchwork stitches decorative stitching 5 0 3 16 2 5 7 0 3 32 1 4 2 5 3 32 1 0 4 0 1 16 3 16 OK J Couching stitch...

Page 258: ...3 16 NO Hemstitching Decorative hems 3 0 1 8 1 5 7 0 1 16 1 4 3 5 1 8 1 6 4 0 1 16 3 16 NO Hemstitching Decorative hems daisy stitch 6 0 15 64 1 5 7 0 1 16 1 4 3 0 1 8 1 5 4 0 1 16 3 16 NO Hemstitchi...

Page 259: ...ing attaching ribbon 7 0 1 4 5 0 7 0 3 16 1 4 1 6 1 16 1 0 2 5 1 16 3 32 NO Narrow rounded buttonhole Buttonhole on light to medium weight fabrics 5 0 3 16 3 0 5 0 1 8 3 16 0 4 1 64 0 2 1 0 1 64 1 16...

Page 260: ...1 5 7 0 1 16 1 4 0 4 1 64 0 2 1 0 1 64 1 16 NO 4 step buttonhole 2 Bar tack of 4 step buttonhole 5 0 7 32 1 5 7 0 1 16 1 4 0 4 1 64 0 2 1 0 1 64 1 16 NO 4 step buttonhole 3 Right side of 4 step butto...

Page 261: ...appliqu on tubular pieces of fabric and mitering corners NO Diagonally right down Straight For attaching appliqu on tubular pieces of fabric and mitering corners NO Sideways to left Zigzag For attachi...

Page 262: ...226 machine casing 226 race 226 Combining Patterns character decorative stitches 128 embroidery edit 219 Cord guide bobbin cover 72 Crazy quilt 72 Custom Thread Table 210 212 Cut Tension key 174 D Dar...

Page 263: ...Multi color key 184 209 Multi directional sewing 110 N Needle changing the needle 39 changing the needle position 65 fabric thread needle combinations 41 mode 11 twin needle 34 Needle bar thread guide...

Page 264: ...stitch foot 65 Straight stitch needle plate 65 Straight stitches 63 Supplemental spool pin 1 23 34 T Tape attaching 73 Tape or elastic attaching 94 Thread fabric thread needle combinations 41 thread t...

Page 265: ...Index 253...

Page 266: ......

Page 267: ......

Page 268: ...English 882 S95 XE2638 001 Printed in Taiwan...

Reviews: