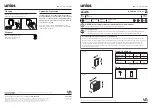
1. Remove 1/4-20 nuts from installed YKB
anchor kit with a socket. Keep the hardware
to reuse in the next step.
2. Line up then place base over installed 1/4-
20 nuts.
3. Secure to anchor bolts with the 1/4-20 nuts
and lockwashers provided with the YKB
Anchor kit using a socket.
Base & Tenon Installation
IMPORTANT SAFETY INFORMATION LISTED ON REVERSE
READ, FOLLOW, AND SAVE ALL SAFETY AND INSTALLATION INSTRUCTIONS
40429 Brickyard Drive • Madera, CA 93636 • USA
559.438.5800 • FAX 559.438.5900
www.bklighting.com • [email protected]
B-K LIGHTING
RELEASED DATE
09/03/2021
REFERENCE NUMBER
INS-2850-00
4.
Seal as per NEC with waterproof silicone
sealant (not included).
Yukon Bollard
Installation Instructions
If the fixture has a receptacle.
7. Secure receptacle cover by tightening #6-32 set
screw using a 7/64” allen wrench.
6. Attach receptacle to installed anchor base
with (4) #10-32 stainless steel countersunk
screws at the base using a 1/8” allen wrench.
5.
Pull primary branch circuit wiring and any
additional dimming controls or other wiring
necessary for installation (not included).
Attach ground from branch circuit to ground
lead on the anchor base. Place connectors
inside of the housing.
(Please refer to page
4 for wiring diagram.)