background image

12

AXOR Industries


Service Manual


Magnum400

TM 


ver.2 rel.05/'15

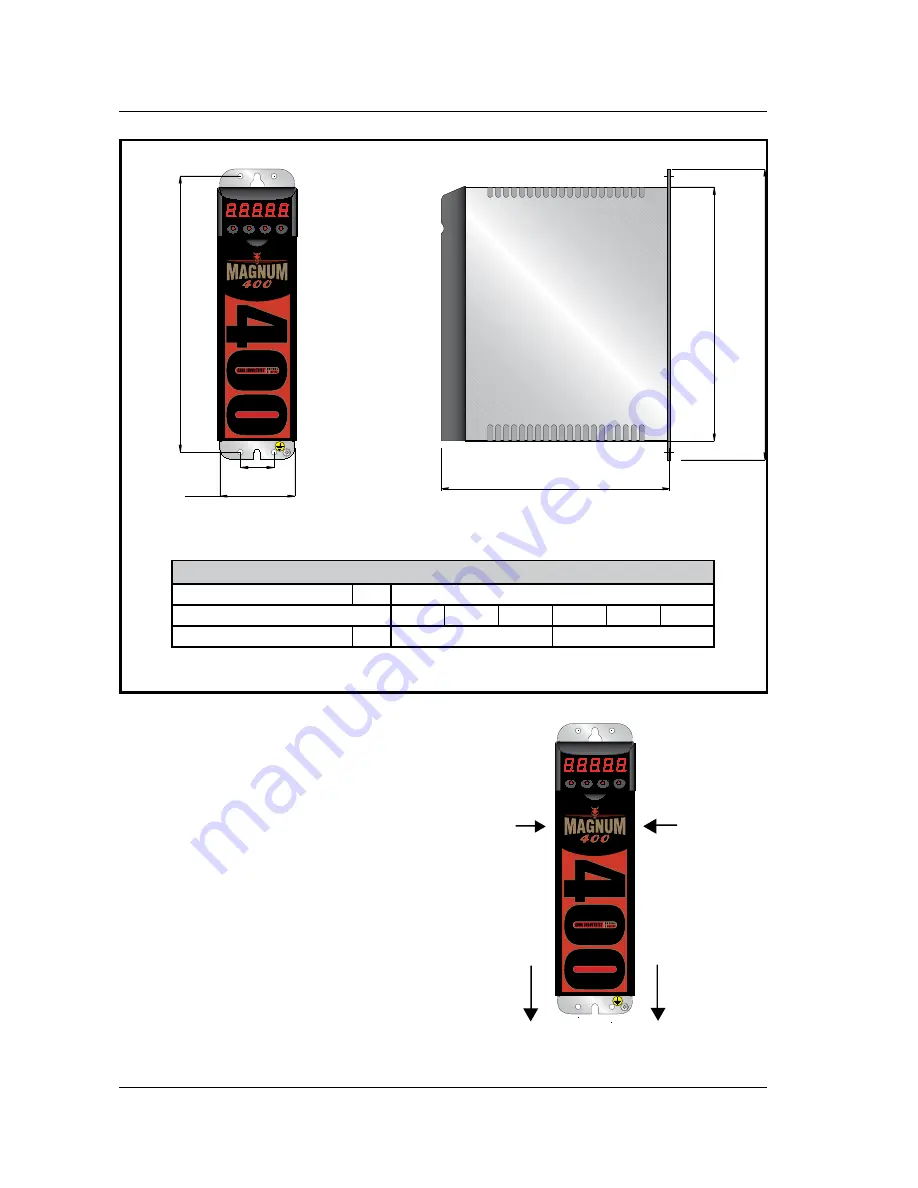
1.4 Mechanical Dimension

Dimension in: [mm]

UP

MODE

DWN

SET

A

A

B

B

73,5

270

247

284

223

33

UP

MODE

DWN

SET

noTe

The 

m1

 and 

m2

 connectors are located  

under the plastic cover. 

To open it, push the cover on the 

borders (see A), move it down and 

remove it (see B). 

Mechanical specifications

external dimensions

mm

284 x 223 x 73,5

Size

1,5/3

3,5/7

7/14

10/20 14/28 20/40

weight

Kg

4,2

4,6

Summary of Contents for MAGNUM 400

Page 1: ...AXOR Industries Service Manual Magnum400TM ver 2 rel 05 15 1...

Page 2: ...ng and Homing Procedures Corrections ver 1 rel 09 06 New paging Update chapters General Advices Installation Interfaces Di agnostic Appendix Insert chapter 7 Applications Insert Index Corrections ver...

Page 3: ...lation procedure 24 2 8 Example of base connection 25 2 9 Supply connections 26 2 10 Motor power connection 27 2 11 Rel OK and regen resistance connections 28 2 12 Digital inputs connection 30 2 13 Di...

Page 4: ...with the drive there are the following enclosures in pdf Operative Modes Manual Additional Features Manual Speeder One Interface Positioner Manual Display and Keypad Manual Alarms Manual ModBus Manua...

Page 5: ...s Service Manual Magnum400TM ver 2 rel 05 15 Chapter 1 Description 1 1 Description 6 1 2 General view Magnum400 9 1 3 Technical Data 10 1 4 Mechanical Dimension 12 1 5 Product plate and Ordering Code...

Page 6: ...der from a Master motor Electrical Axis or Gearing standard PULSE DIRECTION It is possible to connect the drive to a stepper motor controller piloting it with the Pulse and Dir signals Pulse Dir Mode...

Page 7: ...the drive standard 1 ANALOG DIFFERENTIAL or COMMON MODE INPUTS Vref It is used for piloting the drive with an analogue speed reference from an external controller standard 2 programmable ANALOG OUTPUT...

Page 8: ...l Safety Safety The converter is protected from short circuitry the Max Min Voltage the drive I2 t the Motor I2 t etc When there is an alarm the Rel OK contact opens and the motor is stopped or a mess...

Page 9: ...oder or Resolver signals M5 Connector Motor brake and braking circuit connections M3 Connector Auxiliary power supply 24Vdc M4 Connector Main supply J5 Connector RS232 comunication M2 Connector Analog...

Page 10: ...cy kHz 8 Control signals Optoisolated digital inputs 24Vdc 7mA PLC compatible Optoisolated digital outputs 24Vdc 50mA PLC compatible Analog programmable outputs 10V 5 A common mode analog input TPRC 1...

Page 11: ...line receiver AM26LS33 Differential hall signal inputs line receiver AM26LS33 Encoder max frequency 250kHz External Protections fuses or similar Size 1 5 3 and 3 5 7 7 14 and 10 20 14 28 and 20 40 Pow...

Page 12: ...A A B B 73 5 270 247 284 223 33 UP MODE DWN SET NOTE The M1 and M2 connectors are located under the plastic cover To open it push the cover on the borders see A move it down and remove it see B Mecha...

Page 13: ...93759999 M400 20 40 RXX S RO 0 0 0 0 0 X 00 Sxxx Dumping size RXX Internal standard resistor R5 500W external resisor opt 66 for 1 5 3 to 7 14 33 for 10 20 to 20 40 R10 1000W external resistor opt 33...

Page 14: ...14 AXOR Industries Service Manual Magnum400TM ver 2 rel 05 15...

Page 15: ...base connection 25 2 9 Supply connections 26 2 10 Motor power connection 27 2 11 Rel OK and regen resistance connections 28 2 12 Digital inputs connection 30 2 13 Digital outputs connections 31 2 14...

Page 16: ...the drive powered off without supply connections drive having a power supply 220VAC 1 year drive having a power supply 145VAC 200VDC 2 years After this time before enable the drive it is necessary ac...

Page 17: ...al and so forth During operation the converter surface can become hot Protect the user from accidental contact and keep the indicated distances from all objects Never loosen electrical connections whi...

Page 18: ...an integrated EMI anti disturbance filter at the 3 phase power supply input and with another EMI anti disturbance filter at the auxiliary 24V power supply input Being implicit to filter operation the...

Page 19: ...nt from those reserved to the command or control systems PLC PC CNC regulators This improves the level of immunity to interference of the system UP MODE DWN SET UP MODE DWN SET UP MODE DWN SET 30 1 18...

Page 20: ...Up to 1000m without restriction From 1000 to 2500m of altitude the converter must be derated in the output current of 1 5 every 100m Enclosure protection IP20 Pollution level LEVEL 2 Norm EN60204 EN5...

Page 21: ...ncoder signals 0 25 0 35mm2 22 24AWG It must be shielded It must have a capacity less than 120pF m for the Resolver signals 0 25 0 35mm2 22 24AWG for external resistor 1 5mm2 15AWG The cable must be a...

Page 22: ...TN pin of the digital inputs for each drive the 0V of the auxiliary supply the internal zero voltage of the CNC the earth terminals of the PLC CNC frames 2 Connect the ground bar to the zinced panel o...

Page 23: ...a u clamp Axor s cables have incorporated u clamp Note To reduce the capacitive and inductive coupling these cables must be run keeping a distance of more than 30cm from the power cables 10 cm if they...

Page 24: ...e it must be shielded utilising a u clamp to the zinced panel of the electrical box see 2 6 Note about cable shielding 5 If the internal braking resistor is used insert a bridge between pins INT and A...

Page 25: ...CHA CHB CHB CHZ CHZ PGND PULSE PULSE DIR DIR M2 VREF AGND DGT IN4 DGT IN5 DGT IN6 DGT IN7 DGT IN8 DGT IN9 TPRC AN OUT2 AGND RELE OK RELE OK V V 30VAC DC 500mA max 4 5 6 7 1 2 3 8 12 13 14 15 9 10 11...

Page 26: ...ach mo tor Pt Pn Pn Pn Pt nominal power of the transformer VA Pn nominal power of each motor VA which can be calculated in this way Pn n x Cn 9 55 Pn nominal motor power W n motor speed rpm Cn motor n...

Page 27: ...connection of the power cable s shield must be made on the zinc coated panel using a u clamp near the drive 20 50cm Motor side the shield is connected to connector s metal ring so it is connected to...

Page 28: ...and shielded The shield must be connected to ground on both ends utilising u clamps to the zinced panel of the electrical box Attention The internal braking circuit is enabled only if a bridge is pre...

Page 29: ...n be higher than 200 C Do not mount the resistor on surfaces which can be damaged by heat If the resistors are mounted externally protect them Respect the following distances and shieldings Axor exter...

Page 30: ...E S ENABLE DISABLE BY USING THE ENABLE INPUT IS NOT CONSIDERED A SECURITY FUNCTION The other inputs can be used to activate pre programmed functions of the drive for example limit switch electromechan...

Page 31: ...of the pre programmed functions see enclosure Speeder One Interface on the CD provided with the drive Max load for each output 50 mA Always use a relay with a diode in parallel MAGNUM400 TM CN 24VDC r...

Page 32: ...rement values The two outputs furnish 10Volt as the low scale setting refers to They can be set by the Speeder One interface Note We suggest to connect the shield on both sides drive side follow the i...

Page 33: ...raph 2 6 The technical characteristics of Vref inputs are as follows Voltage 10V Max Input impedance 40k ohm To change the sense of rotation apply the positive voltage reference to M2 1 or change the...

Page 34: ...ODER OUTPUTS connection LINE RECEIVER CN inputs COMMON MODE CN inputs Note We suggest connecting the shield on both sides drive side follow the indications illustrated on paragraph 2 6 CN GND CHA CHA...

Page 35: ...d on both sides drive side follow the indications illustrated on paragraph 2 6 Note We suggest to shield separatelly the couples of cable and to connect the shields together and to the PLC ground 12 1...

Page 36: ...puts connections Electrical Axis GEARING Connection Note We suggest connecting the shield on both sides drive side follow the indications illustrated on paragraph 2 6 12 13 MAGNUM400 TM Slave 14 15 M1...

Page 37: ...16 17 2 3 4 AGND 5V 17 pole connector Encoder 1 9 8 2 10 12 7 3 11 6 4 5 13 14 15 16 17 PE Motor Cable Drive Motor 20 50cm Max 25m 1 2 3 4 5 6 7 8 9 10 11 12 13 14 15 16 17 18 19 20 21 22 23 24 25 J1...

Page 38: ...nnector Resolver 1 9 8 2 10 12 7 3 11 6 4 5 PE 1 2 3 4 5 6 7 8 9 10 11 12 13 14 15 16 17 18 19 20 21 22 23 24 25 J1 connector Sub D 25 pole OPTIONAL RESOLVER FEEDBACK connection If the motor does not...

Page 39: ...or J4 connector of the first Magnum400TM and another resistor between pins 1 and 2 of the J3 or J4 connector of the last drive Axor drives use MODBUS communication protocol specified in the Modicon i...

Page 40: ...OR 120 Ohm 1 4W between pins 1 and 2 of the J3 or J4 connector of the last Magnum400TM 120 Ohm 1 2 3 J4 J3 J4 J3 MAGNUM400 1 MAGNUM400 2 CAN Server 120 Ohm CANH CANL PGND dc dc Converter 7 PGND 4 5 6...

Page 41: ...J4 J3 J4 J3 MAGNUM400 1 MAGNUM400 2 Master 120 Ohm A B PGND dc dc Converter 7 PGND 1 2 6 8 4 5 3 A B PGND dc dc Converter 7 PGND 1 2 6 8 4 5 4 5 3 dc dc Converter PGND 7 1 2 6 8 dc dc Converter PGND 3...

Page 42: ...lising the Enable key or the DGT IN1 digital input T T T T AUXILIARY SUPPLY MAIN SUPPLY RELE OK DGT IN1 HARDWARE ENABLE 24V 24V 0V 0V 1 0 ON OFF 1s 50ms 100ms 1 2 3 4 T T T 24V 24V 0V 0V ON OFF 1s DGT...

Page 43: ...and the Select Driver windows open simultaneously On the Select Driver window insert the drive s address all drives have 1 set as default value then click OK 5 If the drive is Not configured it is nec...

Page 44: ...menu c Connect the probe of the oscilloscope on pins AN OUT1 speed signal and AGND zero sig nal d Enable the drive e Adjust the KP and KI gains in a way that you obtain a stable step response in both...

Page 45: ...AXOR Industries Service Manual MAGNUM400TM ver 2 rel 05 15 45 Chapter 3 Diagnostic 3 Diagnostic 3 1 Display 46 3 2 Alarms 47...

Page 46: ...the Ref on function are both enabled the mo tor does not move segment appears rotating in a clockwise or counter clockwise direction The rotor is turning in a clockwise or counter clockwise direction...

Page 47: ...oscillation It is only a message This does not cause the disabling of the drive s functioning but it is possible to close the Rel OK contact during this alarm The current is limited to the rated one...

Page 48: ...contact and disables the drive Disconnect the power control the external connections control the current absorption of the motor brake verify the settings of the Holding Brake pa rameter on the Motor...

Page 49: ...of the shields in the green ca ble AL31 Intervention of the IMMEDIATE STOP function The drive has detected the possibility of a Run away Motor It only generates in Historical Alarm the massage AL5 EN...

Page 50: ...1 Connection to earth 22 Connection to ground 22 D Digital inputs 7 30 Digital output 7 31 Display 7 46 Disposal 16 E EMI filter 8 emulated encoder outputs 7 34 encoder connection 37 Environmental con...

Page 51: ...ion mode 6 RS485 interface 6 speed control 6 Torque control 6 Ordering code 13 P Positioning 19 Power supply 26 Product plate 13 Pulse Dir digital inputs 35 R Regen resistance 28 Rele OK 28 resolver c...

Page 52: ...ts machine plant still further or other standards or EEC guidelines are to be used EC Conformity The EC mark that is applied to the drives references to the Low Voltage Directive 2006 95 EC and EC Dir...

Page 53: ...53 AXOR Industries Service Manual Magnum400TM ver 2 rel 05 15...

Reviews: