background image

AIE100-T2NX Series U

ser’s Manual 


8


Introduction


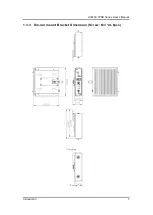
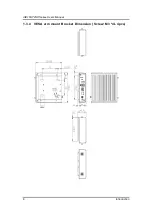
1.3.4  VESA arm mount Bracket Dimension (Screw: M3 *4L 4pcs) 


Summary of Contents for AIE100-T2NX Series

Page 1: ...AIE100 T2NX Series Edge AI Embedded System User s Manual...

Page 2: ...usefulness of any information in this document Axiomtek does not make any commitment to update any information in this manual Axiomtek reserves the right to change or revise this document and or produ...

Page 3: ...source is correct before connecting it to any power outlet 5 Turn Off system power before cleaning Clean the system using a cloth only Do not spray any liquid cleaner directly onto the screen 6 Do not...

Page 4: ...for use in the presence of a flammable anesthetic mixture with air oxygen or nitrous oxide 4 Mode of operation Continuous Note All of I O connectors should be connected with corresponding cables when...

Page 5: ...tention to components requiring designated products for cleaning as mentioned below Cloth A piece of cloth is the best tool to use when rubbing up a component Although paper towels or tissues can be u...

Page 6: ...or recycling and we will make the proper arrangement Trademarks Acknowledgments Axiomtek is a trademark of Axiomtek Co Ltd IBM PC AT PS 2 VGA are trademarks of International Business Machines Corporat...

Page 7: ...80 Key M SSD Drive 17 2 4 Installing the MicroSD Card 21 SECTION 3 JUMPER SETTING CONNECTOR 23 3 1 Jumper Connector Location 23 3 2 Connectors 25 3 2 1 Micro SD Slot CN1 26 3 2 2 Digital I O Connector...

Page 8: ...viii This page is intentionally left blank...

Page 9: ...ries supercomputer on a module to support Linux Ubuntu 18 04 suitable for the most endurable operation It features fanless design with full feature I O one 4 GB 128 bit LPDDR4 memory and enhanced syst...

Page 10: ...RT cuDNN CUDA Toolkit VisionWorks GStreamer and OpenCV all built on top of L4T with LTS Linux kernel O S Supported The AIE100 T2NX supports Linux Ubuntu 18 04 Various Storage devices supported For sto...

Page 11: ...connect PD Device or switch without PoE If you need PoE switch please find the switch with uplink port One USB 2 0 and one USB 3 1 Gen1 connectors Front access design for ease of updating NVIDIA Jetp...

Page 12: ...12VDC Operation Temperature 30 C to 60 C 22 F to 140 F Humidity 10 95 non condensation Vibration Endurance 3Grm w M 2 SSD Storage 5 500Hz X Y Z directions Weight 1 kg 2 20lb without package 1 6 kg 3 5...

Page 13: ...AIE100 T2NX Series User s Manual Introduction 5 1 3 Dimensions The following diagrams show you dimensions and outlines of the AIE100 T2NX 1 3 1 System Dimension...

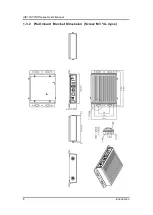
Page 14: ...AIE100 T2NX Series User s Manual 6 Introduction 1 3 2 Wall mount Bracket Dimension Screw M3 4L 4pcs...

Page 15: ...AIE100 T2NX Series User s Manual Introduction 7 1 3 3 Din rail mount Bracket Dimension Screw M3 4L 8pcs...

Page 16: ...AIE100 T2NX Series User s Manual 8 Introduction 1 3 4 VESA arm mount Bracket Dimension Screw M3 4L 4pcs...

Page 17: ...AIE100 T2NX Series User s Manual Introduction 9 1 4 I O Outlets The following figures show you I O outlets on front view of the AIE100 T2NX Front View drawing Rear View drawing...

Page 18: ...pad x 4 Screws Pack x 1 Thermal pad x 3 for M 2 M Key SSD Regarding the latest product manual please download them from Axiomtek official website 1 6 Model List AIE100 T2NX 1L1P Fanless Edge AI Syste...

Page 19: ...IPX2 rating may be affected if a system is dissembled or improperly assembled under such circumstances Axiomtek shall not be liable for any quality deterioration Besides assembling the optional IP42...

Page 20: ...the PCI Express Mini Card Step 1 Turn off the system and unplug the power adaptor Step 2 Turn the system upside down to locate screws at the bottom side as red marked and loosen four screws Step 3 Re...

Page 21: ...ard at a 45 degree angle up from horizontal slowly insert the golden fingers into the PCI Express slot until it is fully inserted in Step 5 Press it down gently but firmly and then secure the PCI Expr...

Page 22: ...lot and affix it with a screw For more details please refer to section 2 1 Installing the PCI Express Mini Card Step 2 Take the Antenna kit out of its box and remove the hex nut and washer from the An...

Page 23: ...es User s Manual Hardware Installation 15 Step 3 Install the antenna cable connector through the opening at the rear of the chassis Step 4 Put the washer and Hex nut into the antenna cable connector a...

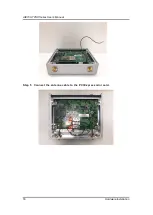
Page 24: ...AIE100 T2NX Series User s Manual 16 Hardware Installation Step 5 Connect the antenna cable to the PCI Express mini card...

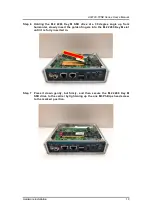
Page 25: ...the M 2 2280 Key M SSD Drive Step 1 Turn off the system and unplug the power adaptor Step 2 Turn the system upside down to locate screws at the bottom side as red marked and loosen four screws Step 3...

Page 26: ...AIE100 T2NX Series User s Manual 18 Hardware Installation Step 4 Take 3pcs thermal pads out of its box Step 5 Apply one thermal pad on the M 2 2280 Key M slot...

Page 27: ...at a 30 degree angle up from horizontal slowly insert the golden fingers into the M 2 2280 Key M slot until it is fully inserted in Step 7 Press it down gently but firmly and then secure the M 2 2280...

Page 28: ...SD drive may be different by the different manufacturers to avoid system damaged by forced closing of the bottom cover and improperly installed Please check M 2 thickness first to decide to apply how...

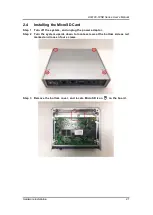
Page 29: ...Installing the MicroSD Card Step 1 Turn off the system and unplug the power adaptor Step 2 Turn the system upside down to locate screws at the bottom side as red marked and loosen four screws Step 3...

Page 30: ...AIE100 T2NX Series User s Manual 22 Hardware Installation Step 4 Turn the MicroSD card upside down and hold it with fingers at a 30 degree angle up from horizontal and then insert and press it gently...

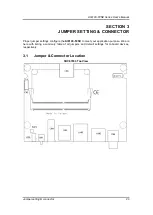
Page 31: ...3 JUMPER SETTING CONNECTOR Proper jumper settings configure the AIE100 T2NX to meet your application purpose We are here with listing a summary table of all jumpers and default settings for onboard d...

Page 32: ...umper setting connector SBC87903 Bottom View Note We strongly recommended that you should not modify any unmentioned jumper setting without Axiomtek FAE s instruction Any modification without instruct...

Page 33: ...on MicroSD slot CN1 3 2 1 Digital I O Connector Optional CN2 3 2 2 HDMI Connector CN4 3 2 3 USB2 0 USB3 1 Gen1 Connector CN5 3 2 4 DC in Connector CN6 3 2 5 PCI Express Mini Card slot SCN1 3 2 6 M 2 2...

Page 34: ...y option The digital I O is controlled via software programming 3 2 3 HDMI Connector CN4 The HDMI High Definition Multimedia Interface is a compact digital interface which is capable of transmitting h...

Page 35: ...USB1_D 8 USB_SS1_TX 3 USB1_D 9 USB_SS1_TX 4 GND 10 5V_USB2 5 USB_SS1_RX 11 USB2_D 6 USB_SS1_RX 12 USB2_D 13 GND 3 2 5 DC Power Jack w Screw CN6 The CN6 is a DC jack with screw Firmly insert at least 6...

Page 36: ...8 UIM_PWR 9 GND 10 UIM_DATA 11 REFCLK 12 UIM_CLK 13 REFCLK 14 UIM_RESET 15 GND 16 UIM_VPP 17 NC 18 GND 19 NC 20 WLAN_DISABLE Xavier NX s GPIO05 21 GND 22 NC 23 PEX2_RX 24 3 3V 25 PEX2_RX 26 GND 27 GND...

Page 37: ...18 3 3V 19 PEX2_RX 20 NC 21 GND 22 NC 23 PEX2_TX 24 NC 25 PEX2_TX 26 NC 27 GND 28 NC 29 PEX1_RX 30 NC 31 PEX1_RX 32 NC 33 GND 34 NC 35 PEX1_TX 36 NC 37 PEX1_TX 38 M 2_DEVSLP 39 GND 40 NC 41 PEX0_RX 42...

Page 38: ...ed to PCI Express Mini Card Connector SCN1 It is mainly used for 3G LTE wireless network application 3 2 9 Micro USB 2 0 Connector OTG SCN4 The SCN4 is specifically designed for image flashing only To...

Page 39: ...LAN2 PoE Pin Signal Pin Signal 1 Tx Data transmission positive 1 Tx Data transmission positive 2 Tx Data transmission negative 2 Tx Data transmission negative 3 Rx Data reception positive 3 Rx Data re...

Page 40: ...itch SSW1 If you turn OFF the Pin1 AT mode of SSW1 the system will be automatically power on without pressing soft power button during power input we can use this switch to achieve auto power on deman...

Page 41: ...nnector is for CMOS battery interface 3 2 16 Power and Storage LED Indicator LED1 The Yellow LED is linked to Solid state Drive SSD activity signal LED flashes every time SSD is accessed The power LED...

Page 42: ...AIE100 T2NX Series User s Manual 34 Jumper setting connector This page is intentionally left blank...

Page 43: ...please follow the instructions below to install Python first Step 1 Connect the Linux host system to internet Step 2 Install Python with the command below sudo apt get update sudo apt get install pyt...

Page 44: ...Example tar xvjf mfi_jetson tx2 nx JP4 6 2 AIE100 T2NX V1 0 0 tbz2 Step4 Change the directory to the image package folder with the command below cd image_file_name Command Example cd mfi_jetson tx2 n...

Page 45: ...d AIE100 T2NX will automatically reboot and please switch the recovery switch SSW2 to OFF to return to standard mode THE DEFAULT LOGIN CREDENTIALS Username nvidia Password nvidia CAUTION Running sudo...

Page 46: ...s User s Manual 38 Jetpack BSP Flash Method 4 2 Image Information Inquiry Command Running axiomtek sh command to inquiry the current image information image version L4T version Linux kernel version an...

Page 47: ...orm CPU RAM GPU status power mode management toolkits version and more Installation Guide Please connect to the internet and enter the following commands in the terminal to install JTOP sudo apt insta...

Reviews: