13
Chapter 2
2.5 Setting Jumpers
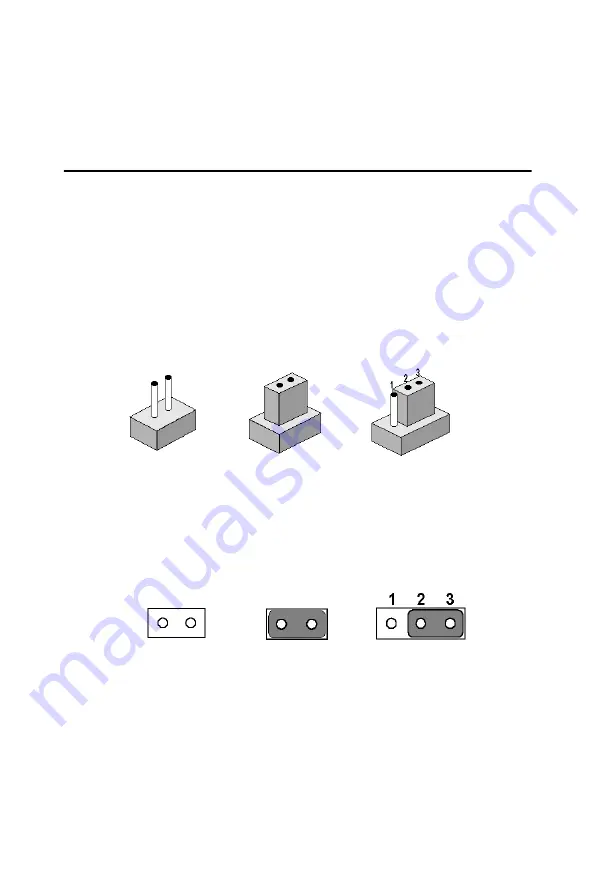
You may configure your card to match the needs of your application by
setting jumpers. A jumper is a metal bridge used to close an electric cir-
cuit. It consists of two metal pins and a small metal clip (often protected
by a plastic cover) that slides over the pins to connect them. To “close” a
jumper, you connect the pins with the clip. To “open” a jumper, you
remove the clip. Sometimes a jumper will have three pins, labeled 1, 2
and 3. In this case you would connect either pins 1 and 2, or 2 and 3.
The jumper settings are schematically depicted in this manual as follows:.
A pair of needle-nose pliers may be helpful when working with jumpers.
If you have any doubts about the best hardware configuration for your
application, contact your local distributor or sales representative before
you make any changes.
Generally, you simply need a standard cable to make most connections.
open
closed
closed 2-3
open
closed
closed 2-3
Summary of Contents for PCM-9371
Page 1: ...PCM 9371 ULV Intel SBC with CPU LCD LVDS Ethernet and Audio User s Manual ...
Page 10: ...PCM 9371 User s Manual x ...
Page 16: ...PCM 9371 User s Manual 6 ...
Page 20: ...PCM 9371 User s Manual 10 2 3 Locating jumpers Figure 2 1 Jumper locations ...
Page 21: ...11 Chapter2 2 4 Locating Connectors Figure 2 2 Connectors component side ...
Page 22: ...PCM 9371 User s Manual 12 Figure 2 3 Connectors solder side ...
Page 34: ...PCM 9371 User s Manual 24 ...
Page 41: ...CHAPTER 4 Award BIOS Setup This chapter describes how to set BIOS configuration data ...
Page 55: ...45 Chapter5 3 Click OK Figure 5 1 Selecting Display Settings ...
Page 61: ...51 Chapter5 2 Select Adapter then Change ...
Page 62: ...PCM 9371 User s Manual 52 3 Press Next then Display a list 4 Press the Have disk button ...
Page 66: ...PCM 9371 User s Manual 56 2 Choose the Settings tab and press the Display Type button ...
Page 67: ...57 Chapter5 3 Press the Change button ...
Page 71: ...61 Chapter5 2 Choose the Video Controller VGA Compatible button ...
Page 72: ...PCM 9371 User s Manual 62 3 Choose the Drive button press Update Driver button ...
Page 76: ...PCM 9371 User s Manual 66 2 Choose Hardware and Device Manager press OK button ...
Page 77: ...67 Chapter5 3 Choose Video Controller VGA Compatible press OK button ...
Page 82: ...PCM 9371 User s Manual 72 ...
Page 99: ...89 Chapter6 8 Press Next button 9 Press Finish to reboot ...
Page 100: ...PCM 9371 User s Manual 90 ...
Page 106: ...PCM 9371 User s Manual 96 7 2 3 Installation for Windows 2000 1 Open Device Manager ...
Page 107: ...97 Chapter7 2 ...
Page 108: ...PCM 9371 User s Manual 98 3 4 ...
Page 109: ...99 Chapter7 5 6 ...
Page 110: ...PCM 9371 User s Manual 100 7 8 ...
Page 112: ...PCM 9371 User s Manual 102 2 a Choose type of network b Click Next 3 a Click Select from list ...
Page 114: ...PCM 9371 User s Manual 104 6 Check the highlighted item and click OK ...
Page 115: ...105 Chapter7 7 Click Next to continue setup 8 Choose the networking protocols then click Next ...
Page 118: ...PCM 9371 User s Manual 108 ...
Page 121: ...111 AppendixA 1070 RETURN 2000 REM Subroutine 2 your application task 2090 RETURN ...
Page 122: ...PCM 9371 User s Manual 112 ...
Page 128: ...PCM 9371 User s Manual 118 ...
Page 149: ...Appendix E Optional Extras for the PCM 9371 ...
Page 151: ...Appendix F Mechanical Drawings ...
Page 153: ...143 AppendixF Figure F 2 PCM 9371 Mechanical Drawing Solder Side ...
Page 154: ...PCM 9371 User s Manual 144 ...


