


MAIN MENU
37
6.6 STORAGE
To copy recorded data for video backup, click
to add an item for backup. You can add several items to copy
different data you need.
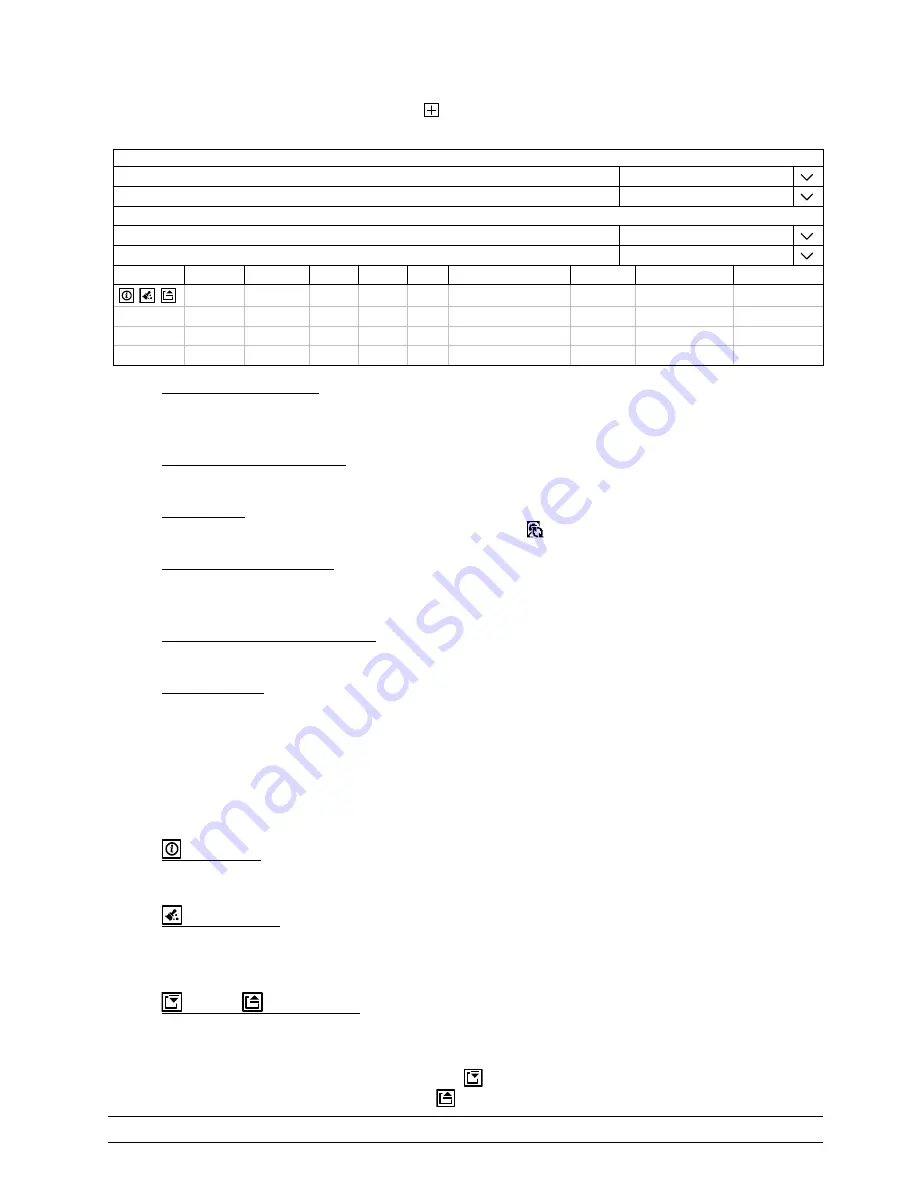
STORAGE
HDD NEARLY FULL (GB)
5
HDD OVERHEAT ALERT (°C)
70
OVERWRITE
ON
KEEP DATA LIMIT(DAYS)
OFF
TEMPERATURE TO ENABLE FAN
30
ID
TYPE
STATUS
SIZE TEMP.
SERIAL NUMBER
FREE SIZE
FORMAT TIME HEALTH STATUS
HDD5 NORMAL
READY 750GB 33°C WD-WCAV53797317 269.856GB
2017/07/18 23:03:52
GOOD
1) HDD NEARLY FULL (GB)
If
HDD BUZZER
is enabled in
MAINTAIN
, select the duration time for buzzer notifications when the hard
disk available capacity is 5/10/15/20 GB left.
2) HDD OVERHEAT ALERT (°C)
Select the temperature alert for your hard disk to be aware of the possible overheat of your hard disk.
3) OVERWRITE
Be defaults, the HDD overwritten function is set to ON, and
will be shown on the screen.
4) KEEP DATA LIMITS (DAYS)
Assign the maximum recording days from
1
to
31
after which all the recorded data will be removed, or select
OFF
to disable this function.
5) TEMPERATURE TO ENABLE FAN
Choose the temperature (
25
/
30
/
35
/
40
) to enable the built-in fan to work for heat dissipation.
6) HDD information
You can check the remaining capacity of the connected hard disk in this device and its current status.
If the health status goes to:
GOOD
- This hard disk works normal.
BELOW AVERAGE
- The hard disk might work with some errors. Please pay attention and do video backup if
needed.
REPLACEMENT NEEDED
– Please replace this hard disk immediately to ensure continuous video recording.
7)
HDD details
You can check the details of the selected hard disk.
8)
HDD formation
Click to format the selected hard disk and erase all data. When a hard disk is inserted to the recorder for the
first time, it’s compulsory to format the hard disk for it to work properly.
9)
Mount /
Unmount HDD
HDD hot-swapping is supported for this device. There’s no need to power off the device first to install or
remove a hard disk.
When a hard disk is installed, you’ll need to click
to manually mount the hard disk for it to work properly.
When you need to remove a hard disk, click
to unmount the hard disk and you’ll be able to remove it.
Note:
It’s not allowed to remove a hard disk directly.


