AVProEdge AC-MX-88X User Manual Download Page 8

8

11. 

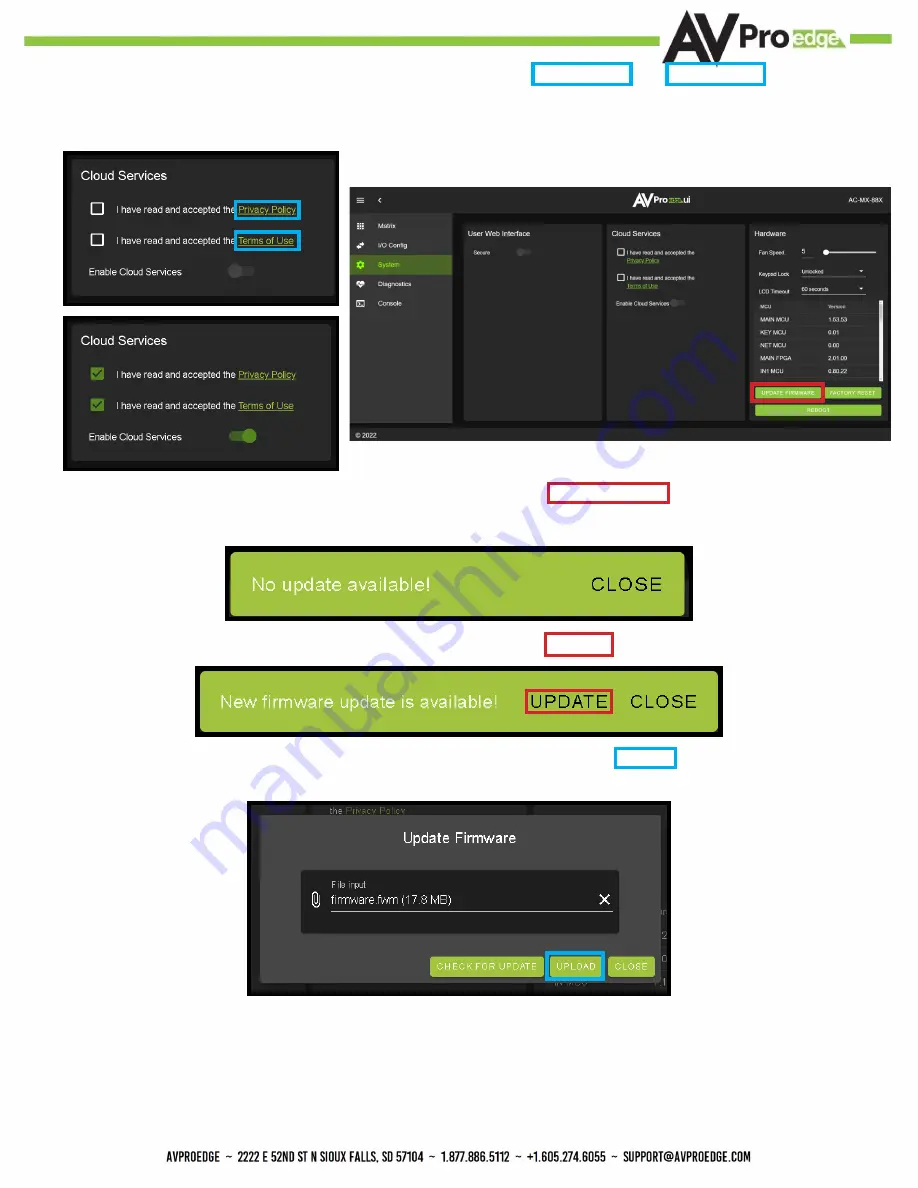
With the AVProEdge WebUI open, navigate to System.  Click on the  Privacy Policy  and  Terms of Use,  this will open 

these documents in a new tab for review.  Once read click on the boxes next to each to agree.  When both are checked 

the switch for Enable Cloud Services will be selectable (will be red or disabled by default).  Click to enable (the switch will 

turn green).

12. 

With the Cloud Services enabled under the Hardware section click the  Update Firmware  button to check for new 

Firmware OTA (over the air).  This will compare the firmware versions currently loaded on the AC-AXION-X and compare 

to the latest available.  If it is up to date, you will see a prompt stating “No update available!” 

13. 

If an update is available, the following prompt will show.  Simply click  UPDATE.


14. 

If a new update is available a file will automatically be selected, simply click the  UPLOAD   button to load the firmware 

files to the Matrix.  Uploading does not install the Firmware, that is the next step. 

Summary of Contents for AC-MX-88X

Page 1: ...1 User Manual 8K 8 8 Matrix with Ultrawide 40Gbps Bandwidth Input and Output Stages AC MX 88X 1...

Page 2: ...IG INPUT SET TINGS 17 W EBUI I O C ONFIG INPUT SET TINGS C ONT 18 W EBUI I O C ONFIG OUTPUT SET TINGS 19 W EBUI I O C ONFIG OUTPUT SET TINGS C ONT 19 W EBUI I O C ONFIG OUTPUT SET TINGS C ONT 20 W EBU...

Page 3: ...34 RS 2 3 2 AND TCP IP C ONTROL 35 C OMMA N D LIST 36 C OMMA N D LIST C ONTINUED 37 C OMMA N D LIST C ONTINUED 38 E XT R ACTED AU DIO 39 BA L ANCED 5 PIN 2CH AND TOSLINK AUDIO PORT SPDIF 39V AU DIO OU...

Page 4: ...formance with HDMI 2 1a devices With the unmatched pedigree of AVPro Edge behind it tradition never fails as the AC MX 88X lets you break convention and seek perfection Features HDMI Specification HDM...

Page 5: ...5 Specifications 5...

Page 6: ...ew 6 Input Select Button Front Panel Display Navigation Buttons IR Eye Output Select Buttons LAN Connection Extracted Audio 48V Power USB C ISP Control HDMI Outputs HDMI Inputs 3pin RS 232 Control 3 5...

Page 7: ...her manually enter in your desired IP settings or enable DHCP and let your network assign the correct settings Use the UP DOWN arrow keys to highlight the row you want to change HIP RIP TCP Port etc c...

Page 8: ...vices enabled under the Hardware section click the Update Firmware button to check for new Firmware OTA over the air This will compare the firmware versions currently loaded on the AC AXION X and comp...

Page 9: ...UPGRADE button to start 16 Once the progress bar hits 100 click the CLOSE button the firmware upgrade process is complete 17 With the Firmware up to date it s time to start setting up the matrix With...

Page 10: ...o sync now it is time to go through the rest of the settings to maximize the setup Starting on the input side with the EDID No Scaling default No scaling will be applied to that output 4K to 1080P Any...

Page 11: ...d but depending on the system both of these may need to be check for optimum performance Check the specifications on the devices in the signal chain to verify compatibility support Advanced Setup WebU...

Page 12: ...d syncs EDID No Scaling Default Signal remains untouched 4K to 1080P Down scales any 4K signal down to 1080P 4 4 4 to 4 2 0 Will convert any 4K Signal with a Video Clock above 500MHz with YUV 4 4 4 an...

Page 13: ...me slider This will bring up the Audio Configuration Page Here you can choose from 8 different EQ settings change the Left Right balance and set the audio delay Enable Disable Switch Volume control 1...

Page 14: ...14 6 Delay eight settings in 90 millisecond increments None default 90 180 270 360 450 540 and 630...

Page 15: ...eo INPUTS and OUTPUTS Click on the INPUT number to select example below shows IN 1 With the INPUT selected simply click on the OUTPUT you want to send that source to Note If you rename the INPUTS OUTP...

Page 16: ...nput default or Bind to Output then this tab will not be visible example below See Page 14 Advanced Setup WebUI Extracted Audio Output Settings for more info Click on the INPUT number to select exampl...

Page 17: ...ote There is a 15 character limit to this field the name will replace the default IN throughout the rest of the WebUI for instance the Video Matrix tab Input Settings Enable switch Use this enable dis...

Page 18: ...080P_8CH 4 1080P_3D_2CH 5 1080P_3D_6CH 6 1080P_3D_8CH 7 4K30HZ_3D_2CH 8 4K30HZ_3D_6CH 9 4K30HZ_3D_8CH 10 4K60HzY420_3D_2CH 11 4K60HzY420_3D_6CH 12 4K60HzY420_3D_8CH 13 4K60HZ_3D_2CH 14 4K60HZ_3D_6CH 1...

Page 19: ...output This is helpful in verifying the signal chain from Matrix to sync display To disable the test pattern change the state back to Enabled default Output Settings Video Scaling The HDMI outputs ea...

Page 20: ...fault this will be Enabled Green To change the setting simply click to switch Disabled Red there will be no Audio passed on that extracted audio port both Toslink and balanced 5pin will be muted Outpu...

Page 21: ...ce Use this slider to adjust the Left Right balance Note Default is 0 zero value can be 10 10 Output Settings Delay ms Audio delay drop down has eight available settings these are measured in millisec...

Page 22: ...s drop down has two options Manual Automatic DHCP Default out of the box will be set to Automatic DHCP the IP Address Subnet Mask Gateway Primary DNS and Secondary DNS will be assigned by your network...

Page 23: ...Up Down arrow buttons to increase decrease the number WebUI System Admin Web Interface This switch has two options Red Disabled Default and Green Enabled When enabled green there will be three fields...

Page 24: ...hange Default Username user Default Password user123 Once the desired Username and Password has been entered click the green APPLY button to set Note The web page will reload to the Log In page With b...

Page 25: ...use the System tab to check for new Firmware OTA over the air This will check the firmware versions currently loaded on the AC MX 88 and compare to the latest available If it is up to date you will se...

Page 26: ...simply leave all files options selected If the version currently installed not newer then that update will be skipped automatically Once the progress bar hits 100 click the CLOSE button the firmware u...

Page 27: ...nection Input Settings EDID Use these four drop downs to select your preferred EDID The available combinations are as follows 1 1080P_2CH 2 1080P_6CH 3 1080P_8CH 4 1080P_3D_2CH 5 1080P_3D_6CH 6 1080P_...

Page 28: ...will see a canned 1080P No 3D SDR 2CH EDID applied to IN 1 Any EDID change once applied will display here Signal Info shows the connected source s current output information This includes Timing Colo...

Page 29: ...Reset Connected Device EDID shows the connected sync s preferred EDID information and current state This includes Manufacturer Monitor Name Sink Device Type Preferred Timing Supported Audio Formats 3d...

Page 30: ...ox and type a GET STA Click the green arrow or hit ENTER RETURN on your keyboard The the command response will show in the field below CLEAR CONSOLE Button This button will clear the current console s...

Page 31: ...y or Sink Device you would like to send to a source 2 Once pressed the front panel display will change to the SWITCH menu showing the current IN OUT routes Press the corresponding OUTPUT button top ro...

Page 32: ...read the EDID from the desired output and the captured EDID will automatically store and overwrite the EDID in USER EDID 1 and will be applied to the selected source Use the arrow keys to highlight E...

Page 33: ...to Matrix you can use the INPUT OUTPUT Buttons to route the audio Press OUTPUT number first then the INPUT number next Front Panel Control Network This menu displays the current Network information Y...

Page 34: ...ed with the product battery not included requires CR2025 The labels on the left are the OUTPUT numbers The arrow buttons are for cycling through the INPUTS Pressing the left arrow will decrease move t...

Page 35: ...e for sending commands to the machine For TCP IP control commands use Telnet Port 23 For RS 232 use a null modem serial cable adapter and set the serial communications to 57600 n 8 1 baud 57600 no par...

Page 36: ...36 Command List Baudrate 57600 Checksum None Bit Num 8 Stop Bit 1...

Page 37: ...37 Command List Continued...

Page 38: ...38 Command List Continued...

Page 39: ...available to be able to route audio however you want This can be used as a separate zoned audio matrix with only using an amplifier Setting up Extracted Audio Routing You can set up Extracted Audio Ro...

Page 40: ...Down mixing on this version see AC AXION 4 Toslink Audio Port Toslink extracted audio ports support up to 5 1 digital audio You can use balanced analog outputs in a balanced system but you can also p...

Page 41: ...Diagnostics section of the WebUI to verify the HDMI Input Output status and EDID settings Page s 27 29 Diagnostics page indicates everything is good but still not getting a picture this may be a band...

Page 42: ...42 Bandwidth Chart...

Page 43: ...43 Bandwidth Chart Continued...

Page 44: ...ently Repair of the equipment should only be carried out by qualified professionals as these products contain sensitive components that may be damaged by any mistreatment Only use this product in a dr...

Page 45: ...tion too but it s YOUR call 3 We know you know what you are doing We will not make you go through unnecessary steps to troubleshoot an extender COVERAGE DETAILS AVPro Edge will replace or repair at cu...

Page 46: ...ings LLC is not responsible for direct special incidental or consequential damages resulting from any breach of warranty or condition or under any other legal theory to the maximum extent permitted by...

Page 47: ...47...

Page 48: ...48...

Page 49: ...9 Thank you for choosing AVProEdge Please contact us with any questions we are happily at your service AVProEdge 2222 E 52nd St N Sioux Falls SD 57104 1 877 886 5112 605 274 6055 support avproedge com...

Reviews: