background image

User’s Manual


7-9


7.5


Replacing the ADF Rollers 

After scanning approximately 200,000 pages through the ADF, 
the ADF roller may be worn out and you may experience 
problems with document feeding.  In this case, you may need to 
replace a new ADF roller.  For ordering the ADF roller, please 
consult your nearest dealer and follow the procedure below to 
replace it.  


Disassembling Procedure 

 
1.


Press the ADF release button to open the front door.  
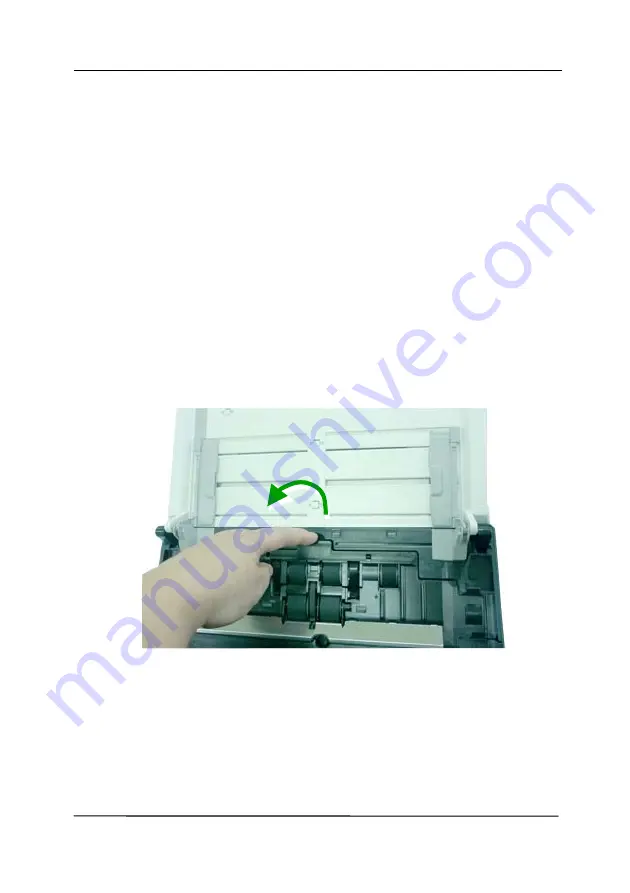
2.


Pull the center of the roller cover to open it.  


Summary of Contents for AD 250F

Page 1: ...Document Scanner User s Manual Regulatory model DL 1409B Avision Inc...

Page 2: ...ieval system or translated into any language or computer language in any form or by any means electronic mechanical magnetic optical chemical manual or otherwise without the prior written permission o...

Page 3: ...and 2 this device must accept any interference received including interference that may cause undesired operation The FCC Class A limits are designed to provide reasonable protection against harmful i...

Page 4: ...5 EU CE compliance of this product is valid if powered with the correct CE marked AC adapter provide by Avision This product satisfies the Class A limits of EN55022 EN55024 safety requirements of EN 6...

Page 5: ...drop off your waste equipment for recycling please contact your local city office your household waste disposal service or the shop where you purchased the product As an ENERGY STAR Partner Avision I...

Page 6: ...any other AC power adapter could cause fire electrical shock or injury Use only the AC power cord and USB cable that came with your device and avoid abrasions cuts fraying crimping and kinking Using a...

Page 7: ...ck or injury Do not insert objects into any opening as they may touch dangerous voltage points or short out components Beware of electrical shock hazards Unplug the device and the AC power adapter and...

Page 8: ...n the unit It may cause unbalance and the device may fall down This may result in injury Store the AC Power cord USB cable bundled out of the reach of children to avoid the risk of injury Keep plastic...

Page 9: ...le page document from the flatbed Before you install and operate the new scanner please take a few minutes to read through this manual It provides proper instructions for you to unpack install operate...

Page 10: ...APD included in the machine Using other AC adapters may damage the machine and void the warranty 2 Please unpack the packing carefully and check the contents against the checklist If any items are mis...

Page 11: ...hen scanning document Paper Guides Adjusts to the width of the documents to prevent skewing of the scanned pages Operation Panel LCD screen Shows a number indicating a scan to destination via the Up D...

Page 12: ...document on the glass platen Paper Stopper Adjust to the length of the documents to prevent them from falling apart 1 3 Rear View Power Jack USB Port Part Name Function USB Port Connect to your compu...

Page 13: ...xcessive heat may cause damage to the unit Do not install the scanner in a humid or dusty place Be sure to use the proper AC power source Place the scanner securely on an even flat surface Tilted or u...

Page 14: ...locate the lock switch Move the lock switch to the unlocked position If you need to transport the machine please move the lock switch to the Locked position Before doing this make sure the scan unit...

Page 15: ...ur scanner Insert the other end to an appropriate power outlet 2 4 Turning on the Power Press the Power Switch button on the front panel the Power LED will flash When it is finished and ready to scan...

Page 16: ...ation of scanner driver is completed this scanner allows you to scan via a TWAIN ISIS or a WIA interface Start your TWAIN compliant image editing software application to select a TWAIN or WIA user int...

Page 17: ...lease FIRST install scanner driver before installing Button Manager V2 Install AVScan X To scan and organize your multi page document s you can install the software application to manage them easily a...

Page 18: ...SB port at the rear side of your computer 2 The computer should detect a new USB device and prompt a New Hardware Found message 3 By following the on screen instructions click the Next button to conti...

Page 19: ...Completing Your First Scan 3 1 Placing Your Document on the Flatbed Open document cover Place your document FACE DOWN on the document glass and align the document to the reference mark as indicated C...

Page 20: ...t s can range in size from 50 x 50 mm 2 x 2 in to 216 x 356 mm 8 5 x 14 in Document s can range in weight from 27 413 g m2 7 110 lb ID cards up to 1 25 mm 0 05 in thick Document s should be square or...

Page 21: ...r documents and align the top edges before feeding them into the scanner 1 Hold both ends of the documents and fan them a few times 2 Rotate the documents by 90 degrees and fan them in the same manner...

Page 22: ...User s Manual 3 4 Document Feeding 1 Unfold the document feeder and its extension 2 Unfold the output tray and raise the paper stopper...

Page 23: ...User s Manual 3 5 3 Raise the paper guide to hold your multi page document 4 Load the stack of document face down with the top of the pages pointing into the feeder...

Page 24: ...User s Manual 3 6 5 Verify that the paper guides are aligned with the edges of the stack...

Page 25: ...veniently load the letter size document If your document width is larger than 216 mm 8 5 in If your document width is larger than 216 mm 8 5 in such as invoices with punch holes slide the Paper Width...

Page 26: ...User s Manual 3 8 Slide UP the Paper Width switch to set your paper width larger than 216 mm 8 5 in...

Page 27: ...rent sizes and weights be sure to follow these guidelines to avoid a skewed image or a paper jam 1 Align the documents TOP EDGE first in the sequence of paper size from large to small 2 If two pages a...

Page 28: ...Align the edges of the documents by tapping the bottom of the stack against the table top 4 Center these pages in the document feeder and make sure that the edges of page of the largest size slightly...

Page 29: ...pper Raise the Paper Stopper and slide it to the right or to the left according to the paper size you are loading from the auto document feeder The paper stopper is used to arrange your document so th...

Page 30: ...The following procedure describes how to verify your scanner installation If the installation is not correct please review the preceding section to check if the cable connection and scanner driver ha...

Page 31: ...ype your desired folder name and file name in the File Path box Default is C Documents and Settings User Name My Documents My Scan Image Note If you do not wish to save the scanned image deselect the...

Page 32: ...earn more details about the Scanner Properties dialog box please see the subsequent chapter Using the Scanner Properties Dialog Box 8 Place your document face down on the document glass or face up in...

Page 33: ...lay View Thumbnail View 11 You can view the scanned image in Fit Page or Actual Size 100 button from the Viewing toolbars at the right side 12 Click the Close box or Quit from the File menu to exit th...

Page 34: ...to scan Options vary based on type of scanner 3 Brightness Adjust the brightness level from 100 to 100 4 Contrast Adjust the contrast level from 100 to 100 5 Resolution Determine the quality of the sc...

Page 35: ...canner s settings It consists of several tabbed windows each of which will be described in this chapter Note In this chapter all options are available based on a duplex double side scanner If you have...

Page 36: ...rties Dialog Box The buttons on the Scanner Properties dialog box Buttons Description Defaults Click the Defaults button the factory default settings will be shown on each tab Cancel Click the Cancel...

Page 37: ...or Dropout None Paper Cropping Automatic Deskew Yes Orientation Portrait OverScan 0 00 Note The availability of this option varies due to scanner model Unit Inch Multi Feed Detection None Preview None...

Page 38: ...ter Note the options vary based on scanner model 2 Choose the tab you want to display The selected tab will be shown with a check mark and then displayed in the Scanner Properties dialog box 3 To acce...

Page 39: ...User s Manual 4 5...

Page 40: ...that except for the resolution you can set individual scan settings for the front side and the rear side For example all settings in the Image tab Compression tab Color Dropout tab can be set individu...

Page 41: ...ent side option If you wish to scan both the front side and the rear side of your color document you can check both Front Color and Rear Color at the same time Note the options vary based on type of s...

Page 42: ...Side Image Selection Front Rear Image Type Description Color Choose Color if you wish to scan a color image for your original in color Gray Choose Gray image if your original contains actual shades o...

Page 43: ...election option This option is useful when you have a mixture of color and non color document Note If you choose Front Rear Auto Color Detection you can not specify the image mode of your rear page an...

Page 44: ...t wish them to be recognized as color image to save the file size you can increase the sensitivity value by moving the bar to the right to let these images to be detected as B W The value ranges from...

Page 45: ...h sides of your documents After checking this option any settings you have changed will automatically applied to both the front side and the rear side For example if you choose your ideal resolution t...

Page 46: ...o produce the highest quality image This is used to scan mixed document containing faint text shaded background or color background with a single setting If Dynamic Threshold is selected Threshold Bri...

Page 47: ...is selected Contrast is not available Halftone In addition to the black and white display Halftone can present a somehow gray shade of image by using different size of dots Halftone image looks like...

Page 48: ...User s Manual 4 14 Error Diffusion Image Dynamic Threshold Dynamic Threshold AD...

Page 49: ...and can be used to subdue backgrounds and subtle unneeded information A high threshold value produces a darker image and can be used to help pick up faint images Adjust the threshold setting by dragg...

Page 50: ...se Photo if your original contains photo to reproduce your photo in vivid grayscale image When using Photo no Threshold and Contrast can be adjusted Normal When using Normal Threshold Brightness and C...

Page 51: ...User s Manual 4 17 Normal Photo Document Threshold 230 Normal Photo Document Threshold 230...

Page 52: ...the brightness The range is from 100 to 100 Contrast Adjusts the range between the darkest and the lightest shades in the image The higher the contrast the bigger the different grayscale Drag the sli...

Page 53: ...ly 25 MB of disk space A higher resolution usually means over 600 dpi is only recommended when you need to scan a small area at True Color mode Choose a resolution value from the drop down list The de...

Page 54: ...changed into its complementary color at the command of Invert Black on White White on Black Scan Source Choice Auto Document Feeder Used to scan multiple pages Flatbed Used to scan a single page For e...

Page 55: ...r in the front tray Choose Merge Two Sides from the Scan Source option and then the scanner is able to scan both sides of your document and merge two A4 images into one A3 image When you select Merge...

Page 56: ...Vertically Merge Vertically Back Side Flip If the reverse side of your document is upside down choose Merge Vertically Back Side Flip and the back side will be automatically rotated 180 degrees and me...

Page 57: ...ors of the image Choice None Document Photo None Choose None to disable this option Document Choose Document if your original contains pure text or a mixture of text and graphic since it is an optimal...

Page 58: ...nvert 4 3 4 Scanning grayscale images The following options are available for scanning gray images Brightness Contrast Resolution Invert 4 3 5 Scanning B W images The following options are available f...

Page 59: ...ng or deleting them To add a new profile 1 Customize your settings For example change your resolution image type cropping method scan size or other scan settings 2 Click the Image tab and then choose...

Page 60: ...ediately loaded and displayed on Scanner Properties dialog box To delete a profile 1 From the Image tab dialog box click Profiles to prompt the Edit Your Profile dialog box 2 Choose the profile you wa...

Page 61: ...Note The preset default profiles include Flatbed Simplex B W 200 dpi Simplex Gray 200 dpi Simplex Color 200 dpi Duplex B W 200 dpi Duplex Gray 200 dpi Duplex Color 200 dpi If you have a simplex or a s...

Page 62: ...ds on your image editing application If your image editing application does not support the type of compression format then either a warning message will appear or the image quality of the compressed...

Page 63: ...en compressed using JPEG technology Move the Image Quality slider to the right or left to increase or decrease your image quality Note the greater the image quality the lower the compression level Def...

Page 64: ...User s Manual 4 30 The Compression tab dialog box...

Page 65: ...one Does not remove any color Auto Automatically outputs the image with the details of the primary color removed Remove Red Remove Green Remove Blue Outputs the image with the details of the specified...

Page 66: ...t corner and choose Tab to show available tab names 2 Choose Preview to show the Preview tab 3 Click the Preview tab to show the Preview page 4 Load your document to the scanner and click the Preview...

Page 67: ...now becomes an Eyedropper 8 Click to select a color which you wish to remove 9 Click and hold your mouse button to view the result after removing the specified color If the result is satisfactory cli...

Page 68: ...User s Manual 4 34 The Color Dropout dialog box...

Page 69: ...a color on the Color palette 1 Click the Color Dropout tab from the Scanner Properties dialog box 2 Choose Gray or B W from the Image Selection box and click Custom from the Color Dropout drop down me...

Page 70: ...User s Manual 4 36 3 Move your cursor over the palette The cursor becomes a cross sign 4 Click to choose a color The RGB values are changed simultaneously...

Page 71: ...User s Manual 4 37 4 6 The Paper Tab The Paper tab allows you to define values relating to image output i e Auto Crop or not Scan Area OverScan Multi Feed Detection The Paper tab dialog box...

Page 72: ...zed documents Automatic 36 Automatically adjusts the cropping window according to different document sizes smaller than 36 and automatically straighten a skewed image Use this option for batches of mi...

Page 73: ...s ID Cards or business cards on the flatbed if available and lets you create multiple individually cropped images in one scan Note To correctly create multiple images please make sure there is at leas...

Page 74: ...d relocate the scan area by click the arrow key on the cross sign while retain the scan size View the result from the Display window The Adjustment option is available when Automatic is selected Adjus...

Page 75: ...ppears in a consistent area on the document such as resumes and so on The following procedure describes how to reproduce the entire document in B W and a portion of document picture in color 1 On the...

Page 76: ...elative scan area A black rectangular box The Preview Image The Preview Button 5 Select image type from the Image Selection box The selected image will appear in highlighted color For example Front Co...

Page 77: ...Area 7 Check the B W image from the Image Selection box to scan the entire document 8 Click the Scan button to start scanning the document in two image types and sizes See the result in below The enti...

Page 78: ...t be scanned in the regular way Also documents larger than A4 size such as A3 and B4 can be scanned by folding in half inserting into the Carrier Sheet and scanning in duplex mode You can also scan do...

Page 79: ...the upper corner For non standard document Center your document in the Carrier Sheet 2 Load the Carrier Sheet with the gray section printed section facing downwards 3 Adjust the paper guides to the wi...

Page 80: ...ze with the drop down list box Or you may select a custom paper size by clicking the Scan Area box and then click Add to include in the choice Choices are listed below None US Letter 8 5 x 11 US Legal...

Page 81: ...Tray 3 To ensure the performance in color mode set the resolution to be 300 dpi or lower in Black and White mode set the resolution to be 600 dpi or lower 4 Depending on your system environments appli...

Page 82: ...ait and then start auto scan after the first scan job is completed If you have many separate documents need to be scanned at the same scan settings this feature is especially useful The default is 0 T...

Page 83: ...e Background Black Background Note For a sheet fed scanner with an auto document feeder this option is currently available only in the Auto crop mode For a scanner with a flatbed platen this option is...

Page 84: ...Feed Detection allows you to detect overlapped document that go through the auto document feeder Multi Feed usually occurs due to stapled documents adhesives on documents or electro statically charged...

Page 85: ...vailability of the function varies based on type of scanner There are two options available if Multi Feed is detected Stop Scanning after Multi Feed If this is selected the scanner will stop the feede...

Page 86: ...yet no Warning dialog box will be displayed How to add the sound alarm 1 Click the Browse button on the right side of the speaker icon The Open dialog box appears 2 Choose your wave file 3 Click the O...

Page 87: ...You can choose your scan area by the Scan Area drop down list box or placing your cursor on the Display window and dragging it diagonally on the Display window Then a red rectangle box will appear to...

Page 88: ...User s Manual 4 54 4 9 The Enhancement Tab The Enhancement tab allows you to set following additional image processing settings The Option tab dialog box...

Page 89: ...moved when Resolution is set lower than 150dpi The hole is near the edge of the document The holes are not aligned along the edge of the document Punch Hole Removal is available only when Auto Crop is...

Page 90: ...Removal When Flatbed on the Scan Source option is selected on the Image tab the Shadow Removal option will be enabled Click to remove the shadow on the book spine when scanning a book Before Shadow Re...

Page 91: ...0 1 2 3 4 Default 0 The higher the value the more background color will be kept Mode Auto Moir If Smooth is selected in the Background Processing option then the choices for the Mode option includes...

Page 92: ...User s Manual 4 58 Background Processing None Background Processing Smooth Background Processing Removal Fill Color White Note Background color in small zone will not be processed or removed...

Page 93: ...er s Manual 4 59 Edge Fill Check White or Black if you wish to add white or black edge on the border of your scanned image Enter the value from 0 to 5 mm Default value is 0 Original Edge Fill 5mm Blac...

Page 94: ...ize Define the speckles also known as image noise you wish to remove by specifying its number size and radius range The measuring unit is pixel The higher the number the more speckles will be removed...

Page 95: ...None Form Horizontal Vertical None the default mode which does not remove any line Form remove any form in the document Horizontal select Horizontal and then enter the length of horizontal line to re...

Page 96: ...User s Manual 4 62 4 10 The Rotation Tab The Rotation tab allows you to set the following image rotating options...

Page 97: ...otate 180 Auto based on contents Automatically rotate images based on the contents of document When Auto based on contents is selected its modes will be enabled to let you select more options Mode Qui...

Page 98: ...lly useful when you scan the inside pages from a book As a result if you choose Flatbed book from the Scan Source option auto rotate every even page will be selected as default Note This option varies...

Page 99: ...ul for documents containing two pages per image when you want to save them as two images one page for one image Choice None Horizontal Vertical Default is None Horizontal Divide one image into the upp...

Page 100: ...to double sided document which are viewed in portrait are sometime fed into the scanner in landscape or vice versa Choice Book Fanfold If Book is selected the image of the reverse side will not be rot...

Page 101: ...User s Manual 4 67 Image Control Option Check the Mirror box if you wish to reverse the right and left side of your image Original The Mirror Effect...

Page 102: ...ocuments Choices Blank Page Removal Barcode Detection Patch Code Detection Blank Page Removal Choices None Blank Page Removal Threshold Image Size None Do not remove the blank pages Threshold Move the...

Page 103: ...ill be created and stored in the following path Windows XP C Documents and Settings All Users Application Data PRODUCTNAME Vista Windows 7 Windows 8 Windows 10 C ProgramData PRODUCTNAME Barcode Types...

Page 104: ...2 of 5 Patch Codes PostNet Royal Mail RM4SCC UCC 128 UPC A UPC E Barcode Zone Specify the barcode zone to be detected Select All to checks the whole document and detects barcodes Or you may speed up t...

Page 105: ...dly may decrease the recognition accuracy due to accumulated dirt on the sheets If the sheet is not recognized correctly or gets smudged replace it with a new sheet Patch code Detection Check Enable t...

Page 106: ...00 The sheet is not recognized correctly when printed in a size smaller than the original Do not use toner saving mode The sheet is not recognized correctly when the print is too light Do not use thin...

Page 107: ...mount of time to start the energy saver after your last action The range is from 1 to 60 minutes Enable Power Off Check the Enable Power Off box and move the slider to set the amount of time to automa...

Page 108: ...image data especially when you have a large amount of documents needed to be scanned You can also specify your memory size by the page number For your information an A4 color document scanning at 300...

Page 109: ...g messages such as ADF pad count exceeds 50 000 scans the number varies based on type of scanner Please replace the ADF pad and reset the pad count Save Settings after Closing Check to save your scann...

Page 110: ...elected or at the back of your document if external imprinter is selected Choice External Imprinter Digital Imprinter If you have installed an external imprinter choose external imprinter If you do no...

Page 111: ...is value is increased sequentially by the scanner Date Time Choose if you wish to include the date and time in your print string Format YYYYMMDDHHSS For example 20090402170645 check0001 indicates year...

Page 112: ...Rotated Vertical Vertical Inversion 90 degrees CW 90 degrees CCW Normal Rotated Vertical Vertical Inversion 90 degrees CW 90 degrees CCW If you check the digital imprinter to stamp text on your scanne...

Page 113: ...mm The value indicates the height from the bottom of your paper to the last letter of your string This option is available only if an external imprinter is installed 0001abc 2010 The value of Print Po...

Page 114: ...eport button If you encounter any error message while using the scanner click the Report button A report txt file Windows XP C Documents and Settings All Users Application Data PRODUCTNAME Vista Windo...

Page 115: ...blems with document feeding In this case it is highly recommended to replace the ADF roller with a new one Note the replacement of the ADF roller has to be performed only by authorized service center...

Page 116: ...function on the ISIS interface screen is briefly described as below Mode Select one of scan modes including B W gray color options Dither 5 halftone levels available can be disabled Dots per inch Sel...

Page 117: ...n 6 1 Installing Button Manager V2 Button Manager V2 provides you an easy way to scan your document and then link the scanned image to your designated software application All this can be done by a si...

Page 118: ...are properly installed Button Manager V2 is started and the Button icon will be displayed on the system tray at the bottom right corner of your computer screen 2 Left click the Button Manager V2 icon...

Page 119: ...rs Folder and file name for the scanned image Image Mode Selection Box Name of the Selected Button Scan To destination and settings Button Name Basic Scan Parameters OCR settings If you wish to change...

Page 120: ...t and displays the scanned image in the window of Microsoft Paint the LCD screen should show Scan to App 3 Press the Scan button on the scanner 4 After the scanning is finished the Microsoft Paint sof...

Page 121: ...the Flatbed Glass The procedures 1 Wet a soft lint free cloth with some isopropyl alcohol 95 2 Open the document cover as shown below Gently wipe the surface of the glass of flatbed 3 Close the docum...

Page 122: ...nk toner particles or paper dust In this case the paper may not be fed smoothly Please follow the following steps to clean the Reverse roller and the Feeding Rollers to ensure the best of the scanner...

Page 123: ...User s Manual 7 3 3 Wipe the feeding rollers until they are cleaned 4 Press both sides of the cover of the ADF reverse roller and pull the cover down...

Page 124: ...User s Manual 7 4 5 Press and wipe the rollers one by one Rotate the roller until the surfaces are completely cleaned...

Page 125: ...Cleaning the Glass 1 Press the ADF release button Open the front door 2 Wet a clean cloth with some isopropyl alcohol 95 3 Wipe the glass as illustrated below by moving the swab from side to side to...

Page 126: ...l be worn out and you may have problems with document feeding It is time to replace the Reverse roller For ordering the replacement please contact your dealer Disassembling Procedure 1 Press the ADF r...

Page 127: ...erse roller externally to detach it from the slot and then detach the left end from its hole Reassembling Procedure 1 Insert the left end of the reverse roller to the hole of its original place 2 Inse...

Page 128: ...User s Manual 7 8 3 Close the reverse roller Cover 4 Close the ADF cover...

Page 129: ...d you may experience problems with document feeding In this case you may need to replace a new ADF roller For ordering the ADF roller please consult your nearest dealer and follow the procedure below...

Page 130: ...7 10 3 Move the tab of the ADF roller DOWN as indicated 4 Detach the right end of the ADF roller from the scanner and remove the ADF roller 5 Hold the right end of the Upper ADF roller to detach it f...

Page 131: ...to its slot and place the ADF roller to its proper position 2 Insert the left end of the lower ADF roller first to its slot and place the ADF roller to its proper position Make sure the belt in the c...

Page 132: ...User s Manual 7 12 3 Move the tab of the ADF roller UP The Belt 4 Close the ADF roller cover A snap in sound could be heard if correctly installed...

Page 133: ...am In the event of a paper jam follow the procedures below to remove the paper 1 Press the ADF release button on the right side Gently open the front door 2 Carefully pull the paper out of the ADF uni...

Page 134: ...esktop surface This may cause the scanner to malfunction Question Paper becomes jammed during scanning Answer 1 Open the front door 2 Pull out the jammed paper carefully 3 Close the front door Questio...

Page 135: ...e out too dark Answer 1 Please adjust the screen settings to sRGB 2 Please adjust the brightness settings on the screen from application software Question When I choose optical resolution to be 600 dp...

Page 136: ...card interface card The name and version of your scanning software application The version of your scanner driver Please call us at Headquarter Avision Inc No 20 Creation Road I Science Based Industri...

Page 137: ...www avision com cn Europe Area Avision Europe GmbH Bischofstr 101 D 47809 Krefeld Germany TEL 49 2151 56981 40 FAX 49 2151 56981 42 E MAIL info avision europe com Web Site http www avision de Espa o B...

Page 138: ...tical Resolution 600 dpi Scanning Modes Black White Gray Color ADF Capacity Up to 100 pages 75 g m2 20 lb Max Document Size 216 x 356 mm 8 5 x 14 in Min Document Size 50 x 50 mm 2 x 2 in Paper Weight...

Reviews: