Avermedia EB1004 BAK Operation Manual Download Page 7


9


Connect the video output of each video camera or composite video source 
to the 

CH1 ~ CH4

 connectors. 


VGA monitor 

Connect a VGA monitor to the 

VGA OUT

 connector of the DVR unit to 

use as a display for video surveillance and playback. 


Power adapter 

Plug the provided 110V AC or 220V power adapter into the DVR unit's 
power socket. 

Optional Devices 


Television monitor 

Use a BNC-to-RCA adapter to connect a regular TV monitor to the DVR 
unit's 

VIDEO OUT

 connector.


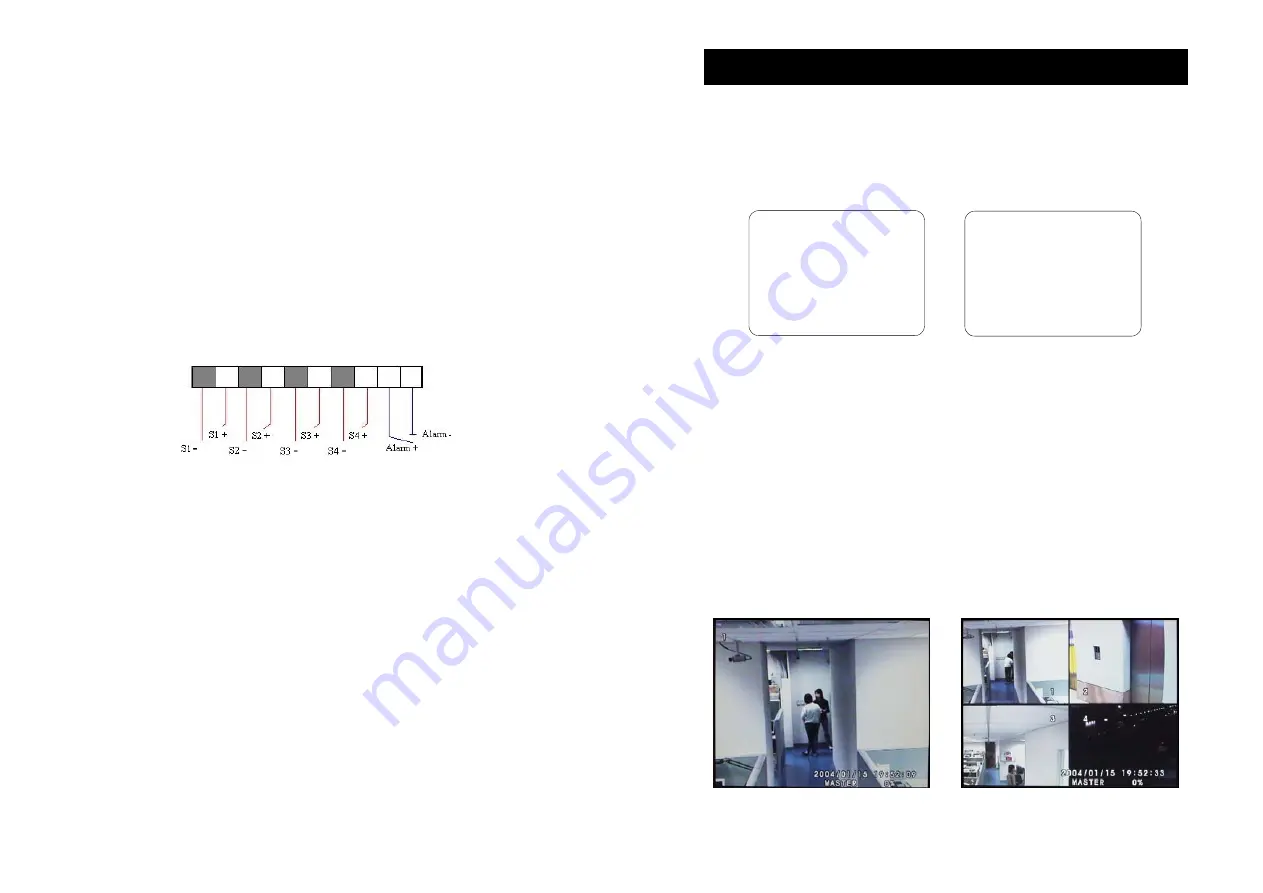
Sensors and alarm device 


Connect up to four sensor devices to the terminals that are numbered 1 to 
8 at the back panel. Each pair of terminals is for the ground (-) and 
positive (+) input voltage. For instance: 

Terminal 1 : Connect to the ground (-) wire of Sensor 1 
Terminal 2 : Connect to the positive (+) wire of Sensor 1 
  

.... 


.... 

Terminal 7 : Connect to the ground (-) wire of Sensor 4 
Terminal 8 : Connect to the positive (+) wire of Sensor 4 
 

Connect an alarm device to the terminals that are numbered 9 and 10: 

Terminal 9 : Connect to the positive (+) wire of the alarm device 
Terminal 10 : Connect to the ground (-) wire of the alarm device 


Desktop/Laptop computer 

Connect EB 1004 BAK to a PC with a USB cable. Insert the USB 
connector to PC’s USB socket. 


10


  Operating the DVR Unit 

First Time Use 

Connecting the DVR unit to a power outlet automatically turns on its power. 
When the DVR unit is newly installed or replaced with hard drive(s), the hard 
drive(s) will automatically be formatted. 


HDD Checking... 
 Master 
  80072MB 
 HDD 

formatting 

HDD Checking... 
 Master 
  80072MB 
  New HDD format completed 
 Slave 
  No 

HDD 

Detected 


Surveillance Screen 

Surveillance video can be viewed and recorded in two screen modes: 

EACH


mode and 

QUAD

 mode. 

Under the 

EACH

 mode, video from the video cameras is recorded in 

full-screen resolution, but each video takes turns in being recorded (from one 
camera to the next). Each of the surveillance videos is recorded only at a 
maximum frame rate of 7.5fps. When viewing live video using 

EACH

 mode, 

you can switch between full screen and quad screen. 

Whereas in 

QUAD

 mode, video from the video cameras is recorded at a lower 

resolution, yet each video is recorded in full frame rate, full motion. Videos 
recorded in 

QUAD

 mode can only be played back in 

QUAD

 mode. 


EACH mode 

QUAD mode 

Summary of Contents for EB1004 BAK

Page 1: ...AVerMedia EB1004 BAK Real time Security DVR Operations Manual P N 300AABLP MADE IN TAIWAN...

Page 2: ...t the computer and peripherals must be shielded and grounded Operation with non certified computers or non shielded cables may result in interference to radio or television reception Any changes or mo...

Page 3: ...NU 14 CAMERA SELECT 14 RECORD SELECT 15 RECORD MODE 15 RECORD FRAMERATE 15 VIDEO QUALITY 16 RECORD SCHEDULE 16 SUB MENU 17 PASSWORD CHANGE 17 2 TIME SET 18 VGA SETUP 19 MOTION SETUP 19 HARD DRIVE SETU...

Page 4: ...BAK provides a removable rack for installing one hard drive and an internal slot for installing a second hard drive Features and Specifications Non PC stand alone security digital video recorder 4 com...

Page 5: ...UNIT FIRST 16 Removable Power LED 17 Removable Hard disk LED 18 Hard disk LED 19 DVR Power LED 20 USB2 0 Socket 6 Back Panel 3 1 2 5 4 6 1 VIDEO OUT BNC Composite video output for connection to a tel...

Page 6: ...the cover of your PC 2 Remove a front cover and free a 5 1 4 drive bay Insert the hard disk holder Mount the hard disk holder screw up the holder and connect the IDE slot and power connector from PC...

Page 7: ...rminal 10 Connect to the ground wire of the alarm device Desktop Laptop computer Connect EB 1004 BAK to a PC with a USB cable Insert the USB connector to PC s USB socket 10 Operating the DVR Unit Firs...

Page 8: ...witch to the other hard drive or search for a range of video recordings press The arrowhead cursor will then move up to the top of the screen 3 Press the SELECT button to switch between the MASTER and...

Page 9: ...IME 05 PRESS THEN SELECT PRESS MENU TO EXIT 14 MAIN MENU 1 Press the MENU button to display the OSD main menu MAIN MENU CAMERA SELECT 1234 RECORD SELECT 1234 RECORD MODE EACH RECORD FRAMERATE 30 VIDEO...

Page 10: ...NTSC 25 fps for PAL There are 10 different frame rates you can choose from 16 VIDEO QUALITY There are three video quality settings to choose from BEST GOOD or NORMAL Choosing NORMAL allows you to save...

Page 11: ...GE TIME SET VGA SETUP MOTION SETUP PRESS THEN SELECT PRESS MENU TO EXIT PASSWORD CHANGE To change the password 1 Input the prompted information CURRENT PASSWORD NEW PASSWORD CONFIRM PASWORD 18 The fac...

Page 12: ...IT 20 To setup all camera press You will see the screen shows MOTION CAMERA 1 2 3 4 Press the same button again to cancel the setting To setup channel 1 and 4 only press You will see the screen shows...

Page 13: ...ive You will then be prompted to enter the password If an invalid password is entered you will not be allowed to format the hard drive Note All recordings on the SLAVE hard drive will be deleted when...

Page 14: ...a PC when the PC is off Follow the instructions to install the driver 1 Insert the CD driver into CR ROM s plate It will auto run You will see the screen on the right side Note The application suppor...

Page 15: ...le 14 Version Identification Press Ctrl Alt V buttons to see the product version if you need this when you contact with customer service For users with only one hard disk in EB DVR unit there are 2 wa...

Page 16: ...Click once to fast play the video at 2x Click twice to fast play the video at 4x Click 3 times to fast play the video at 8x Click the same button to cycle through different fast play modes The followi...

Page 17: ...authorized product modification or failure to follow instructions included with the product B Misapplication of service by someone other than the manufacturer s representative C Any shipment damages C...

Reviews: