background image


-


To 

The recipient e-mail address and separate it with a semicolon 

-


Subject 

Enter the message title 

-


Message 

Type the message 

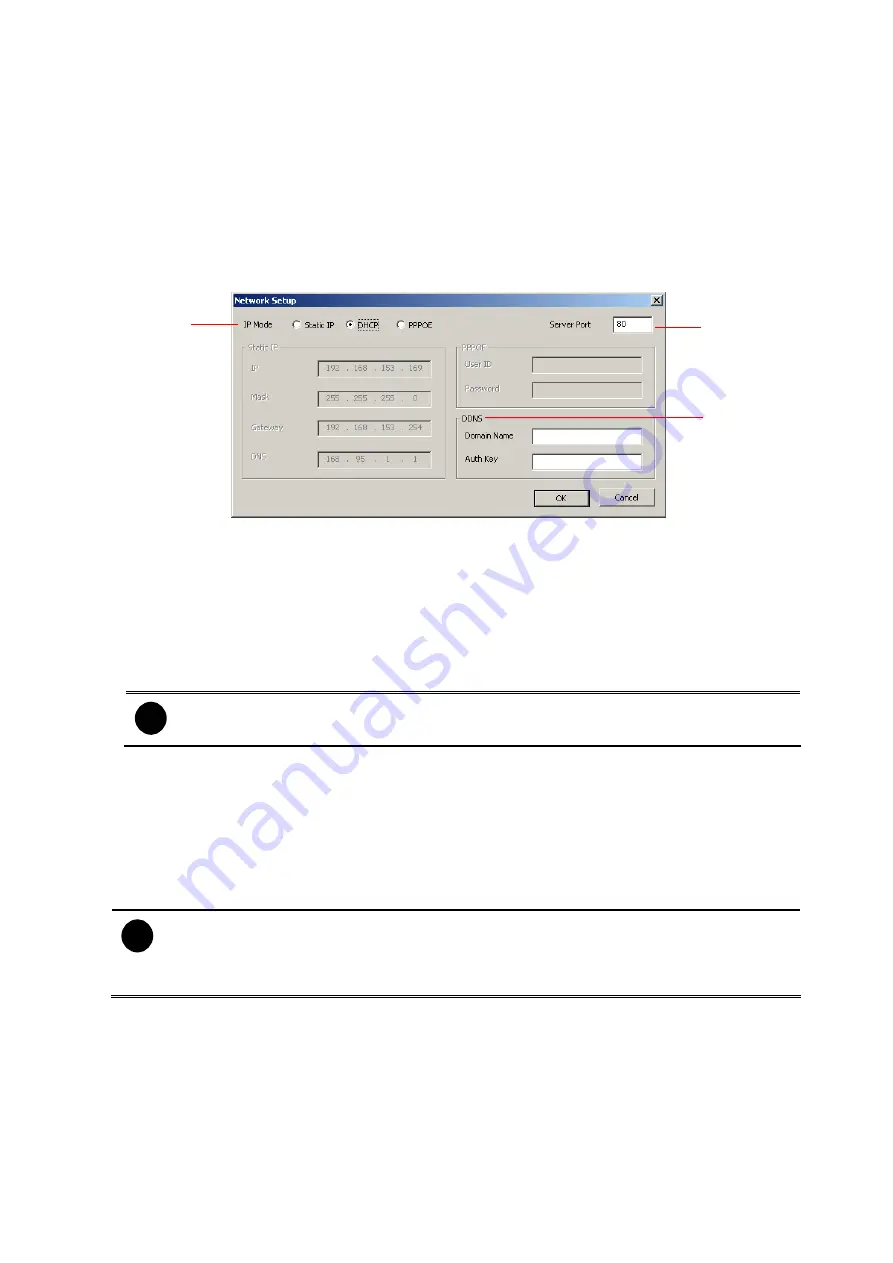
8.1.1.4 Network Setup 

(1)

(2)

(3)


(1) IP Mode 

-


Static IP 

Assign a fixed and global IP address for the DVR system 

IP:

 Assign a constant IP address which real IP addresses give from ISP. 

Mask:

 Enter the subnet mask of the IP address which user has assigned to DVR 

system. 

i


It is a bitmask used to tell how many bits in an octet(s) identify the subnetwork, 
and how many bits provide room for host addresses.


Gateway:

 Enter the network gateway IP address 

DNS:

 Domain Name Server translates domain names (such as www.abb.com.tw) to 

IP addresses. It will translate the domain name into IP address when DVR system 
request. 

-


DHCP


Assign the IP address by local DHCP server to DVR system.   

i


The Dynamic Host Configuration Protocol (DHCP) is a set of rules used by a 
communications device (such as a computer, router or networking adaptor) to allow 
the device to request and get an Internet address from a server which has a list of 
addresses available for assignment.


-


PPPOE


Point-to-Point Protocol over Ethernet is a network protocol for encapsulating PPP 
frames in Ethernet frames. It is used mainly with ADSL services. 

(2) Server Port 

A port is using for the remote connection. Any port can be assigned as a server port, 
except the ports already used by the network services. 

43 


Summary of Contents for AVerDiGi EB1304 NET

Page 1: ...AVerMedia AVerDiGi EB1304NET SATA EB1304NET SATA User Manual ...

Page 2: ...lied is made with respect to the contents of this documentation its quality performance merchantability or fitness for a particular purpose Information presented in this documentation has been carefully checked for reliability however no responsibility is assumed for inaccuracies The information contained in this documentation is subject to change without notice In no event will AVerMedia be liabl...

Page 3: ...ANY UNAUTHORIZED PRODUCT MODIFICATION NOTICE INFORMATION IN THIS DOCUMENT IS SUBJECT TO CHANGE WITHOUT NOTICE THE INFORMATION CONTAINED HEREIN IS TO BE CONSIDERED FOR REFERENCT ONLY LIGHTNING WARNING TO AVOID THE LIGHTNING STRIKE STRONGLY SUGGEST INSTALLING THE LIGHTNING ROD AT LIGHTNING FREQUENTLY AREA FOR ADDED PROTECTION UNPLUG THE DVR UNIT DURING THE LIGHTNING STORM THIS MAY PREVENT TO DAMAGE ...

Page 4: ... Time 11 2 2 1 Set up the System Date and Time 11 2 3 Surveillance Screen 12 2 4 Playback the Video 12 Chapter 3 OSD Navigation Tree 14 3 1 Menu Function 15 Chapter 4 Using the USB Playback Console 26 4 1 Recommended system requirements 26 4 2 Installing the USB Playback Console 26 4 3 Running the USB Playback Console 27 4 3 1 To Cut and Save the Portion of the Recorded Video 29 4 3 2 Playback DVR...

Page 5: ...1 Familiarizing the Local Playback Buttons 49 8 3 1 1 To Cut and Save the Wanted Portion of the Recorded Video 50 8 3 2 Familiarizing the Download and Playback Buttons 51 Chapter 9 Using HandyViewer to Access DVR server 53 9 1 Using PDA Viewer to Access DVR Server 53 9 1 1 To install PDAViewer thru ActiveSync 53 9 1 2 To install PDAViewer from the Internet 54 9 1 3 To Use the PDAViewer 55 9 1 4 To...

Page 6: ...ies depending on the standard power outlet of the country where it is sold 5 Power Adapter 6 Internal HDD holder 8 screws are inculded 7 Software CD User Manual included 1 2 Features and Specifications Fire resistance material Non PC stand alone network digital video recorder 4 composite video inputs and 1 composite output VGA output for LCD or CRT monitor display On Screen Display OSD control men...

Page 7: ...recording 00 00 23 00 set by hour Search for recorded video files by date time event Input Output 4 sensor inputs and 1 relay output control 1 3 Front Panel 1 3 1 EB1304NET SATA Name Function 1 DVR Power LED Light when the unit is power on 2 HDD LED Indicate the hard disk running state Light when the HDD is running Read Write 3 IR Sensor Receive signal from the remote control to operate the unit 4...

Page 8: ...uttons in playback mode to switch to display each channel in full screen or view all channels at the same time Use the buttons in setting password of OSD menu to For 1 For 2 For 3 For 4 For 0 6 1 2 3 4 Quad 7 Record R EC Start video recording To stop recording press 8 Menu Call up and exit the OSD main and sub menu 9 UP DOWN SELECT Use the UP and DOWN buttons to change setting and move to the left...

Page 9: ... video either from the VGA OUT or VIDEO OUT 4 VGA OUT Output the video signal to a CRT or LCD monitor Input the audio signal from audio output device which it has a power supply by itself The audio is embedded with channel 1 Output the audio signal to a audio out device which it has a power supply by itself i The audio input output device needs to be powered by external power 5 Audio Out In 6 Sens...

Page 10: ...ied or statutory with respect to the reliability of the hard disk function or its compatibility In no event AVerMedia shall be liable for damages with respect to any business interruption of clients lost profits loss of programs or other data on your information handling system or otherwise This includes direct indirect incidental special or consequential damages resulting from the incompatibility...

Page 11: ...n the power is connected the Power LED light turns on 1 5 2 Adjust Fan Speed The DVR provides 3 speed of fan for user to adjust by actual condition 1 Loosen all screws 2 Push the cover backward and lift 3 Move the pin cover to the pin 3x is maximum 2x is medium and 1x is low 4 Push the cover forward and secure the cover after adjust the fan speed 6 ...

Page 12: ...onitor Connecting the unit to a pen drive or external hard disk through USB interface for backup then use the bundled software enables user to transfer playback and segment the video Follow the illustration below to make the connection Each time you change the video display output or video system NTSC PAL the power must be turned off and on to reset the DVR unit 7 ...

Page 13: ... TX RX RX Sensor Alarm RS485 1 2 3 4 5 6 7 8 9 10 11 12 13 14 The signal from the sensor i e infrared sensors smoke detectors proximity sensors door sensors etc is being transmitted to the unit and this triggers the system to respond and send signal to relay device i e alarm telephone etc Pin Definition 1 Sensor 1 signal 2 Sensor 1 Ground signal 3 Sensor 2 signal 4 Sensor 2 Ground signal 5 Sensor ...

Page 14: ...or entering password Switch to CIF mode 6 5 As a number key for entering password 0 FN RIGHT UP LEFT EB DVR 2 3 5 6 8 9 7 1 4 REC A B MENU S ELECT ZOOM S PEED S PEE D FOCU S ZOOM DOWN FOCUS RM H6 PTZ 2 1 3 4 5 6 7 8 9 10 11 18 17 12 13 14 15 16 Button Function 2 4 6 8 7 0 As a number key for entering password 8 A B Set a playing recorded video from A point to B point segment and repeat playing on ...

Page 15: ...urveillance screen until user stop User also can backup AB Repeat file to pen drive or external hard disk See 2 1 2 1 Press play button to call out the SEARCH MODE menu to find the recorded video that user wants to playback A B A B A B A B 2 Select TIME SEARCH or EVENT LIST TIME SEARCH search by date and time select the date and time from where you want to begin the video playback EVENT LIST searc...

Page 16: ...k press select for YES to format the hard disk and menu for NO to remain unchanged HARD DISKS INFORMATION VERSION S3 01 01 00 03 MASTER HDD HDD FORMAT YES SELECT NO MENU HDD CHECKING SIZE 76GB 509MB 2 2 1 Set up the System Date and Time Before starting record video adjust the date and time first 1 Press to call up the OSD menu and then use and to go up and down and select Submenu And then press or...

Page 17: ...el or preview all 4 channels 1 CH1 Camera1 3 CH2 Camera 2 7 CH3 Camera 3 9 CH4 Camera 4 5 QUAD 4 Channel 2 4 Playback the Video The DVR system can record and playback video simultaneously Therefore user don t need to stop recording while playback the video 1 Press 2 Use the and buttons to go up and down and select TIME SEARCH or EVENT LIST Then press or to make a selection SEARCH METHOD TIME SEARC...

Page 18: ...g conditions EVENT LIST HARD DISK MASTER S A 2006 05 03 2006 05 03 13 26 34 13 00 01 13 26 50 13 16 46 A 2006 05 03 12 00 01 13 00 01 B 2006 05 03 11 48 37 12 00 00 A 2006 05 03 11 30 23 11 31 18 A 2006 05 03 11 29 47 11 30 13 S 2006 05 03 11 28 55 11 28 58 B 2006 05 03 11 28 33 11 28 55 A 2006 05 03 11 25 41 11 28 32 A 2006 05 03 11 23 26 11 23 30 A Always Recording It records non stop and automa...

Page 19: ...JUSTMENT TIME SETUP AUTO RECORD AUTO SCAN PASSWORD SETUP AUDIO RECORD AUDIO MUTE NTSC OFF 1 VIDEO SYSTEM MULTIPLE REMOTE REMOTE ID PTZ SETUP CHANNEL NAME SETTING S3 01 01 00 03 PASSWORD SETUP SUPERUSER USER NETWORK 1 050 050 000 024 VIDEO ADJUSTMENT CAMERA BRIGHTNESS CONTRAST HUE SATURATION RESET TO DEFAULT VALUE OFF 10 SEC 10 SEC 10 SEC 10 SEC AUTO SCAN AUTO CHANNEL 1 CHANNEL 2 CHANNEL 3 CHANNEL ...

Page 20: ...n full screen resolution and takes turns from one channel to the next one when Auto Scan enables Each channel is recorded only at a maximum frame rate of 15fps User can switch to view the video in single full screen or QUAD screen Whereas in CIF mode video recording is at a lower resolution but each video is recorded in 30fps 25fps NTSC PAL User can switch to view the video in single full screen o...

Page 21: ...when the sensor has triggered BUTTON REC Start recording when the record button is pressed ON ON OFF NO S UB ME NU PAS S WOR D CHANGE VIDE O ADJ US TME NT AUTO R E C OR D AUTO S CAN PAS S WOR D S E TUP AUDIO R E COR D AUDIO MUTE NTS C OFF 1 VIDE O S YS TE M MUTIPLE R E MOTE R E MOTE ID PTZ SETUP CHANNEL NAME SETTING S3 01 01 00 03 TIME SETUP PASSWORD CHANGE Set a security combination number There ...

Page 22: ...TIME AUTO SYNC TIME TIME ZONE LAST SYNC TIME DAYLIGHT SAVING DELETE RECORDED FILES OLDER THAN 10 DAYS 2007 03 12 15 45 57 OFF GMT 2007 03 12 12 00 00 DATE TIME SETUP Setup system date time daylight saving and enable auto synchronize time through network DATE Set the current date TIME Set the current time AUTO SYNC TIME Enable disable time synchronization automatically through network The DVR syste...

Page 23: ...UTO S CAN PAS S WOR D S E TUP AUDIO R E COR D AUDIO MUTE NTS C OFF 1 VIDE O S YS TE M MUTIPLE R E MOTE R E MOTE ID PTZ SETUP CHANNEL NAME SETTING S3 01 01 00 03 TIME SETUP AUTO RECORD Enable disable auto continue recording when interrupted i e power breakdown video playback or configuration setup It continue recording after 10 second of idleness This is applicable in Always Record mode AUTO SCAN E...

Page 24: ...and then assign REMOTE ID to each DVR system Then user can just use one remote control to control all DVR system by pressing REMOTE ID To remote control multiple DVR systems press FN and number key remote ID number on the remote control 000 PELCO D 2400 1 1 PTZ SETUP CAMERA PTZ CONTROL PTZ ID PROTOCOL BAUD RATE AUTO PAN 05 SEC DWELL TIME 1 OFF PTZ SETUP To enable PTZ camera control by remote contr...

Page 25: ... To setup the baud rate of PTZ camera For more detail please refer to your PTZ camera s user manual AUTO PAN Select the preset number to assign an auto move direction for the PTZ camera For example 1 3 means the PTZ camera will auto move from preset position 1 2 and 3 DWELL TIME Set a time that how long the IP PTZ camera stays in that position before it moves to the next one CH01 CH02 CH03 CH04 CH...

Page 26: ...ct HDD FORMAT Then press or 2 In the CHECK PASSWORD screen press or Then use the and buttons to select the security combination number Repeat till you key in the last number Also user can use the number button on the remote control to enter the password Press or button again to make the selection To move the selection to the left and right use and buttons CHECK PASSWORD ENTER PASSWORD 3 After ente...

Page 27: ...t the channel when the video loss that the DVR system will send out a alarm 1 2 3 4 MEDIUM 010 SEC MOTION SETUP MOTION CAMERA SENSITIVITIY MOTION RECORD TIME MOTION CAMERA Enable disable the channel number to detect motion SENSITIVITY Set the sensitivity level The sensitivity is from H High 9 2 and L Low MOTION RECORD TIME Set the amount of time in second to record when motion is detected 1 2 3 4 ...

Page 28: ...E TWOR K INFOR MATION IP ADDR E S S S UB NE T GATE WAY DNS MAC ADDR E S S CHANGE 192 168 153 100 255 255 255 255 DHCP Assign the IP address by local DHCP server to DVR system Use and buttons to go up and down and select DHCP and then press or to make selection i The DHCP Dynamic Host Configuration Protocol is a set of rules used by a communications device such as a computer router or networking ad...

Page 29: ...UB NE T GATE WAY DNS MAC ADDR E S S CHANGE 192 168 153 100 255 255 255 255 NW ENABLE Allow internet remote user to playback or monitor the channels Without enabling the network function the channels cannot be playback or monitor from remote site i F 1 is Channel 1 F 2 is Channel 2 F 3 is Channel 3 F 4 is Channel 4 Use and buttons to go up and down and select NW ENABLE network enable and then press...

Page 30: ...TE 1 2 3 4 89MB USB BACKUP Using USB device ex Pen drive or External Hard disk to backup partial recorded video and playback on PC Use and buttons to go up and down and select USB BACKUP and then press or Use and to move left and right And use and buttons to change the value and press or to confirm i Remember to plug in the USB device before starting to backup If the external hard disk is first ti...

Page 31: ...rt 4 2 Installing the USB Playback Console To install the USB Playback Console 1 Place Installation CD into the CD ROM drive When the installation main screen appears click Install USB Playback Console and then follow the on screen instructions 2 Select the language you prefer 3 Click OK to install the application 4 Click Exit to close the installation main screen You may plug in the pen drive or ...

Page 32: ...lit Screen Mode Select from different screen view to playback the recorded video file of the entire camera or one camera on screen 4 Playback Controller Begin Move at the beginning of the recorded video file Previous Go back to the previous frame by frame Slower Play the recorded video file at the speed of 2x 4x or 8x Rewind Wind back the recorded video file Pause Briefly stop playing the recorded...

Page 33: ...function is including HDD Backup to call out HDD Backup application see also Chapter 5 iEnhance to call out iEnhance application see also Chapter 6 10 Export Export includes Snapshot Print Output Video Clip and Backup function Snapshot Capture and save the screen shot either in jpg or bmp format Print Print the screen shot Output to AVI Save the segmented file in mpg or avi format 11 Segment Keep ...

Page 34: ...o set the end mark To cancel segmentation click Segment button again 3 Click Output button to save the wanted portion 4 In the Save As dialog box locate on where user wants to save the file type the filename and select the video format 4 3 2 Playback DVR Recorded File from Hard Disk 1 Please have the hard disk which containing of recorded video data install on your PC or using external USB enclosu...

Page 35: ...me and click OK 4 3 4 Playback Backup File avf To playback backup file in avf format user can use the AVFPlayback application that included in backup folder when backup into USB storage device Also user can use USB Playback Console to playback backup file see also Chapter 4 3 1 Plug the USB storage device into PC USB port 2 Run AVFPlayback from USB storage device 3 Click Open in AVFPlayback UI 4 C...

Page 36: ...vent list All recorded video events list No the list order number Record the record type see also Chapter 2 4 Begin Time the beginning of record time End Time the end of record time 4 Set Marked File Use Ctrl and mouse to select the multiple events from event list and then click Set Marked File to mark multiple events When click Set Marked File button the marked event will turn to un mark and un m...

Page 37: ...e the hard disk which was recording video on the DVR system install on your PC or using external USB enclosure to connect to your PC 2 To run the HDD Backup application click the HDD Backup button on USB Playback Application main interface 3 Click Browse in Source Disk to locate the recorded video file 4 And then the Select Disk windows will appear as below 5 Select the hard disk drive from Select...

Page 38: ...10 Click Start to process backup 11 To stop the backup progress click Stop 12 To play the backup file see 4 3 3 33 ...

Page 39: ...lication click the Watermark button on USB Playback Application main interface 2 In the ImageVerification screen click Load Source Image and locate the image source 3 Click Verify Image to begin the process 4 Check the result in the Processed Image screen If the picture is unmodified the image in the Source Image and Processed Image screen would be exactly the same If the picture is being modified...

Page 40: ...g of the video file Previous Go back to the previous frame Rewind Wind back the video file Pause Temporary stop playing the video file Play Play the video file Faster Play the video file at the speed of 2x 4x or 8x Next Go to the next frame End Go to the end of the video file 4 Save Video Save the edited or segmented video in avi format 5 Print Print the screen shot 6 Segment Mark the beginning an...

Page 41: ...s Bar Show the progress of the file being played You may move the bar to seek at any location of the track 20 iStable To reduce the jolt in the recorded video also see Chapter 7 1 21 Add Setting Include the new setting to the temporary setting block 22 Rename Change the name of the selected setting in the temporary setting block 23 Delete Permanently remove the selected setting in the temporary se...

Page 42: ...click Install when the Internet Explorer Security Warning dialog box appears After installing the WebCamX cab and when connecting to the DVR system you are required to enter User ID Superuser or User and password default password is 111111 and select the type of network Superuser has the authority to remote setup the DVR system configuration on Web Viewer i If user can not connect to DVR server it...

Page 43: ...single camera view on screen User can right click on the screen to switch to different camera view 5 Split screen view To view 4 camera on screen simultaneously 6 Record Start to record the video of the selected camera in AVI format Directly click screen to select the channel that user wants to record and press Record button 7 Remote Console Initiate Remote Console It allows you to control DVR ser...

Page 44: ...hange all the camera video quality based on the selected setting Click OK to exit 8 1 1 To Setup Remote System Setting Click OK to exit and save the setting and Cancel to exit without saving the setting The setting here applies to Remote DVR only i After changed the DVR system setting refresh your web browser in order to apply the new setting to the DVR system 8 1 1 1 Camera Setup 1 2 3 4 1 Camera...

Page 45: ...st 2 Record Mode Select D1 CIF recording mode Under D1 mode the video recording is in full screen resolution Each channel is recorded at a maximum frame rate of 15fps You can switch to view the video in single full screen or 4 split screen Whereas in CIF mode video recording is at a lower resolution but each video is recorded in 30fps 25fps NTSC PAL 3 Record Frame Rate Set the number of frames per...

Page 46: ...cable in Always Record mode under schedule setting 6 Audio Record Enable disable audio recording To record sound make sure the microphone is connected to the unit 7 Disk Overwrite Enable Enable disable replacing the earliest record when the hard disk space runs out By default the HDD overwrite setting is enabled 8 Motion Detection Motion Camera Enable disable the channel number to detect motion Mo...

Page 47: ...o the table below to customize the sensor state Not installed Indicates that there is no sensor connected Normal open Indicates that the initial state of the sensor is normal open Video recording initiate when there is a changes in the sensor state Normal close Indicates that the initial state of the sensor is normal close Video recording initiate when there is a changes in the sensor state Sensor...

Page 48: ...er translates domain names such as www abb com tw to IP addresses It will translate the domain name into IP address when DVR system request DHCP Assign the IP address by local DHCP server to DVR system i The Dynamic Host Configuration Protocol DHCP is a set of rules used by a communications device such as a computer router or networking adaptor to allow the device to request and get an Internet ad...

Page 49: ... Users can register their own domain name on http ddns avers com tw See Appendix A Domain Name Enter the domain name that user has registered Auth Key A password use to access DDNS that user has setup when register the domain name i To register a domain name please refer to Appendix A Please restart DVR system in order to active DDNS service 44 ...

Page 50: ...uperuser Change the remote accessing password of super user Superuser has the authority to remote setup the DVR system configuration on Web Viewer Password Enter the new password Password Confirm Re enter password to confirm 2 User Change the remote accessing password of user Password Enter the new password Password Confirm Re enter password to confirm 45 ...

Page 51: ...ion via internet connection 6 Setup Configure the Remote Console setting see also Chapter 8 2 1 7 Preview Switch to Preview Playback mode This allows you to view live camera display 8 Playback Switch to Playback mode This allows you to view the recorded video file see Chapter 8 3 9 Status Bar Display the current date time and hard disk free space 10 Camera ID Show the number of cameras that are be...

Page 52: ...e selected path click Delete Enable network storage Select the Enable network storage check box to send the recorded video in network attached storage i To add network storage the Internet storage drive folder must be mapped as Network Driver in DVR server To know how to assign or connect to a network drive please refer to your Windows help file and search Map Network drive 2 Language Customize th...

Page 53: ...to open the file that is recorded in the DVR server When you choose Remote Playback select Download and Playback Click OK to proceed and Cancel to void this operation In the Video Playback Date Time Selection the number from 00 to 23 represent the time in 24 hour clock The numbers from 01 to 16 represent the camera number To Make a Selection 1 Select the date in the calendar Use and buttons to shi...

Page 54: ...ngle screen i If there are only 4 cameras you won t be able to switch to 9 16 and 13 split screen mode To zoom in an area on the screen Right click and Drag a square on the area you want to enlarge To back to normal view right click the channel screen again 2 Progress bar Show the progress of the file being played You may move the bar to seek at any location of the track 3 Hour Buttons Select and ...

Page 55: ...apacity in preview mode and play speed in playback mode 9 Camera ID Show the number of cameras that are being viewed When you are in single screen mode click the camera ID number to switch and view other camera 10 Output Save the segmented file in mpg avi or dvr format see also Chapter 8 3 1 1 11 Segment Keep a portion of the recorded video you want see also Chapter 8 3 1 1 12 Snapshot Capture and...

Page 56: ...nning of the recorded video file Previous Go back to the previous frame Slower Play the recorded video file at the speed of 1 2x 1 4x or 1 8x Rewind Wind back the recorded video file Pause Briefly stop playing the recorded video file Play Play the recorded video file Faster Play the recorded video file at the speed of 2x 4x or 8x 16x or 32x Next Go to the next frame End Go to the end of the record...

Page 57: ...k 2 Use the Playback Control buttons or drag the bar on the playback progress bar and pause on where you want to end the cut Then click Segment to set the end mark To cancel segmentation or set the segment marks from the start click Segment button again 3 Click Output button to save the wanted clip 4 In the Save As dialog box locate on where you want to save the file type the filename and select t...

Page 58: ...t IE browser and is connected to the internet To use this feature you need to install the PDAViewer software either thru ActiveSync connection or download it from the internet Please check if your PDA meets the 2 requirements below OS MS Windows CE 4 0 PocketPC 2002 2003 Mobile 5 PDA version CPU ARM architecture 9 1 1 To install PDAViewer thru ActiveSync 1 Connect your PDA to your PC Place the CD ...

Page 59: ...re connected to the internet 1 Open the web browser and enter the server IP Then click the hyperlink Download PDA Viewer 2 When the Download dialog box appears enable Open file after download and click Yes After the installation the PDAViewer icon will appear in the Programs list 54 ...

Page 60: ... remote DVR server in PDAviewer see Chapter 9 1 4 2 Split Screen Mode Select between 2 screen display types It also allows you to switch and view different camera number or channels 3 About Display the PDA Viewer software version 4 Minimize Reduce the size to taskbar 5 Exit Close the PDA Viewer 6 Focus Adjust the focus of PTZ camera to produce clear image 7 Full Screen Use the entire screen to onl...

Page 61: ... up to the DVR server 3 Click Connect icon and select the DVR server 4 Click Playback to enter playback option screen 5 Select the camera data and time 6 Click Playback to start playing the recorded video 7 While playback user can view and change status of I O devices 8 On the playback screen tap on video screen longer the pop up menu will appear 9 Select the Remote IO 10 The sensor and relay devi...

Page 62: ...et To install JAVAViewer from the DVR Server 1 Open the web browser and enter the DVR server IP http DVR server IP port JAVA Viewer html Then click Connect 2 When the Download screen appears select JAVA Viewer jad and download it to your mobile phone 3 After the installation the JAVAViewer will be in your mobile phone system To find the JAVAViewer program where is located please refer to your mobi...

Page 63: ...elect the Connect to connect to DVR server 4 Click Yes to accept the data from DVR server 5 When connection is success you will see the camera video on the screen 6 To switch to different camera view select menu and select the channel 7 The JAVAViewer support PTZ control function you can refer to Help file for detail function control key Select menu and go the way down to select the Help file ...

Page 64: ... to access the following dialog First input the MAC address of your DVR system as CD Key number and select the product name The CD Key of MAC address input format shall be 12 digits without colon or hyphen To find MAC address of your DVR system follow the steps below In OSD menu select NETWORK SETUP Select any one of IP mode A NETWORK INFORMATION windows will show up MAC address of DVR system is d...

Page 65: ...lowing table shows the ports that DVR server uses for certain network service Port Variable Remote Console CM 3000 5550 Y WebCam 80 Y 2 way audio 9999 Y Remote Control CM3000 RC1000 5555 Y DVR POS 5150 Y DVR DDNS Upload Download 53 1053 N 60 ...

Page 66: ...ed with product 4 AVerMedia does not warrant that this product will meet your requirements it is your responsibility to determine the suitability of this product for your purpose WHAT WE WILL AND WILL NOT PAY FOR We will pay labor and material expenses for covered items However we will not pay for the following 1 Removal or installation charges 2 Shipping charges 3 Any incidental charges EXCLUSION...

Reviews: