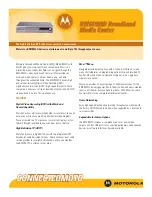
background image

- 1 - 


D

MB-04R

 Embedded Mobile DVR

 - User Manual


(V1.0) 


User Manual of DMB-04R Embedded Mobile DVR (V1.0)

Summary of Contents for DMB-04R

Page 1: ...1 DMB 04R Embedded Mobile DVR User Manual V1 0 User Manual of DMB 04R Embedded Mobile DVR V1 0...

Page 2: ...ove or update the products or procedures described in the manual Tips for users Please install the DVR in well ventilated places Please make sure the DVR operates in the allowed range of temperature a...

Page 3: ...witch Connection 13 2 6 Alarm Output Connection Guide 16 3 Operation Guide 17 3 1 Front Panel Description 17 3 2 IR Control 18 3 3 Menu Description 20 3 3 1 Menu items 20 3 3 2 Menu Operations 21 3 4...

Page 4: ...Mask Area Setup 36 5 2 6 Preview Properties 37 5 3 Alarm setup 38 5 3 1 External Alarm Input and Relay Output 38 5 3 2 Motion Detection Alarm 40 5 3 3 Video Loss Alarm 42 5 3 4 View Tampering Alarm 4...

Page 5: ...Upgrade 52 6 4 Hard Disk Management 52 6 5 Clear Alarm Out 53 6 6 Reboot 53 6 7 Power Off 53 6 8 View Log 53 6 9 System Information 54 Appendix A HDD Capacity Calculation 55 Appendix B ETHERNET Connec...

Page 6: ...built in application code in FLASH definitely makes it more stable Key features Support SATA Adopt patented army technology of high shock tolerance for hard disk Support ignition power on Support shut...

Page 7: ...nned SMART Choice of recording modes cycle and non cycle Support USB 2 0 recordings backup to flash disk USB HD USB CD DVDRW Preview and playback Portion or whole video mask Portion or whole video mas...

Page 8: ...e for alarms e g switch triggered abnormity and GPS Screen capture at client software Track tracing and video playback at client side PPP enabled Log system Client developing SDK provided DEMOs with s...

Page 9: ...B 04R Installation Steps 1 Please prepare all the tools and materials 2 5 inch SATA HD anti static gloves HDD Lock key cross screwdriver HD screws 2 First open the HD Lock with the key and loosen the...

Page 10: ...and insert it tightly 6 Put in the second HD on the bracket PCB face down aim at the HD interface and insert it tightly 7 Restore the HD bracket position aim at the holes and tighten the screws 8 Inst...

Page 11: ...lt configuration the corresponding recording times for different Volume are HD volume Unit GB Recording time Bit Rate 512Kbps Unit Hour Recording time Bit Rate 1Mbps Unit Hour Recording time Bit Rate...

Page 12: ...less network module board on the right corner 2 Carefully overturn the board with wireless module use your finger press the yellow handspike softly as shown The slot will pop up 3 Unplug the pop up sl...

Page 13: ...PTZ or G mouse 6 ALARM IN Alarm Input Connect to alarm input 4 ch switch signal input please refer to 2 5 7 ALARM OUT Alarm Output Connect to alarm output 1 ch switch signal output please refer to 2...

Page 14: ...nnected to the positive pole of DC 12 24V of vehicle batteries Vehicle Batteries 12 24V GND Device Ignition Switch Fig 2 2 2 Negative pole ignition switch Ignition switch are connected to the GND of v...

Page 15: ...atteries After KEY connected to the switch when switch on the DVR will start up with the vehicle when switch off the DVR will shut down within the preset delay time More information on the time delay...

Page 16: ...mended to use external relays while connecting to AC load As the right side figure shows There are 4 short circuit port on main board that refers to each alarm output channels JJ1 JJ2 JJ3 JJ4 which ar...

Page 17: ...means the device is standby green means the DVR starts up normally Ready Status indicator green means the device is in normal working status can be controlled by remote control Record Recording indic...

Page 18: ...herwise the HDDs will not work 3 2 IR Control No Name Description 1 POWER Reserved 2 DEV Reserved 3 Numeric Keys Input number upper and lower case symbol and Chinese character 4 EDIT 1 Enter the edit...

Page 19: ...TZ Position Control 3 Playback fast slow forward and rewind ENTER 1 Confirm when in menu mode 2 Switch between and in the status box 3 Pause when playback 13 PTZ Enter PTZ Control mode 14 ESC Cancel a...

Page 20: ...te Image Quality Frame Rate Enable Recording Pre Recording Time Post Recording Time Copy to Camera Network Basic network parameters e g IP Mac Multi cast IP Http Port DNS IP Remote Host Port Download...

Page 21: ...nterface Press PTZ button to enter the PTZ control interface Note Password is required and the default user name is admin password is 12345 Copy to Camera User Add Del User Password Verify Default Set...

Page 22: ...ich is pointing to the selected item This Active Frame can be moved by or keys There are such kinds of menu items a Check Box Provide 2 options means enable and means disable You can use ENTER or EDIT...

Page 23: ...e edit box by pressing Numeric Keys on the IR control If you want to input English i e uppercase just switch the input method to Uppercase by pressing A until the item shown as follow then you can inp...

Page 24: ...power on and switch on the ignition the device begin to start up the POWER indicator is turn green When Ready turn green means this device is ready to be controlled by IR control The initialization s...

Page 25: ...Pink Manual Recording Pink Motion Detection Sensor Alarm Green Schedule Recording Green No Alarm Blue Motion Detection Recording Blue Motion Detection Red External Alarm Recording Red Sensor Alarm Pr...

Page 26: ...amed user The method of adding and deleting user please refer to section 5 1 2 please modify the password as follow Step 1 Enter the main menu and select User icon Fig 4 2 Step 2 Input the new passwor...

Page 27: ...ou want to do the other operation such as playback manual record and so on you need to exit the PTZ operation menu Press the ESC button to exit and go back to the preview mode 4 5 Manual Record Note T...

Page 28: ...U key to enter main menu Press Play key to enter into playback menu Press PTZ key to enter PTZ control mode 4 6 Playback Note The user must have Playback right Press PLAY key enter Playback interface...

Page 29: ...escription Display Hide information bar MENU Open Close sound PLAY under the mute mode will appear on the bar Adjust play progress Backward Forward The unit is Adjust play speed Use to increase play s...

Page 30: ...press Confirm button DVR will start to backup the selected segments If you press Cancel button DVR will abort the backup 2 Backup all the files in a certain period of time After entering the playback...

Page 31: ...ind the player software in attached CD The files can be searched by their names for example if a file with name ch01 200808071029 mp4 that means this file is the record video of channel 1 the beginnin...

Page 32: ...e Video lost alarm schedule Motion detection alarm schedule External alarm schedule Wireless server login setting GPS parameters Boot Halt parameters 5 1 Basic Setting 5 1 1 Administrator and Password...

Page 33: ...re Password status as Note For security reason it is better for you to set Require Password as after completing all the setup 5 1 2 Add and Delete User Select Add in User Management interface to add n...

Page 34: ...ack Remote playback download the recorded files on DVR MAC address This MAC address is not the address of DVR but the PC that will access DVR If you setup this MAC address only the PC with this MAC ad...

Page 35: ...ptive You can modify video output standard to match video input in Display menu 5 2 2 Screen Saver Setup If the user operates nothing for a period of time the device will return to preview automatical...

Page 36: ...n by pressing this button You can copy the position to any other camera but please note that camera s name can not be copied 5 2 4 Video Parameters Setup The video parameters include brightness contra...

Page 37: ...the minimum size is only one pane You can setup 4 mask areas at most Press A key to clear all mask areas Note The mask areas can not be copied to other cameras There is no preview image and record ima...

Page 38: ...isplay 4 channels when there is an alarm from camera 1 the screen will switch to camera 1 after 10 seconds Preview layout setup There is a square frame divided into many windows If you select 4 Screen...

Page 39: ...age order is Alarm in Trigger camera PTZ PTZ linkage can be setup in Alarms and PTZ Linkage interfaces Fig 5 13 Please make sure the camera has already linked with alarm in and preset points sequences...

Page 40: ...larms interface Fig 5 14 5 3 2 Motion Detection Alarm Motion Detection Alarm setup includes motion detection area schedule and policy In Image Setup menu you need to set detection sensitivity before t...

Page 41: ...el setup and return Image Setup menu ESC Motion alarm policy Fig 5 16 1 Motion alarm schedule You can setup it in Motion Det Policy menu The setup steps are the same as external alarm in schedule plea...

Page 42: ...f them will active Area and Policy Enter into area setup interface the setup methods are same as that of mask area setup Only one view tampering area can be setup Please refer to section 5 2 5 Enter i...

Page 43: ...te is 384K 768Kbps It is better to select the proper max bit rate based on the camera background and image quality requirement Image Quality If you select variable bit rate type you can define image q...

Page 44: ...twork Parameters If you want use network to access DVR you must setup network parameters Note If any network parameter is modified you must save and reboot DVR to make it into effective The parameters...

Page 45: ...d to set gateway 2 The bandwidth of every channel please refers to the Max bit rate setup of section 5 4 1 5 6 PTZ In PTZ menu you can setup the PTZ parameters and G mouse mode Fig 5 21 PTZ parameters...

Page 46: ...nt This movement is manual controlled In PTZ menu press Setup button on the right side of Cruise item you can enter into Cruise setup menu to setup cruise and run the defined cruises Press PecCru butt...

Page 47: ...ed limit etc The parameters can be set in Exceptions menu Fig 5 25 You can choose an exception type then select the handle methods as following Audible Warning DVR beep warning Upload to Center Send e...

Page 48: ...Fig 5 27 you can setup the shutdown mode and time There are two normal modes 1 Halt Delay When the KEY interface of the device link with the vehicle s ignition switch you can delay halt by setup the...

Page 49: ...ot receive GPS signals The setup include GPS interface Time correct Overspeed warning GPS information display GPS Interface Please set GPS Interface as RS485 before connecting G mouse with DMB 04R Als...

Page 50: ...t PU Peripheral Unit CU Client Unit The server login parameters have to be set before the device login the wireless network server The server login interface is shown in Fig 5 30 At first user need to...

Page 51: ...stem Info The Utilities menu is shown in Fig 6 1 6 1 Save Parameters Save current parameters to device FLASH this change will take effective after reboot Fig 6 1 Fig 6 2 6 2 Restore Parameters Restore...

Page 52: ...with FTP server through network and download the upgrade firmware file If you select USB mode please make sure you connect one USB flash memory with DVR and the firmware file is in its root directory...

Page 53: ...rch Search by type Type is divided into Major type and Minor type Major type includes operation alarm exception and all The operation major type include Power On Shut Down Abnormal Shut Panel Login Pa...

Page 54: ...inish searching DVR will list the matched log information 2000 items maximum Search by type time Select By Type Time input major type minor type start time and stop time DVR will list the matched log...

Page 55: ...te the storage capacity i m which is storage of each channel needed unit Mbyte i m i q i h i D 2 In the formula i h The recording time for each day hour i D Number of days for which the video shall be...

Page 56: ...ile size of ONE channel in ONE hour is Bit Rate Max Bit Rate File Size Bit Rate Max Bit Rate File Size Bit Rate Max Bit Rate File Size 96k 42M 320k 140M 896k 393M 128k 56M 384k 168M 1 00M 450M 160k 70...

Page 57: ...cable when DVR is connected with network hub or switch 2 Use the following right side method to make the cross network cable when DVR is directly connected with client end PC 1 white orange 1 white o...

Page 58: ...2 4Vp p 1000 Audio Output 1 ch RCA 2 0 2 4Vp p 600 Stream Type Video stream or Video Audio stream Alarm Input 4 ch alarm input support Normal Open and Normal Close Alarm Output 1 ch alarm output Wire...

Page 59: ...ower Consumption 6W Operating Temperature 10 55 Humidity 10 95 Dimensions 236mm 73mm 210mm Weight About 3Kg Device Control Special IR control for mobile DVR User Manual of DMB 04R Embedded Mobile DVR...

Page 60: ...he remote controller then input the DVR s device code now press ENTER At this time if all of the operations can be received by the DVR it means this DVR can be controlled by this remote controller In...

Page 61: ...or blocked by other objects After excluding all of above reasons please try a new GPS module if it still does not work please contact us Note In caves tunnels and some other environments there is no G...

Reviews: