background image

Issue 4 November 2006

39


Chapter 4: Using the Call Log Application

Introduction

This chapter describes the three Call Logs available on your 4610SW IP Telephone. It also 
provides procedures for adding a Call Log entry to a Speed Dial button and deleting one or all 
Call Log entries. 

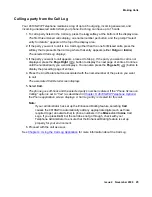
For information on calling a party listed in any Call Log, see 

Making Calls

 in 

Chapter 2: Using 

Your 4610SW IP Telephone

 of this guide.

About the Call Log

Call Logs are helpful for:

tracking who called while you were away from the phone, 

redialing the number of a previous call you made, or 

obtaining telephone numbers from previous calls. 

The 4610SW also allows you to set up a Speed Dial button for any call listed, facilitating dialing 
of frequently-called numbers.

All calls made to or from your 4610SW IP Telephone are added to one of three Call Logs - 
Outgoing Calls, Incoming Answered Calls, and Missed (unanswered) Calls. At all times 
regardless of the current screen, the top display line shows the Missed Call icon and the current 
number of missed calls. The Missed Call Log displays automatically whenever you access the 
Call Log application, but you can quickly access a different log if desired. 

Each log has a main screen, which lists the calls in chronological order (newest to oldest) and a 
detail screen. The main screens provide the Name and Number of the calling or called party, if 
available. The Main screens also provide a time (for the current date) or date (for calls prior to 
the current date). As you access each main screen, a border appears around the corresponding 
softkey and that softkey label appears in color to emphasize which log is displayed. The details 
screen displays all this information (in a wider format), reminds you of what type of call it was, 
and allows you to take certain actions with that entry. 

Each Call Log can contain a maximum of 15 entries. When a log contains more than three 
entries, 

Page Right

 and

 Page Left 

buttons are available to help you scroll through the log three 

entries at a time. Calls are listed in order from top to bottom, the most recent call first.

Summary of Contents for one-X 4610SW

Page 1: ...4610SW IP Telephone User Guide 555 233 784 Issue 4 November 2006 ...

Page 2: ...support telephone number is 1 800 242 2121 in the United States For additional support telephone numbers see the Avaya Web site http www avaya com support Software License USE OR INSTALLATION OF THE PRODUCT INDICATES THE END USER S ACCEPTANCE OF THE TERMS SET FORTH HEREIN AND THE GENERAL LICENSE TERMS AVAILABLE ON THE AVAYA WEBSITE AT http support avaya com LicenseInfo GENERAL LICENSE TERMS IF YOU...

Page 3: ...pplications 17 Phone Application 17 Speed Dial Application 17 Call Log Application 18 Web Access Application Optional 18 4610SW Telephone Options 18 Additional 4610SW Functionality 19 Push Feature 19 Automatic Backup Retrieval Feature 19 Chapter 2 Using Your 4610SW IP Telephone 21 Introduction 21 Call Appearances 21 Making Calls 21 Manual Dialing 22 Automatic Dialing 22 Redialing a party 23 Dialin...

Page 4: ...d 33 Editing During or After Entry 34 Name Entry Example 35 Adding a Speed Dial Button 36 Updating Speed Dial Button Label Information 37 Deleting a Speed Dial Button Label 38 Chapter 4 Using the Call Log Application 39 Introduction 39 About the Call Log 39 Viewing a Call Log 40 Adding a Call Log Entry to a Speed Dial Button 41 Deleting Call Log Entries 42 Deleting a Single Call Log Entry 42 Delet...

Page 5: ...ng Options 57 Viewing IP Address Status 57 Viewing Quality of Service QoS Status 58 Viewing Interface Status 58 Viewing Miscellaneous Status 58 Viewing the Network Audio Quality 58 Changing the Display Contrast 59 Feature Button Labeling 59 Logging Off the 4610SW IP Telephone 61 Reinstating the Phone After a Log Off 62 Backup Restore Options 62 Settings Saved During a Backup 63 Setting the Automat...

Page 6: ...n 73 Interpreting Ringer Tones 73 Interpreting Display Icons 75 Testing Your Phone 75 Testing the Telephone s Lights and Display 75 Basic Troubleshooting Chart 76 Troubleshooting 4610SW Applications 78 Resetting and Power Cycling the IP Telephone 79 Resetting Your Phone 79 Power Cycling the Phone 80 Index 81 ...

Page 7: ...ended to be a technical reference guide for System Administrators or phone technicians Issue Date and Change History This is the current version of this document revised and issued in November 2006 for software Release 2 7 This document was issued for the first time in December 2003 It was revised for Release 2 1 in July 2004 This document was revised for Release 2 2 in April 2005 and revised in A...

Page 8: ...ng a party on the call log conferencing and transferring calls logging off the phone for security purposes and logging back on to the phone Chapter 3 Using the Speed Dial Application Describes how to add update and remove Speed Dial buttons to facilitate quick dialing of frequently called numbers Chapter 4 Using the Call Log Application Describes how to view entries on each of the three types of c...

Page 9: ...610SW see 4610SW IP Telephone Stand Instructions Document Number 555 233 165 For information related to maintaining an IP Telephone System on a Local Area Network see the 4600 Series IP Telephone LAN Administrator Guide Document Number 555 233 507 Standard telephone features are described in the Overview for Avaya Communication Manager Document Number 03 300468 Document Underlined type indicates a...

Page 10: ...About This Guide 10 4610SW IP Telephone User Guide ...

Page 11: ...plication The WML browser provides access to Web sites tailored specifically for devices with smaller display screens like cell phones and Personal Data Assistants In addition to these features and applications the 4610SW provides a robust menu of options to customize your phone preferences Your telephone s display area coincides with how your System Administrator sets up the Line Feature buttons ...

Page 12: ...Introducing Your 4610SW IP Telephone 12 4610SW IP Telephone User Guide Figure 1 4610SW IP Telephone 4 7 8 9 10 11 12 13 14 15 2 1 4 16 17 18 19 20 21 5 6 3 3 ...

Page 13: ...ayscale colors indicate phone application activity 3 Line Feature buttons Six Line Feature buttons provide both call appearances lines for incoming and outgoing calls and application specific functionality 4 Softkeys Used to navigate to or start application specific actions such as Call a number Cancel the current activity Save entered data such as a Speed Dial label 5 Phone Exit Displays the Phon...

Page 14: ...he volume of the key click sounds Key clicks sound when you press fixed buttons on the phone such as the dialpad or softkeys 15 Headset Jack Provides a port for connecting a headset on the underside of the phone 16 Hold Red button used to place a call on hold 17 Transfer Transfers a call to another phone 18 Conference Sets up conference calls with more than one other person 19 Drop Drops the last ...

Page 15: ...w you to navigate forward and back through those additional pages To activate the function or feature represented by a phone button simply press the appropriate button Line Feature buttons appear on both sides of the display area These buttons provide call appearances Lines and other call related features as administered by your System Administrator in the Phone application They also serve as appl...

Page 16: ...Feature is off inactive Light Gray None Feature denied Broken Flutter This is a temporary condition accompanied by an error beep the first time it occurs This condition then changes to the off inactive state Light Gray None Idle Indicates a call appearance line is available White Ringing Indicates an incoming call is arriving on this line White Active Indicates the line is in use Light Gray On Hol...

Page 17: ...Use this application to make and receive calls and perform call handling operations like conference calling or transferring calls to another phone Chapter 2 Using Your 4610SW IP Telephone provides information on using the Phone application Speed Dial Application The Speed Dial application provides access to Speed Dial buttons which facilitate automatic dialing Use this application to set up button...

Page 18: ...and is specifically administered by your System Administrator Depending on the Home page links available you may browse Corporate intranet sites or browse the World Wide Web Chapter 5 Using the Web Access Application covers navigating Web access screens and pages and provides information about entering text on Web pages Making a call from the Web Access application is covered in Chapter 2 Using Yo...

Page 19: ...re on a call the party with whom you are speaking is automatically put on Hold and cannot hear the pushed message Once you start hearing the pushed message you can stop listening by selecting a Call Appearance Line for example the line you were on when the pushed message came in going back on hook etc Typically though pushed audio messages involve emergencies or other important information and sho...

Page 20: ...Introducing Your 4610SW IP Telephone 20 4610SW IP Telephone User Guide ...

Page 21: ...tton can be used to select that call appearance Any call associated messages for that call appearance show on the top display line Depending on how your telephone is administered you may have some blank Line Feature button labels Pressing a Line Feature button associated with a blank button label has no effect Making Calls You have several ways of making calls You can lift the handset activate a h...

Page 22: ...top display line provides call related messages If applicable the Call Timer displays at the top of the display area Note Note Displaying the Call Timer is optional and is set by means of the Options button See Chapter 6 4610SW IP Telephone Options for information 2 Use the dialpad to enter the number you want to call The number entered displays on the active call appearance line and the 4610SW IP...

Page 23: ...ast three outgoing calls for selection of the number to be dialed Both procedures follow Your Telephone Administrator can turn off the Redial feature or can restrict your phone to dialing only the last number dialed If the Redial feature is turned off pressing the Redial button generates an error tone If the Redial feature is restricted to only the last number dialed follow the instructions below ...

Page 24: ...also press the Page Left button to display the preceding page of entries 3 Press the Line Feature button associated with the name number of the person you want to call The number of the selected person dials automatically 4 Pick up the handset activate the headset or use the Speaker to proceed with the call 5 Hang up the handset deactivate the headset or press the Speaker button to end the call Au...

Page 25: ...until the number party you want displays You can also press the Page Left button to display the preceding page of entries 4 Press the Line Feature button associated with the name number of the person you want to call The associated Call Detail screen displays 5 Select Call The phone goes off hook and the selected party s number is dialed If the Phone Screen on Calling option is set to Yes as descr...

Page 26: ...the Phone screen is active the Bell icon appears as the phone rings and if so administered the Voice Message light flashes When the Phone screen is active call information displays on the incoming call appearance line If the Phone screen is not active call information appears on the top display line To receive the call pick up the handset activate the headset or press the Speaker button and talk N...

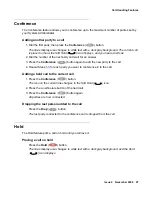
Page 27: ...button again to add the new party to the call 4 Repeat Steps 1 3 for each party you want to conference in to the call Adding a held call to the current call 1 Press the Conference button The icon on the current line changes to the Soft Hold icon 2 Press the Line Feature button of the held call 3 Press the Conference button again All parties are now connected Dropping the last person added to the c...

Page 28: ...te button again Speaker A two way built in Speaker lets you place and answer calls without lifting the handset Note Note It is also possible to disable the Speaker feature or limit it to one way operation If your Speaker does not operate as indicated contact your System Administrator to ensure that your telephone s Speaker is properly administered Placing or answering a call without lifting the ha...

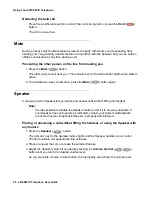
Page 29: ... button lights The Speaker is now operational Turning the Speaker off during a call Lift the handset or activate the headset at any time The Speaker and the corresponding indicator light turn off voice control reverts to the handset headset Ending a call while the Speaker is active Press the Speaker button The Speaker and the corresponding indicator light turn off and the call terminates Transfer ...

Page 30: ...d light at the top middle of the phone illuminates Follow your standard voice mail retrieval procedures to retrieve your messages If you have voice mail related questions contact your Telephone System Administrator Logging Off the Phone Log your 4610SW IP Telephone off to prevent unauthorized use during an absence Logging off erases your unique set of Options deletes your Call Log and restores any...

Page 31: ...rent extension or press and retry logging in at another time Password entry If the Password field displays asterisks indicating the telephone has stored your password press to accept the hidden password The telephone never displays your password for security purposes If the Password field does not display asterisks the telephone has not stored your password Use the dialpad to enter your password a...

Page 32: ...Using Your 4610SW IP Telephone 32 4610SW IP Telephone User Guide ...

Page 33: ... move A subsequent press of the same key replaces the character shown with the next alphabetic character assigned to that key still in upper case or the number assigned to that key if all three alphabetic characters have been displayed For example pressing the 2 on your dialpad displays the letter A Pressing the 2 key again replaces the A with a B pressing it again replaces the B with a C and pres...

Page 34: ...g a name the first character entered is initially displayed in upper case with subsequent characters initially displayed in lower case letters Symbol softkey 3 Displays the Symbol Character screen from which you may select one of the following attributes Period Line Feature button 1 Inserts a period at the cursor position Comma Line Feature button 2 Inserts a comma at the cursor position In a Numb...

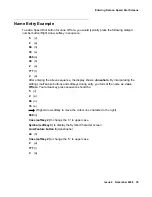
Page 35: ...bove sequence the display shows Janeohara By incorporating the editing Line Feature buttons and softkeys during entry you format the name as Jane O Hara Your actual key press sequence should be 5 J 2 a 66 n 33 e Right Arrow softkey to move the cursor one character to the right 666 o Case softkey 2 to change the o to upper case Symbol softkey 3 to display the Symbol Character screen Line Feature bu...

Page 36: ...ng the Speed Dial button Use up to 24 characters and the Symbol softkey to insert appropriate spaces hyphens slashes etc in the number being entered Include any trunk number s needed to obtain an outside line 6 Verify the Name and Number entered in Step 3 and Step 5 are correct To change an entry use the Left Arrow Line Feature button and or the Right Arrow Line Feature button to move the cursor t...

Page 37: ... on either the Name or Number Entry screen see the previous section titled Entering Data on Speed Dial Screens 5 To change the name use the Left Arrow Line Feature button and or the Right Arrow Line Feature button to move the cursor to the right of the character s to be changed Press the Backspace Line Feature button to remove the character s and re enter the character s Or press the Clear Line Fe...

Page 38: ...displays 2 Use the Page Left and or Page Right buttons as appropriate until the entry you want to delete displays 3 Press the Delete softkey The prompt Select label to delete displays 4 Press the Line Feature button corresponding to the button you want to remove The Speed Dial Deletion screen displays the prompt Press Delete again to confirm 5 Visually verify that you want to delete the Name and N...

Page 39: ...ent screen the top display line shows the Missed Call icon and the current number of missed calls The Missed Call Log displays automatically whenever you access the Call Log application but you can quickly access a different log if desired Each log has a main screen which lists the calls in chronological order newest to oldest and a detail screen The main screens provide the Name and Number of the...

Page 40: ...utton Review the last three calls Press the Page Left button Review outgoing calls you made Press the Outgo softkey The Outgoing Calls Main screen displays Review calls you received and answered Press the InAns softkey The Answered Calls Main screen displays Review missed calls Press the Missed softkey The Missed Calls Main screen displays Delete one or all entries from the log displayed See the s...

Page 41: ...o edit Number 25 displays with the cursor positioned at the end of the Number field Note Note For assistance with entering information on this screen see the section in Chapter 3 Using the Speed Dial Application titled Entering Data on Speed Dial Screens 5 If no Name Number changes are needed proceed to Step 8 To change the telephone number use the Left Arrow softkey and or the Right Arrow softkey...

Page 42: ... InAns 3 With the entry to be deleted displayed press the Line Feature button corresponding to that entry The selected entry s Detail screen displays 4 Press the Delete softkey The prompt Press Delete again to confirm displays at the top of the screen 5 Visually verify that you want to delete the Name and Number displayed then choose one of the following options 6 To exit the Call Log application ...

Page 43: ...Log press the Outgo softkey to display that Call Log then proceed to Step 3 3 Press the Delete All softkey The prompt Press Delete again to confirm displays 4 Visually verify that you want to delete all entries for the Call Log then choose one of the following options 5 To exit the Call Log application press the Phone Exit button If you want to Then Cancel the deletion without removing all of this...

Page 44: ...Using the Call Log Application 44 4610SW IP Telephone User Guide ...

Page 45: ...ernet data types nor is it intended to replace your PC s browser The 4610SW s Web functions are geared towards use on a small three line display screen more like those of a Personal Data Assistant PDA or cellular telephone This chapter describes the basic functions available with the Web Access application These functions include accessing and navigating pages linked to the Home page entering text...

Page 46: ...eature button to the left of the Password field and enter your password 3 Choose one of the following options Navigating Web Pages The Web Access application browser performs similarly to those on your PDA or cell phone Navigate Web pages using a combination of Line Feature buttons and softkeys Note Note Calls made or received while working with the Web application have no impact on Web access Web...

Page 47: ...her Web pages as follows Note Note You can view and scroll through images if any are presented as well as text If you want to Then Redisplay the Home page Press Line Feature button 5 Any Web page loading processing stops and the Home page displays Move the Web page down one page to see the next three lines Press Line Feature button 6 Move the Web page up one page to see the previous three lines Pr...

Page 48: ...ou complete the current field text line either press the Line Feature button to the left of the next text line you want to enter press one of the Line Feature buttons on the right side of the display to move to a different line or page or press the Done softkey Pressing a left side Line Feature button displays a cursor in that line if it is a text entry box Pressing a right side Line Feature butto...

Page 49: ...r to insert a space respectively When the Mode softkey displays Num your 4610SW IP Telephone recognizes a key press as a numeral or a typographic character such as or and advances the cursor one position to the right When the Mode softkey displays Symbol use the Line Feature buttons to select the desired symbol Access additional pages of symbols using the More softkey or the Page Right or Page Lef...

Page 50: ... the Clear Line Feature button to remove the name entirely then retype it The Name field allows up to 13 characters 3 After changing the name or to change the number without changing the name press Done The Speed Dial Number Entry screen displays the prompt Use dialpad to edit Number 25 with the cursor positioned at the end of the Number field 4 To change the telephone number use the Left Arrow Li...

Page 51: ...and Options settings Personalizing Feature button labels Selecting a different language for the 4610SW user interface Allowing the Voice message light to flash when the telephone rings Enabling or disabling Automatic Gain Control for the Handset Headset or Speaker This chapter also covers how to verify the status of certain phone server interactions This information can be useful in troubleshootin...

Page 52: ...n delay and the Audio Status screen 2 on which you can troubleshoot network delay and audio quality Note that this option displays only when you are on a call The three options categories displayed on the second Options Main screen are Contrast Control provides access to the Contrast Option screen on which you adjust the 4610SW s display area contrast Feature Button Labeling allows you to customiz...

Page 53: ...ge call related settings The second screen allows you to set visual alerting Move between the two Application Options screens using the standard paging indicators To change or set any Application screen option press the Line Feature button on either side of that option For example if an option is set to No pressing the corresponding Line Feature button changes the setting to Yes Setting the Redial...

Page 54: ...tore the previous setting without changing it press the Cancel softkey After saving or cancelling the first Options Main screen displays Setting the Phone Screen on Calling Option When the Phone Screen on Calling option is set to Yes the Phone screen appears in the display area when you make a call regardless of the screen you were working with at that time You lose any unsaved work in progress fo...

Page 55: ... Hold Timer displays Call time data is still maintained by the phone for Call Log purposes 1 To change this option press the corresponding Line Feature button 2 Press the Line Feature button for the next setting you want to change or save this setting by pressing the Save softkey To restore the previous setting without changing it press the Cancel softkey After saving or cancelling the first Optio...

Page 56: ...patterns 2 To hear any of the first four ring patterns press the Line Feature button to the left or right of any numbered pattern To hear additional ring patterns proceed to Step 3 The Current Pattern number changes to the selected pattern which rings once 3 To display the second Personal Ringing screen and hear the remaining four ring patterns use the Page Right or Page Left Indicator buttons to ...

Page 57: ...buttons as applicable The View Status Main screen 2 displays providing access to additional settings and phone information 3 To select any option on this screen press the Line Feature button on either side of that option To display any additional screen s the Paging Indicator displays Use the Page Right or Page Left Indicator buttons to scroll from one page to another as applicable 4 To return to ...

Page 58: ...ss Viewing the Network Audio Quality If you experience poor audio quality during a call the problem is likely with your network Your LAN Administrator might ask you to display these screens to diagnose or troubleshoot audio problems Although technical in nature these screens provide information that can help identify causes of poor audio quality Note Note The Network Audio Quality button displays ...

Page 59: ... the current level 3 Save the contrast level you set by pressing the Save softkey or to restore the previous setting without changing the contrast press the Cancel softkey The second Options Main screen displays Feature Button Labeling Line Feature buttons appear on both sides of the telephone s display area These buttons provide call appearances Lines These buttons also provide other call related...

Page 60: ...want to Then Re label one or more Feature buttons Select Relabel Feature buttons The Feature Button Relabeling screen displays Proceed to Step 3 View the default labels for your Feature buttons Select View default labels The Default Feature Button View screen displays Review the default labels then select Return to re display the Feature Button Labeling Options screen Repeat Step 2 selecting a dif...

Page 61: ...ng Off the 4610SW IP Telephone Log your telephone off to prevent unauthorized use during an absence or for privacy purposes Locate the Log Off option on the second Options Main screen CAUTION CAUTION Logging off deletes all Call Log entries and unless automatic backup restore is enabled returns any options you may have changed to their default values 1 To log your phone off from any application sc...

Page 62: ...ne failure or replacement Establish or modify FTP File Transfer Protocol settings such as the network server address directory path for saving backed up data and a User ID and Password for server access through your phone Verify whether an automatic backup has occurred Because each telephone system has unique characteristics and settings modifying the Backup Restore options usually requires your S...

Page 63: ...er you change any of these values If this setting is Disabled you might have to first provide additional information such as the FTP server on which your backed up data will reside before you can change the setting 1 Check below the FTP Status line for one of the following messages and proceed as directed If Then No message displays Proceed to Step 2 to change the automatic backup setting from Dis...

Page 64: ...TP File Transfer Protocol to retrieve the latest backup file from the server The message FTP Retrieval in progress displays Any one of the following additional messages may display as appropriate If Then Following server connection the backup file is retrieved with data in the proper format The messages File successfully retrieved and Press Save to replace current data with data from retrieved fil...

Page 65: ...en They are Server IP Address the specific server to which your 4610SW IP Telephone is connected for backup restore and other network related functions If your phone has been repaired this value is set to zero and should be re established Directory Path the server location to which your telephone s data for example Speed Dial labels names and numbers options and Feature button labels is sent durin...

Page 66: ...ny applicable Line Feature buttons to enter the path provided by your System Administrator 22 or fewer characters See Entering Characters Using the Dialpad and Editing During or After Entry in Chapter 3 Using the Speed Dial Application for information about data entry Select Save to save the setting and return to the first FTP Settings Main screen Alternately you can select Clear to remove the cur...

Page 67: ... listed in the previous bullet list English Simplified Chinese Russian and Hebrew English Japanese Kanji Russian and Hebrew English Korean Russian and Hebrew Add or modify your Server Password Select Password The FTP Password Input screen displays The top display area prompts FTP Password 13 Use the dialpad and any applicable Line Feature buttons to enter the Password using parameters provided by ...

Page 68: ...screen displays The prompt Are you sure displays in the currently active language and in the new language you selected The four softkeys at the bottom of the display are labeled respectively Yes and No in both the currently active language and the selected new language 4 Choose one of the following options If you want to Then Proceed to change the current language to the new language Select either...

Page 69: ...g 1 Select PC Ethernet interface from the third Options Main screen The first PC Ethernet Interface screen displays showing the current setting 2 If the setting to which you want to change appears on the first screen see Step 3 If the setting to which you want to change does not display on the first screen use the Page Right indicator to move to the second screen 3 Press the Line Feature button on...

Page 70: ...4610SW IP Telephone Options 70 4610SW IP Telephone User Guide ...

Page 71: ...ction to your 4610SW 4621SW 4622SW and 4625SW IP Telephones 4620SW IP Telephones having one hole on the lower right side post November 2004 manufacture also use this cable The HIP cord which allows basic direct headset connection to your 4606 4612 4624 and 4630SW IP Telephones 4620SW IP Telephones having two holes on the lower right side pre November 2004 manufacture also use this cable The Modula...

Page 72: ...r noisy environments hearing impaired users and other special purposes See the following table for specialized handsets and replacement handsets for your phone Handset Connector Type Ordering Code AK1A 2001 Replacement Handset 700203797 AK5A 1001 Push to Talk 700229727 AK6A 1001 Amplified 700229735 AK8A 1001 Noisy Location 700229743 ...

Page 73: ...resolve a problem Additionally Chapter 6 4610SW IP Telephone Options describes several status screens to use to troubleshoot certain problems as requested by your System Administrator For all other IP telephone questions or problems contact your System Administrator Interpreting Ringer Tones As you become more familiar with your IP telephone you will recognize the various tones you hear in respons...

Page 74: ...sy and the called party has been given a call waiting tone Confirmation Three short tone bursts This indicates a feature activation or cancellation was accepted Coverage One short tone burst This indicates your call will be sent to another extension for a covering user to answer Dial Continuous tone indicating dialing can begin Intercept Time out _ _ _ Alternating high and low tone indicating a di...

Page 75: ...Mute button then press the following numbers on the dialpad 8 3 7 8 which stands for TEST The display indicates the self test has started If the test is successful the message Self test Passed end displays If the test is not successful the message Self test Failed end displays instead 2 Press to return to the Phone screen If nothing appears on the display and the phone is receiving power your phon...

Page 76: ... power interruption causes Phone worked earlier but does not currently seem to work Contact your System Administrator Speaker does not operate Ask your System Administrator if your Speaker was disabled Phone does not ring Use the Up Down Volume keys to set your ringer volume to a higher level From another phone place a call to your extension to test this suggested solution Display shows an error i...

Page 77: ...io Quality screen described in Viewing the Network Audio Quality in Chapter 6 4610SW IP Telephone Options to provide your System Administrator with specific information related to this problem Contact your LAN Administrator with as complete a description of the problem as possible No dial tone Check that both the handset and line cords into the phone are securely connected Note that there might be...

Page 78: ...r PHONE APPLICATION Please review the previous section Basic Troubleshooting Chart SPEED DIAL APPLICATION You cannot dial out using any Speed Dial button Verify that all call appearances incoming outgoing lines are not already in use If all lines are in use wait until a line is available to make your call You cannot add an entry to the Speed Dial list You have 48 Speed Dial entries the maximum all...

Page 79: ...l pad press the following keys in sequence 7 3 7 3 8 The display shows the message Reset values no yes WEB ACCESS APPLICATION Pressing the Web softkey does not display a Web site Check with your LAN Administrator to determine if the Web server is not operating if there are network connectivity problems or other network problems Dialing from this application does not go through Your administrator m...

Page 80: ...ministrator can perform a more severe power cycle routine by unplugging both the phone and the Ethernet cables WARNING WARNING Because the type of power cycle mentioned in Step 2 involves reprogramming certain values Step 2 should only be performed by your System Administrator If you want to Then Reset the phone without resetting any assigned values Press asterisk A confirmation tone sounds and th...

Page 81: ...ta from 64 Backup Restore Options 62 Backup Restore Settings Saved During 63 Basic Troubleshooting Chart 76 C Call Appearances 21 Call Handling Features 26 Call Log About the 39 Calling a Party from the 25 Deleting a Single Entry 42 Deleting All Entries 43 Troubleshooting 78 Viewing a 40 Call Log Application 18 Call Log Application Using the 39 Call Log Entries Deleting 42 Deleting a Single Entry ...

Page 82: ...5 Log Off Reinstating the Phone after a 62 Logging In 31 Additional Prompts and Messages 31 Extension entry 31 Password entry 31 Logging Off the 4610SW IP Telephone 30 61 M Making Calls 21 Manual Dialing 22 Message Display Rate Setting the 55 Miscellaneous Status Viewing 58 Mute button 14 Mute feature 28 Mute LED Indicator 14 N Navigating Application Screens 15 Web Pages 46 Navigating Web Pages Ho...

Page 83: ...Answer Option 54 Setting the Phone Screen on Calling Option 54 Setting the Redial Option 53 Setting Visual Alerting 56 Softkeys 13 16 Speaker Changing from the handset or headset to the Speaker 29 Changing from the Speaker to the handset or headset 29 Ending a call while the Speaker is active 29 Turning the Speaker off during a call 29 Turning the Speaker on during a call 29 Speaker button 13 Spea...

Page 84: ...Mail Message Retrieving a 30 Voice Message Light 13 Volume Control buttons 14 W Web Access Application Calling a party from the 26 Troubleshooting 79 Using the 45 Web Access Authentication 46 Web Pages Entering Characters Using the Dialpad 49 Entering Text on 48 Navigating 46 Web Site Telephone Number Adding a Speed Dial Button for 50 ...

Reviews: