34
4.5.5 Live Data
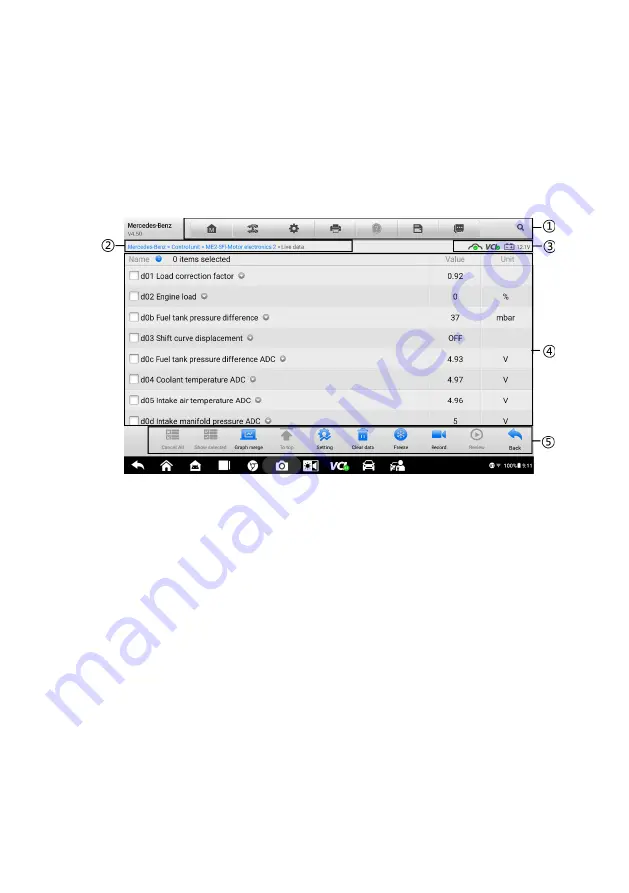
When this function is selected, the screen displays the data list for the selected module.
The items available for any control module vary from one vehicle to another. The
parameters display in the order that they are transmitted by the ECM, so expect variation
among vehicles.
Gesture scrolling allows you to quickly move through the data list. Simply swipe the
screen up or down to locate the data you want. The figure below shows a typical Live
Data screen.
Figure 4-10 Sample Live Data Screen
①
Diagnostics Toolbar Buttons
—
See
Table 4-2 Diagnostics Toolbar Buttons
25 for detailed descriptions of the operations for each button.
②
Current Directory Path
③
Status Information Bar
—
See
on page 26 for detailed
descriptions of the operations for each icon.
④
Main Section
Name
column
—
displays the parameter names.
Check box
—
tap the check box at the left side of the parameter name to
make selection of an item. Taps the check box again to deselect the item.
Drop-down button
—
tap the drop-down button at the right side of the
parameter name opens a submenu, which provides various choices for data
display mode.
Value
column
—
displays the values of the parameter items.
Unit
column
—
displays the unit for the parameters.
Summary of Contents for OTOFIX D1 Pro
Page 9: ...2 1 1 5 Procedures An arrow icon indicates a procedure Example To use the camera ...
Page 66: ...59 Figure 7 5 Sample Vehicle Information Figure 7 4 Screen OBD Connect Screen ...
Page 90: ...83 Refer to the associated TeamViewer documents for additional information ...
Page 96: ...89 To search by functions Figure 16 2 Sample Function Viewer Screen 2 ...
Page 102: ...95 ...
Page 110: ...103 20 3CE Compliance RED Directive 2014 53 EU ...


