


56
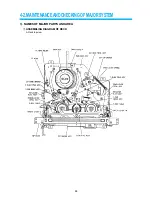
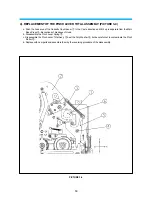
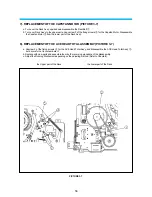
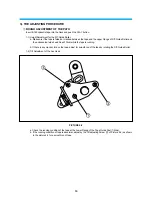
7). REPLACEMENT OF THE CAPSTAN MOTOR (PICTURE 3-7)
a. Turn over the Deck Ass’y upside down disassemble the Reel Belt
!
.
b. Turn over Deck Ass’y to the upper part and unscrew 3 of the fixing screws
@
for the Capstan Motor. Disassemble
the Capstan Motor
#
from the lower part of the Deck Ass’y.
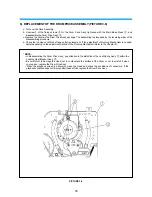
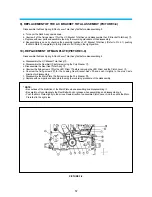
8). REPLACEMENT OF THE ACE HEAD TOTAL ASSEMBLY (PICTURE 3-7)
a. Unscrew 2 of the fixing screws
$
for the ACE Head Total Ass’y, and disassemble the ACE Head Total Ass’y
%
.
but be careful not to contaminate it.
b. Replace with new parts and assemble them by the reversing procedure of the disassembly.
c. Adjust the Running Mechanism depending on the adjusting method (Refer to Chapter5).
the Upper part of the Deck
the Lower part of the Deck
PICTURE 3-7
Summary of Contents for AVP-7180
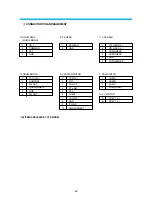
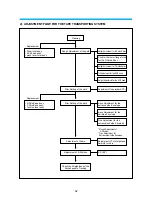
Page 16: ...3 2 CIRCUIT DIAGRAMS 15 1 CONNECTION DIAGRAM...
Page 17: ...16 2 POWER CIRCUIT DIAGRAM...
Page 19: ...18 3 SERVO SYSCON CIRCUIT DIAGRAM...
Page 21: ...20 4 VIDEO NOR AUDIO CIRCUIT DIAGRAM...
Page 23: ...22 5 Hi Fi PRE AMP CIRCUIT DIAGRAM...
Page 24: ...23 6 A V IN OUT CIRCUIT DIAGRAM...
Page 42: ...41 3 TIMING CHART OF S1 MECHA MECHANISM...
Page 46: ...45 B Deck bottom view...
Page 50: ...SKETCH OF JIGS AND TOOLS 49...
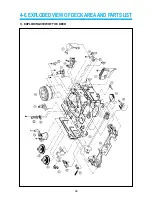
Page 70: ...4 6 EXPLODED VIEW OF DECK AREA AND PARTS LIST 69 1 EXPLODING VIEW OF THE DECK...
Page 71: ...70...
Page 74: ...AUDIOVOX SPECIALTY MARKETS CO LP 23319 COOPER DR ELKHART IN 46514 219 266 1886...


