background image


6.6 

Preparation for use 

 
After the All-in is connected to the power and properly checked. The machine can be put into operation. 


Reset the emergency stop. 


Set the main switch (POWER) to on (1). 


Adjust the seal temperature (TEMP). 


Adjust the operation speed (SPEED). 


Turn on the MOTOR, FAN, and HEATER if necessary. 


Press START/STOP to turn on the machine.  


Let the machine heat up. The led TEMP/ACT stops flashing if the machine is at the set temperature. 

 
Turn off the All-in normally with the cool run. If the All-in is not used for a longer period of time, set the main 
switch (POWER) off and disconnect the power cord from the mains supply. 


6.7 

Emergency stop 

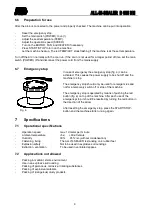
In case of emergency the emergency stop (fig. 4) can be 
activated. This causes the power supply to be shut off and the 
machine to stop. 
 
The emergency stop should only be used for emergencies and 
not for a temporary switch off or stop of the machine. 
 
The emergency stop is operated by means of pushing the red 
button (fig. 4) on top of the machine. After each use of the 
emergency stop it should be resetted by turning the red button in 
the direction of the arrow. 
 
After resetting the emergency stop, press the START/STOP-
button and the machine starts running again. 


Specifications 

7.1 

Operational specifications 


Operation speed   

max. 10 meter per minute 


Ambient temperature 

+5ø . . . +40ø Celsius 


Humidity   


30% . . . 95% rel. (without condensation) 


Fastening, fixing   

The ALL-IN-SEALER is standing on 4 rubber feet 


Explosion safety   

Not to be used in explosive surroundings 


Extraction, ventilation 

To be used in ventilated spaces 


7.2 

Applocations not allowed 


Packing in medical, sterile environment. 


Use in an explosive surrounding. 


Packing of poisonous, corrosive, irritating substances. 


Packing of explosive materials. 


Packing of (dangerous) dusty products. 

Fig. 4 

Summary of Contents for D 555 NH

Page 1: ...AUDION ELEKTRO ALL IN SEALER D 555 NH MANUAL D555 NH ENG Rev06...

Page 2: ...e hold responsible for eventual damage caused by specifications deviating from the standard model Although extreme care has been exercised during writing this manual AUDION ELEKTRO will not accept any...

Page 3: ...10 8 1 Maintenance and adjusting ALL IN SEALER 11 8 2 Heating elements 12 8 2 1 Adjust heating plates 12 8 2 2 Replace heating elements 12 8 3 PTFE belts Fout Bladwijzer niet gedefinieerd 8 3 1 Adjust...

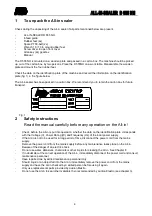
Page 4: ...on the All in Check before the All in is put into operation whether the data on the identification plate corresponds with the Voltage V Power Rating W and Frequency Hz of the local power supply If the...

Page 5: ...re control keeps the temperature fixed at the same level during operation The ALL IN SEALER is suitable for sealing ready to hand bags of Polyethylene PE Polypropylene PP thin PVC s and various lamina...

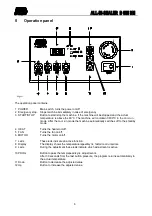
Page 6: ...ly switches off to the standby mode 4 HEAT Turns the heater on off 5 FAN Turns the fan on off 6 MOTOR Turns the motor on off 7 Leds These leds indicate an active function 8 Display The display shows t...

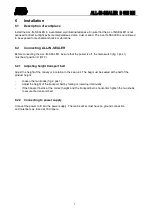
Page 7: ...tch fig 3 pos 1 must be at position O OFF 6 2 1 Adjusting height transport belt Adjust the height of the conveyor in relation to the seal unit The bag must be sealed at the half of the product height...

Page 8: ...f the temperature deviation is more than 5 degrees from the adjusted value Make a couple of bags Re adjust if the bags are not sealed properly The seals are not tight The sealing temperature is too lo...

Page 9: ...gency stop should only be used for emergencies and not for a temporary switch off or stop of the machine The emergency stop is operated by means of pushing the red button fig 4 on top of the machine A...

Page 10: ...own or at least 10 minutes Only use spare parts supplied by Audion Elektro The maintenance schedule below is for normal use In case of intensive use or under extreme circumstances maintenance should b...

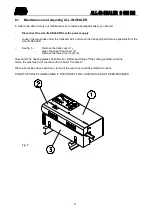
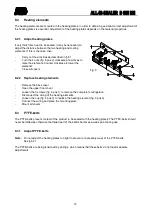
Page 11: ...lt as far as possible from the ALL IN SEALER See fig 5 Remove the back cover 1 Open the upper front cover 2 Remove the lower front cover 3 Take care The heating plates can still be hot Before switchin...

Page 12: ...s 8 2 2 Replace heating elements Remove the back cover Open the upper front cover Loosen the 3 screws fig 6 pos 1 to remove the complete moutingplate Disconnect the wiring of the heating elements Loos...

Page 13: ...tes by rotating the handles above the plates clockwise fig 6 pos 5 Push the PTFE pulley on the righthand side to the left until you hear a click The pulley is now locked Place the new PTFE belt over t...

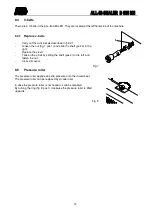
Page 14: ...pos 2 to the right Replace the v belt Tension the v belt by sliding the shaft pos 2 to the left and fasten the nut Close all covers 8 5 Pressure roller The pressure roller applies an extra pressure on...

Page 15: ...the transport belt if the belt touches the sides the tension on the belt is too high or too low Note Loosen the 4 locknuts fig 9 pos 1 before adjusting the tension Only adjust the tension when the be...

Page 16: ...tor if necessary This factor will affect the motor output If set at e g 90 the motor will run slower and set at e g 110 the motor will run faster To perform a motor set up follow the next steps Select...

Page 17: ...the right side in the middle The standard values are ON and 50Hz if the jumpers are removed 9 Technical data ALL IN SEALER D 555 NH Dimensions Weight Sealwidth Power rating Voltage Frequency Noise Se...

Page 18: ...s in display E1 E2 E3 Wrong frequency 50 60Hz Loose wire to PT100 Short circuit in PT100 Check the frequency and adjust the jumper Check wiring and connections to the PT100 Replace PT100 Conveyor does...

Page 19: ...nd immovables or to persons both to the opposite party as to third persons 4 In no way we are liable for damage arisen from or caused by the supplied or by the unsuitability of this for the purpose fo...

Page 20: ...Appendix A1 14 Electrical circuit...

Page 21: ...Appendix A2 Electrical circuit...

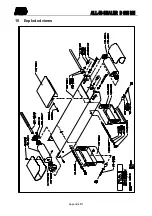
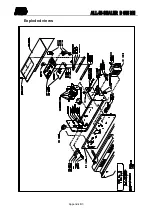
Page 22: ...Appendix B1 15 Exploded views...

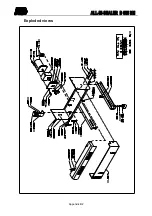
Page 23: ...Appendix B2 Exploded views...

Page 24: ...Appendix B3 Exploded views...

Page 25: ...Appendix B4 Exploded views...

Page 26: ...Appendix B5 Exploded views...

Page 27: ...11 669 Trade reg Hilversum no 32057820 VAT no NL803873104B01 Our terms and conditions are deposited at the Chamber of Commerce in Hilversum Op alle overeenkomsten zijn van toepassing onze algemene lev...

Page 28: ...AUDION ELEKTRO Hogeweyselaan 235 1382 JL Weesp Holland Tel 31 0 294 491717 Fax 31 0 294 491761 E mail export audion nl E mail holland audion nl Website www audion com Represented by...

Reviews: