background image

Syn248 Installation and Configuration Guide

Back to Contents

Troubleshooting

89


b. Select the extension from the 

Select Extension to Back up 

drop-down list, and 

click 

 to save the file to a specified location on your computer. 

You will need to locate and retrieve this file later, so make sure you remember 
where you saved it. The default file name will be in the format: 

backup_ds_[extension number]_[year]-[month]-[day]_[time].cfg

If you back up the same extension less than one minute after creating the 
backup, you may overwrite the earlier backup file.

3. Perform a complete factory reset to return to the values set at the factory. 

a. Unplug the LAN cable.

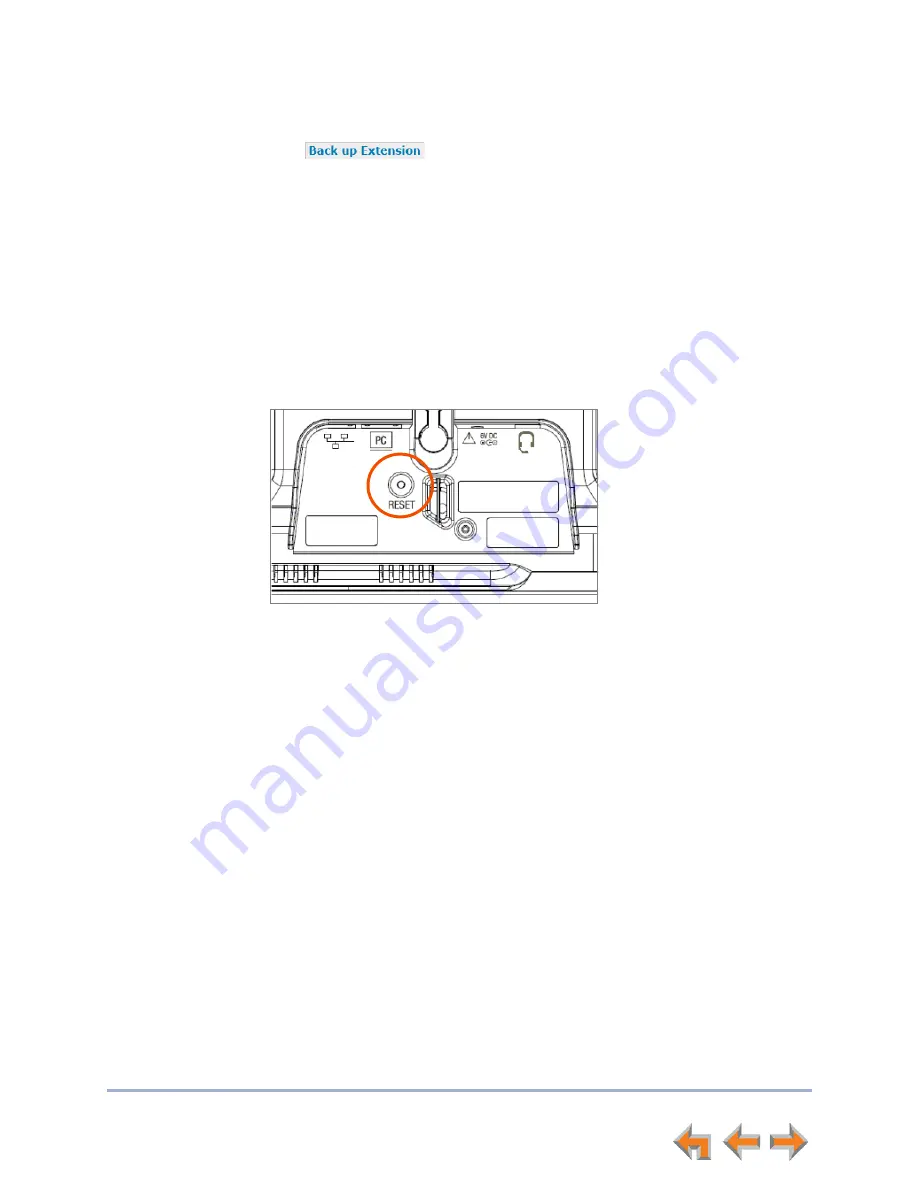
b. Insert a pen or the end of a paper clip into the 

RESET

 button, located on the 

underside of the Deskset. Hold until 

Restoring to Factory Defaults

 appears on 

the screen (approximately 5 seconds).

After the Deskset restarts, the screen displays 

EXT 0

.

c. Reconnect the LAN cable.

The Deskset rejoins the system. Unless the entire system was reset, the Deskset 
retains its previous extension number. After the Deskset rejoins the system, the 
screen changes from 

EXT 0

 to the previous extension number.

4. If you backed up the Deskset settings in Step 2, restore your settings.

a. Log on to the WebUI as the Administrator at the PC where you stored the backup 

file.

Syn248 Desksets with static IP addresses need to have new addresses assigned 
if the Deskset IP addresses are to be used for logging into the WebUI. At the 
Deskset, press 

MENU

 –>

 3 

–>

 3 

–>

 2 

to set the

 IP address

.

b. Click 

Device Management

, then click 

Back up/Restore

.

c. Under 

Restore Extension Settings

, select the Deskset's extension number 

from the 

Select Extension to Restore

 drop-down list. See 

“Back Up and 

Restore Settings” on page 58

.

d. Select the backup file.

e. Click 

Restore Extension

.

Summary of Contents for Syn248 SB35020

Page 1: ...erved AT T and the AT T logo are trademarks of AT T Intellectual Property licensed to Advanced American Telephones San Antonio TX 78219 Syn248TM is a trademark of Advanced American Telephones Issue 1 0 03 12 Syn248 Installation and Configuration Guide ...

Page 2: ...g Telephone Lines and Extensions 13 Providing Limited Telephone Service During AC Power Outages 13 Analog Line Connection Order on Gateways 13 Connecting a Two Line Wall Jack to the Gateway 13 Extension Assignments 14 Gateway Placement 15 Rack Mounting 15 Wall Mounting 16 Gateway Installation 17 Deskset Installation 19 System Configuration 26 Logging in to the WebUI 27 Error Handling 29 System Set...

Page 3: ...Panel Interface 73 Gateway Configuration 74 Upgrade Gateway Software 75 Resetting Devices 77 Deskset Admin Settings 78 Setting Intercom Call Forward No Answer 79 Fwd Trans to Outside Line 80 IP Settings 80 Reset User Password 82 Upgrade Deskset Software 82 Set Time and Date 83 Troubleshooting 84 Common Troubleshooting Procedures 85 Resetting Devices 85 Resolving General Functional Issues 86 Resolv...

Page 4: ... 103 Appendix B IP Addresses and Connectivity 104 Appendix C Technical Specifications 105 Appendix D Default Settings 106 Appendix E Part Lists 108 SB35010 Gateway Parts List 108 SB35020 Deskset Parts List 109 Appendix F Maintenance 110 Appendix G Important Safety Instructions 111 Glossary 112 ...

Page 5: ...Deskset Before using this AT T product please read Appendix G Important Safety Instructions on page 111 Please read this guide thoroughly for all the information necessary to install your new AT T product Additional Documentation Downloadable copies of all Syn248 documents including user s guides and quick start guides are available from www telephones att com smb For customer service or product i...

Page 6: ... this document Text Conventions Table 1 lists text formats and describes how they are used in this guide Go back to the last page viewed Go to the previous page Go to the next page Table 1 Description of Text Conventions Text Format Description Screen Identifies text that appears on a device screen or a WebUI page in a title menu or prompt HARD KEY or DIAL PAD KEY Identifies a hard key including t...

Page 7: ...ices Each system must include at least one Analog Gateway and one Deskset Each Gateway supports up to four analog telephone lines System Overview on page 7 Recommended Installation Sequence on page 10 Site Preparation on page 11 Assigning Telephone Lines and Extensions on page 13 Gateway Placement on page 15 Gateway Installation on page 17 Deskset Installation on page 19 ...

Page 8: ...ersions 1 0 and later support the features described in this guide All Gateways and Desksets must have compatible software versions installed To determine the software version of a SB35010 Gateway from the device front panel from idle press SELECT SELECT and then DOWN The software version appears To determine the SB35020 Deskset software version press MENU then 4 and then until Software Ver appear...

Page 9: ...Syn248 Installation and Configuration Guide Back to Contents Installation 8 ...

Page 10: ...rview Figure 1 illustrates how the Syn248 system differs from conventional telephone systems in that calls are not coordinated by a central controller Instead the system uses a distributed control system over a new or existing LAN Figure 1 Sample System Network blue lines telephone red lines Ethernet ...

Page 11: ...set Installation on page 19 This Deskset is assigned extension number 200 4 Install the other Desksets See Deskset Installation on page 19 5 Configure the system using the WebUI See System Configuration on page 26 6 Complete post installation tasks Ask all users to record their user names on their Desksets See Name Recording for the Auto Attendant Directory on page 38 Check for software upgrades a...

Page 12: ...248 devices in the system By default Syn248 assumes that this automatic assignment will occur If no DHCP server is present you can assign static IPs DHCP or static IPs are only required if the system is to be managed from a routable network and or automatic time updates from an NTP server are desired Syn248 devices will self assign link local IP addresses for all voice communication in addition to...

Page 13: ...tect your system from power outages by connecting an Uninterruptible Power Supply UPS to your PoE switch and Gateway s For power requirement specifications see Appendix C Technical Specifications on page 105 Other Preparations Before installing the Gateway and Desksets the following preparations may need to be taken All telephone lines must be gathered into one access point situated no more than 9...

Page 14: ... LINE 4 Analog Line Connection Order on Gateways For outgoing calls by default the system seizes the lowest idle LINE port numbers as labeled on the Gateway when users go off hook You can also configure the automatic off hook line selection for each extension see Extension Basic Settings on page 47 If you plan not to change the default settings telephone lines should be connected to your system wi...

Page 15: ...ach other through Peer to Peer P2P discovery protocols and automatically self configure Additional telephony and network configuration is administered through the WebUI Even if you disconnect a unit from the network its extension number is reserved If you want to remove an extension from the network permanently you must disconnect it then delete the extension number using the WebUI Device Manageme...

Page 16: ...ing instructions Rack Mounting To mount the Gateway into a standard 19 inch rack 1 Remove the two mounting brackets and six screws from the packing tissue 2 Position a bracket at the front of the device 3 To align the screw holes place the bracket on the device so that the locating indent on the bracket matches the indent on the device 4 Insert each of the three screws into the holes provided and ...

Page 17: ...through the ventilation holes on each side of the device Figure 3 Wall Mount Orientation To mount the Gateway to a wall 1 Install two pan head screws with inch diameter head 7 inches 20 cm apart The screw shaft diameter should be inch 3 2 mm Ensure you use anchors appropriate for your mounting surface Leave about inch 3 2 mm clearance between the screw head and the wall 2 Position the device with ...

Page 18: ...ction to earth ground must be verified by qualified personnel Grounding Terminal If your service provider uses Centrex lines you must log in to the WebUI and enter a line access code for each line to allow calibration to take place Before connecting the PSTN lines connect the Gateway and one Deskset to the network then see Logging in to the WebUI on page 27 and Line Calibration Configuration on pa...

Page 19: ... for up to 15 seconds during initialization then turn off After another Syn248 device is installed and after the Gateway has found the network and the other Syn248 device Synchronized appears on the third line of the display as shown in Figure 8 This is the Idle screen Figure 8 Gateway Idle Screen Synchronized An IP address beginning with 169 xxx indicates there is no DHCP server on the network Wi...

Page 20: ...e network and has AC power The yellow LED flashes when there is network activity 2 PC Port Intended for connecting an end user PC to share the same LAN connection as the Deskset 3 Reset Button Restarts the Deskset when pressed momentarily Restores factory defaults when pressed and held for more than five seconds with the LAN cable disconnected 4 Power Jack For connecting the AC adapter to the Desk...

Page 21: ... wall and Deskset Option 2 installation on page 21 Figure 10 Deskset Stand Options 2 Place the Deskset on a flat surface with the power and network ports facing you as illustrated in Figure 12 3 Place the stand illustrated in Figure 11 on the base with the flexible tab side away from you Figure 11 Deskset Stand Tabs 4 Insert the solid tabs of the stand into the Option 1 or Option 2 slots on the ba...

Page 22: ...and you hear a click as the flexible tabs lock into place To rotate the Handset tab for wall and Deskset Option 2 installation 1 Press the switch hook and slide the Handset Tab toward the top of the base as shown 2 Rotate the Handset Tab 180 so that the hook is at the top 3 Slide the Handset Tab back into the base Switch hook Handset Tab Hook ...

Page 23: ...nect power on page 25 3 Place the Deskset base over the mounting plate above the mounting studs as shown in 4 Slide the Deskset base down as shown in 5 Plug the Ethernet cable into the wall jack 6 Plug the power adapter into a power outlet not controlled by a wall switch Skip this step if using PoE 7 Make sure the Handset tab is in Wall position as described in To rotate the Handset tab for wall a...

Page 24: ...he Deskset 2 Plug the end of the handset cord with the longer straight portion into the handset then hang up Connect an optional corded headset Plug an optional corded headset or cordless headset base into the RJ 9 connector on the bottom of the Deskset as shown Handset Jack On Deskset Handset Jack on Handset Optional Headset Jack Do not plug a headset into the jack for the corded handset ...

Page 25: ...hernet cable into the PC port on the Deskset 4 Plug the other end of the second Cat 5 Ethernet cable into your computer If a GigE network is being used a computer connected through the Deskset will be limited to 100 Mbits s If you require a GigE Ethernet rate use separate Ethernet connections for the Deskset and the computer so that the computer can take advantage of the greater bandwidth If a PC ...

Page 26: ...f you are using the supplied power adapter 1 Plug the power adapter blue tag into the DC Power jack on the back of the Deskset 2 Plug the power adapter into an outlet not controlled by a wall switch The display screen illuminates within about a minute If the user s computer is plugged into an uninterruptible power supply UPS consider plugging the Deskset into it too Power Jack ...

Page 27: ...UI you are accessing it on the device not on the Internet This chapter shows you how to access and log in to the WebUI then guides you through the settings you may have to configure to commission or to customize a Syn248 System This chapter also covers device management using the WebUI As the system administrator you will use the WebUI to delete devices from the system change extension numbers bac...

Page 28: ...ernet cable 2 On the Deskset press MENU then 4 The Deskset Information screen appears Note the IP Address 3 Open a browser We recommend Internet Explorer 7 or higher for best performance If you are using a different browser some of the pages presented here may look different and have different controls 4 Type the Deskset IP Address as shown in Step 2 in the browser address bar then press ENTER The...

Page 29: ...nd change settings in two different types of fields drop down lists and entry fields into which you type information For your security the WebUI times out after 10 minutes so if it is idle for that time you must log in again The remaining procedures in this chapter assume that you are already logged in to the WebUI as administrator In most cases there are multiple settings on one page Changing a s...

Page 30: ... detailed error description by resting your mouse pointer on the highlighted field Figure 13 WebUI Error Indication To view Detailed System Information 1 On the System Information page click Information specific to each installed device appears There may be a delay as the system gathers this information Error Message Invalid Entry The Connected column indicates whether or not the listed device is ...

Page 31: ...ension Any Deskset can be designated as the system operator The default is Extension 200 The Operator can select the current Auto Attendant menu See Configuring the Auto Attendant on page 33 As well incoming external calls are forwarded to the operator extension if the caller presses 0 zero after the Auto Attendant answers or when callers reach an extension s voicemail Deskset users can call the o...

Page 32: ... to the callers 5 Enable or disable Hook Flash system wide When enabled Desksets have a soft key available when an external line is active Pressing simulates a hook flash which signals your telephone service provider to activate a feature For example hook flash may switch you to another incoming call when you hear a call waiting tone or enable you to create a conference call These features may be ...

Page 33: ...ave your own preferred time server then enter the server s URL c Select your Time Zone d Click Yes or No for Daylight Savings Time OR To set the time and date manually click Manual a Enter the current time and date b Select your Time Zone c Click Yes or No for Daylight Savings Time 7 Click to save these settings or click ...

Page 34: ... can select one of three Auto Attendant menus from the Operator extension the Default menu a Day Menu or a Night Menu The default menu instructs callers to Enter the extension number or enter 0 for the operator You can configure the Day Menu and Night Menu with your own voice greetings and key press commands Customizing the Auto Attendant Day and Night Menus Auto Attendant menus consist of the rec...

Page 35: ...llows callers to directly dial extensions by entering an extension number after reaching the Auto Attendant 4 Select Enable Operator Enabling the operator allows callers to press zero 0 to reach the operator The default operator extension is 200 When Enable Operator is On callers cannot press 0 for other actions If you assign dial key values that are the same as the first digit of any extension 2 ...

Page 36: ...d sign See Name Recording for the Auto Attendant Directory on page 38 and Extension Basic Settings on page 47 Extensions Sends calls directly to a specific extension Personal Voicemail Sends call directly to a specific extension s personal voicemail 6 When you are done click to save these settings or click to refresh the screen without saving the changes If no digit keys have been pressed five sec...

Page 37: ...This is the Widget Company We are open from 9 AM to 5 PM Monday to Friday If you know your party s extension dial it now To reach someone by spelling their name followed by the pound sign press 1 For Sales press 3 For Customer Service press 4 To replay this message press 5 To speak with the operator press 0 The Auto Attendant menu that you configure might look like the menu shown in Figure 14 4 Cl...

Page 38: ...Syn248 Installation and Configuration Guide Back to Contents System Configuration 37 Figure 14 Day Menu Example ...

Page 39: ...or incoming callers ask Deskset users to state their name slowly clearly and at a reasonable volume You may also recommend that users state both their name and extension number to assist incoming callers further To record play or delete a personal name 1 Press MENU then 2 then 1 and then 2 to display the Name Recording menu The and soft keys do not appear if the name has not already been recorded ...

Page 40: ...u at left click Hold Settings The Hold Settings page appears 2 If you want to use a hold announcement click Enable 3 Enter the amount of delay before the announcement first plays to a caller on hold 4 Enter the delay before the announcement repeats 5 To play record or delete the announcement click 6 Follow the instructions on the Hold Announcement page to record a prompt OR Click to delete the ann...

Page 41: ... and clicking you return to the Hold Settings page If you press before you hang up the recording is not saved OR Click to return to the Hold Settings page without saving the changes 8 On the Hold Settings page click to save these settings or click to return to the previous page without saving the changes ...

Page 42: ... allows calls to a busy phone number to roll over to the next available telephone line then we recommend setting the same CFNA destination for all lines in that group To configure CFNA settings 1 In the navigation menu at left click Phone Line CFNA The Phone Line Call Forward No Answer page appears 2 Select a line The lines are listed along with their names See Line Naming on page 46 3 Select a Ca...

Page 43: ...l is forwarded again according the extension s Intercom CFNA setting Outside Phone Number After selecting this enter a telephone number Auto Attendant The unanswered call is directed to the currently selected Auto Attendant menu 4 Select the Seconds before Forwarding from 5 to 45 seconds 5 Click to save the setting The new setting appears in the CFNA Destination column at top To configure another ...

Page 44: ...e defined as a paging zone Any Deskset user can initiate a page to all extensions or only to the members of a paging zone You can configure up to six paging zones each with one or more members You can place every extension in a paging zone To create a paging zone 1 In the navigation menu at left click Paging Zones The Paging Zones Summary page appears 2 Click to create a new paging zone The Create...

Page 45: ...The new paging zone appears on each Deskset when the user views the Paging Zones menu To edit or delete a paging zone 1 On the Paging Zones Summary page click the button for the paging zone you want to edit or delete The Edit Paging Zone page appears 2 Select one or more extensions that you want in this paging zone from the Available Members list and click OR Select one or more extensions to remov...

Page 46: ...tem Directory 1 In the navigation menu at left click System Directory The System Directory List page appears 2 Click 3 Complete the Add System Directory List Entry page with the information indicated 4 Click to save the entry The System Directory menu appears with the entry added OR Click to return to the previous page without saving the changes To edit an entry click Edit to the right of the entr...

Page 47: ...Gateway for easier identification To name a line 1 In the navigation menu at left click Line Naming The Line Naming page appears 2 In the Select Line to Change list select a line All Gateway lines are listed 3 Enter the New Line Name using up to 16 characters 4 Click to save the entry The new name appears in the Line Naming summary table ...

Page 48: ...rator 1 In the navigation menu at left click Extension Settings then Basic Settings The Extension Basic Settings page appears 2 Select an extension from the Select Extension list to display the current settings for that extension 3 Enter an Extension Name into the First Name and Last Name fields Enter up to 16 characters for each Be aware that with very long names depending on the characters used ...

Page 49: ... for unanswered calls Off The extension rings until the call is answered or the caller hangs up Conference room extensions typically have Call Forward No Answer Settings set to Off and have their ringers set very low or off Voicemail Extension Outside Phone Number Ensure that the extension is not in use and do not assign an extension number with the first digit of any extension that is the same as...

Page 50: ...the delay Without touching the Deskset you can speak to and be heard by the person who called If Intercom Auto Answer is enabled on the Deskset a Disable button appears allowing you to disable the feature The user can always enable or disable Intercom Auto Answer again 9 Under User Password create or change the Deskset password The password must consist of up to 6 digits 10 Click to save any chang...

Page 51: ...e Personal Directory 1 In the navigation menu at left click Extension Settings then Personal Directory The Directory List for Extension page appears 2 Select the desired extension number from the list The Directory list appears You can add edit delete and sort the entries as described below To add a new entry click The Add Personal Directory List Entry page appears a Complete the form with the inf...

Page 52: ... page appears with the fields populated with the entry to be edited Click to save the entry The Directory List page appears with the entry added To sort entries by last name click The list updates and the button changes to To delete Directory List entries a Mark the entries to delete by selecting the check box to the left of each entry b Click The selected entries are removed ...

Page 53: ... and Intercom lines and provide one touch access to certain Deskset features To edit Programmable Feature Key assignments 1 In the navigation menu at left click Extension Settings then Feature Keys 2 Select the desired Deskset Extension from the Select an Extension list The default PFK assignments appear 3 Reassign functions to each key See Programmable Feature Keys on page 53 4 Click to save the ...

Page 54: ... Quick Dial to multiple keys Every other feature can be assigned only once After one of these features has been assigned it disappears from the list for the other PFKs If all 10 PFKs are assigned to Intercom the Deskset cannot make or receive external calls Phone lines connected to the Gateway Held Calls List Page Call Log Help Quick Dial Directory Intercom Redial Do Not Disturb Messages Clicking ...

Page 55: ... s password if needed 2 In the navigation menu at left click Extension Settings then Feature Keys 3 If necessary select the desired Deskset extension number from the Select an Extension list When logging in as a user you cannot select a different extension 4 On the Programmable Feature Keys page enter a name and number for every Quick Dial entry you want to create Any hyphens in phone numbers are ...

Page 56: ...Syn248 Installation and Configuration Guide Back to Contents System Configuration 55 Figure 15 Quick Dial Key Location ...

Page 57: ...the device All local settings and personal information Call Logs and Voicemail for example remain stored in the Deskset Device Management consist of Deleting Devices on page 56 Change an Extension Number on page 57 Back Up and Restore Settings on page 58 Updating Devices on page 62 Device Log on page 65 Deleting Devices You can delete any device in the system from the Device Management page Discon...

Page 58: ...n the Deskset To erase all data on the Deskset if for example the Deskset is being given to another user press the RESET button on the Deskset for more than 5 seconds to return all settings to factory defaults Deleting a Gateway When replacing a Gateway delete the old Gateway first if you want the new Gateway to use the same line numbers Lines 1 to 4 for example If you do not delete the old Gatewa...

Page 59: ... menu at left click Device Management then Back up Restore The Back up Restore Extension Settings page appears 2 Select the desired extension from the Select Extension to Back up list Backup files are automatically saved on your computer using the following naming convention backup_ device _ extension number _ year month day _ time cfg The device will be either ds for a Deskset or system for a sys...

Page 60: ...tings 1 On the Back up Restore Extension Settings page choose the desired extension from the Select Extension to Restore list 2 Select whether you want to overwrite Voicemail and Call Logs If the desired extension does not appear in the list then you may need to reintroduce that extension See Reintroducing a Deskset Into the System on page 88 Ensure that there are no calls in progress or they will...

Page 61: ...em settings are distributed over all the Desksets and Gateways System settings are globally backed up once and restored to the whole system at one time The following items are backed up and restored The following items are not backed up The extension list The assignment of line numbers to the lines If a PC is installed in series with the Deskset restarting the Deskset causes the PC to lose its net...

Page 62: ...ch Gateway while restoration is in progress to ensure you do not receive any incoming calls If you have two Gateways and you log into one of the Gateways using the Gateway s IP address you do not need to unplug all of the other outside lines from the other Gateway just the one that you are logged into 2 In the navigation menu at left click Device Management then Back up Restore then System Setting...

Page 63: ...IP address for logging into the WebUI only the devices with compatible code versions appear in the device lists For this reason if you are updating devices individually wait until all other devices are updated before updating the software version of the device whose IP address was used for logging into the WebUI When an updated device restarts with new software it may disappear from the device lis...

Page 64: ...t for the latest software and systematically updates and then restarts each device All calls are dropped A caution appears to remind you that all devices will be restarted as each is updated Any Desksets registered with the system but disconnected at the time of the update will be updated as soon as they are reconnected to the system After you have started an update using attempts to manually upda...

Page 65: ...way press SELECT SELECT and DOWN Check the SW Ver Using requires a minimum Internet download bandwidth of 1 Mbps and an Internet router that can handle the same number of total simultaneous connections as the number of Syn248 devices Refer to your router specification Performing an update without meeting the minimum requirement may cause some or all devices not to update correctly See System Upgra...

Page 66: ...ce Log 1 In the navigation menu at left click Device Management then Device Log The Device Log page appears 2 In the Device Log list select the desired device and click If you select a Gateway Line Calibration Data and Configuration tables also appear For more information about Line Calibration see Resolving Audio Echoes on page 87 and Line Calibration Configuration on page 67 3 It takes a minute ...

Page 67: ...ation menu at left click Device Management then Device Log 2 In the Device Log list select the desired device 3 Under Configure Device Log click Browse and select the Device Log Configuration file 4 Click Configure Device Log After configuration is complete you can proceed with generating the Device Log as described on page 65 ...

Page 68: ...rocedure before connecting the lines to the Gateway Consult your Centrex line provider for the correct code to enter To enter Centrex line access codes 1 In the navigation menu at left click Device Management then Device Log 2 Select the Gateway from the Device Log drop down list Line Calibration Data and Line Calibration Configuration appear 3 Enter the Line Access Code for each line 4 Click Save...

Page 69: ...guration Guide Back to Contents System Configuration 68 Help To display the Help menu 1 In the navigation menu at left click Help A PDF Help file opens 2 To view a topic click the link for that topic The page for that topic appears ...

Page 70: ...em To register a device you need its MAC address To find a Deskset MAC address Press MENU then press 4 Note the MAC Address line To find a Gateway MAC address Press SELECT DOWN SELECT and then press DOWN until MAC Address appears To register your Syn248 system 1 Open a new browser tab and navigate to the product registration web site http smbtelephones att com registration 2 Select your products t...

Page 71: ...on menus Most of these functions are duplicated in the WebUI but if you need to assign static IP addresses they must be set at each device You can only directly reset a device from the device although some functions in the WebUI include device resets This chapter covers SB35010 Gateway Features on page 71 Gateway Front Panel Interface on page 73 Resetting Devices on page 77 Deskset Admin Settings ...

Page 72: ...onfiguration data See Gateway Front Panel Interface on page 73 2 Reset Restarts the Gateway when pressed momentarily Restores factory defaults when pressed and held for more than five seconds with the LAN cable disconnected 3 PSTN Line Ports 1 4 Traditional 2 conductor wiring FXO Foreign Exchange Office Ports 4 Bypass Port Traditional analog POTS Plain Old Telephone Service that is available durin...

Page 73: ...Highlight the previous or next item in the list LINE 1 LINE 2 LINE 3 LINE 4 Line status LEDs indicate the status for each PSTN line Indications include Off Connected Red steady Disconnected Green steady In use Green flashing Ringing Line status LEDs flash red after lines are connected while matching line impedance Display the Main menu when in idle mode or while in network detection mode save curr...

Page 74: ...SELECT key Figure 18 Gateway Idle Screen From the Main menu you can access Device Information Network Status and the Configuration menu Figure 19 Gateway Menu Screens Press the DOWN key to highlight an entry then press SELECT to see information about your Gateway or your Network On the Device Information screen you can view On the Network Status screen you can view Select Configuration to view or ...

Page 75: ...urrent Gateway settings Auto IP Is set automatically Static IP You can change the static IP only from the Gateway See your network administrator if you require details regarding IP assignments Restore Defaults Highlight Restore Defaults and press and hold SELECT for two seconds when prompted to restore the Gateway to factory defaults Upgrade Software Highlight Upgrade Software and press SELECT If ...

Page 76: ...ut or Host Not Found appears Upgrade the software from the PC which can offer more information about connection issues If the host is found but there is no new software available then the No New Version message appears 3 If new software is available you are prompted to initiate the upgrade by pressing SELECT or abort by pressing CANCEL Once the downloading starts the display indicates the progress...

Page 77: ...cess terminates the download midstream and returns you to the Configuration menu The previous software version remains in effect When the upgrade is complete the screen briefly displays 100 complete then 0 complete for few seconds before restarting the Gateway 4 Press CANCEL repeatedly until you return to the Gateway Main menu ...

Page 78: ...and the Redial list are all deleted You can use this complete reset when assigning Desksets to new users If you do not disconnect the LAN cable before pressing the RESET button the extension number is retained During the reset a PC connected to the Deskset PC port momentarily loses network connectivity If there is one Gateway in the system but there are still Desksets connected then only the voice...

Page 79: ...ss MENU then 3 2 Enter the Admin password and press SELECT The Admin Settings screen appears as shown in Figure 23 The default Admin password is 12345 To change this password see Changing the System Basic Settings on page 30 Figure 23 Admin Settings Screen The Admin Settings menu contains the items listed in Table 3 Table 3 Admin Settings Menu Menu Item See Intercom CFNA page 79 Fwd Trans to line ...

Page 80: ...CFNA settings 2 Press or to select a target Mailbox Ext Then press and enter a valid extension in the to Ext field Phone Then press and enter a valid phone number Before you can save this setting Fwd Trans to Outside Line must be enabled OFF Calls will not be forwarded Go to Step 5 3 Press to highlight the Delay before forwarding 4 Press or to adjust the delay time in five second increments 5 Pres...

Page 81: ... the Deskset IP address See Appendix B IP Addresses and Connectivity on page 104 for a discussion of the Syn248 network configuration and IP settings To display the IP Settings screen 1 On the Admin Settings menu press 3 to display the IP Settings screen 2 Perform one of the following a Press 1 to select IP Configuration See To set the IP Configuration on page 81 b Press 2 to select Set Edit Stati...

Page 82: ...s The number field is limited to 12 digits not including dots Pressing inserts a dot Pressing when the cursor is positioned next to a dot deletes the dot and the digit to the left of the dot 3 Press or to move to another field 4 Press to accept the changes and return to the Admin Settings menu IP Status The IP Status screen is for informational purposes only To view the IP status 1 On the IP Setti...

Page 83: ...62 To access the Deskset Software Upgrade feature 1 On the Admin Settings menu press 5 to display the Software Upgrade screen The system scans for an upgrade If an upgrade is available the Found New Upgrade screen appears Press to install the upgrade or press to return to the Admin Settings menu If no upgrade is available the No New Version screen appears Press to return to the Admin Settings menu...

Page 84: ...hown below 2 Press or to select the Clock source You can set the system time to follow a Network Time Protocol NTP Server recommended or you can set the time and date manually If you select NTP Server the manual time and date settings disappear from the screen Ensure that you have configured the NTP Server on the WebUI See Changing the System Basic Settings on page 30 3 If you select Manual use th...

Page 85: ...ions in this section Common Troubleshooting Procedures on page 85 Initial Installation on page 91 Display Messages on page 91 Gateway Setup on page 94 WebUI on page 95 PC Deskset Interaction on page 101 Other Deskset Features on page 102 For customer service or product information visit our web site at www telephones att com smb or call 1 888 386 2006 In Canada call 1 888 469 2005 ...

Page 86: ... the system configuration the user settings and Personal directory and Voicemail messages Call Log and the Redial list are all deleted You can use this complete reset when assigning Desksets to new users If you do not disconnect the LAN cable before pressing the RESET button the extension number is retained During the reset any PC connected to the Deskset PC port momentarily loses network connecti...

Page 87: ...REEN For Desksets connected to PoE check whether any PoE switch ports have been configured for devices that require less power If so configure your PoE switch to auto detect device power requirements For Deskset PoE specificiations see Appendix C Technical Specifications on page 105 To resolve a sluggish unresponsive or unusually behaving device Reset the device by pressing the RESET button for le...

Page 88: ... likelihood of audio performance issues like echo If the loss number is below 10 the following procedures can be used to increase the loss value a Unplug that telephone line at the Gateway b After the line LED turns red and waiting 15 to 30 seconds plug the line back in to recalibrate 5 If the recalibration has no effect a parallel device such as a fax adapter alarm system DSL modem or DSL splitte...

Page 89: ...Gateway display The Gateway might not have recognized a new outside telephone line so line calibration which allows the Gateway to adjust its performance depending on the phone lines characteristics did not occur After unplugging the telephone line wait for 15 to 30 seconds before plugging the telephone line back into the Gateway Reintroducing a Deskset Into the System If there are no more than 24...

Page 90: ... Defaults appears on the screen approximately 5 seconds After the Deskset restarts the screen displays EXT 0 c Reconnect the LAN cable The Deskset rejoins the system Unless the entire system was reset the Deskset retains its previous extension number After the Deskset rejoins the system the screen changes from EXT 0 to the previous extension number 4 If you backed up the Deskset settings in Step 2...

Page 91: ...ter a power failure the system self assigns a link local address to the Deskset beginning with number 169 254 If the Deskset is set for automatic IP address configuration it searches for the DHCP server If the DHCP server is found it assigns an IP address If the Deskset is set with static IP addresses the address does not change We recommend that you check each Deskset and Gateway to confirm that ...

Page 92: ... Network Make sure the LAN cable is attached to the LAN Probable Cause Corrective Action Many See To resolve a blank screen or device that does not work at all on page 86 Probable Cause Corrective Action The Gateway is failing to synchronize with a Deskset configured for a different system configuration Always disconnect the LAN cable before restoring factory defaults by pressing the RESET button ...

Page 93: ...e RESET button for more than five seconds See Reintroducing a Deskset Into the System on page 88 The maximum number of that type of device has been reached A device must be removed from the network and deleted from the system before another device can be added The same Deskset extension number already exists Reset the Deskset to factory defaults without the network cable connected Use a paper clip...

Page 94: ...ress the RESET button for at least five seconds d Restore your settings after the Deskset restarts Probable Cause Corrective Action Probable Cause Corrective Action The Deskset may have an incompatible software version Log on to the WebUI using the IP address of the Deskset and update the software See Updating Devices on page 62 Probable Cause Corrective Action The user attempted a software upgrad...

Page 95: ...and try the upgrade process again 2 If the error message persists visit our web site at www telephones att com smb or call 1 888 386 2006 In Canada call 1 888 469 2005 Probable Cause Corrective Action Line calibration allows the Gateway to adjust its performance depending on the phone lines characteristics The Gateway may not have performed calibration Make sure an LAN cable is plugged into the po...

Page 96: ... no longer compatible with the software version of other devices within the network 1 Log on to the WebUI as administrator using the IP address of the device that caused the problem Click Device Management then Update Device in the WebUI navigation menu at left 2 Click The selected device updates its software and reboots 3 After the device reboots check the software version number on the device to...

Page 97: ...address of a device that does not have updated software and is not having any problems Click Device Management then Update Device 2 Select a device from the Update Device drop down list Do not select the device whose IP address you are using 3 Click The selected device updates its software and reboots 4 After the device reboots check the software version number on the device to confirm that the up...

Page 98: ... Update individual devices manually either through the front panel or through the WebUI for that particular device Power cycle each device that did not get upgraded Unplug the power cord and plug it back in As each device reboots it automatically updates if it detects updated software in the system If you are using the WebUI to upgrade the device ensure that you log on using that device s IP addre...

Page 99: ...tically Probable Cause Corrective Action The device whose IP address you used to log in to the WebUI failed to synchronize with the system The WebUI displays Unable to save data at this time Please re enter and try again Check the device status in the footer of the WebUI page If the status reads Synch Failed see Reintroducing a Deskset Into the System on page 88 More than one person is using the W...

Page 100: ...de process again Probable Cause Corrective Action A communication error between the devices and the server If this failure occurred after clicking power cycle each device that did not get upgraded Unplug the power cord and plug it back in As each device reboots it automatically updates if it detects updated software in the system Wait 30 minutes to allow for the device to update If the system has ...

Page 101: ...to Network port on the Deskset and to the LAN If a PC at the same workstation is sharing the LAN connection attach a network cable to your computer s network port and to the PC port on the back of the Deskset Confirm that your computer and your Deskset are on the same subnet so that they can talk to each other Check that the first three sections of each IP address are the same If they are not they...

Page 102: ...to your LAN Probable Cause Corrective Action A computer connected through the Deskset will be limited to 100 Mbits s Use separate network connections for the Deskset and the computer so that the computer can take advantage of the network s greater bandwidth Probable Cause Corrective Action For PCs connected to the LAN through Desksets disruption to the Deskset operation affects the PC For example ...

Page 103: ...other Desksets Verify that the first two sections of the IP address the portion before the second dot match the IP addresses of the other Desksets or that the subnets are set up to communicate with each other Press MENU 4 at a Deskset to find the IP address If the other Desksets have been assigned static IP addresses you may have to assign your Deskset a static IP address to match the other Deskse...

Page 104: ...g lines as shown in Figure 27 After adding the Gateway to the system ensure that you select a Phone Line CFNA destination for the additional phone lines connected to the Gateway see Configuring Phone Line CFNA on page 41 and that you assign the lines to Line keys on the Desksets see Deskset Programmable Feature Keys PFKs on page 52 Figure 27 Expanded Syn248 System blue lines telephone red lines Et...

Page 105: ...ase is renewed as long as the device remains connected and there is no change to the network However if the device is disconnected or if there is a network or AC power interruption the lease may not be renewed that is the IP address expires and a new IP address may be assigned Most LANs use servers to automatically assign IP addresses Syn248 defaults to assuming that this automatic assignment will...

Page 106: ...ngle SB35010 Gateway 1 8 13 5 7 9 H W D Weight SB35010 Gateway 88 18 oz 2500 g including adapter SB35020 Deskset 35 59 oz 1009 g including adapter Power Requirements SB35010 Gateway 5 1 V DC 1700 mA SB35020 Deskset 5 1 V DC 1700 mA AC Adapter PoE Class 2 RJ 45 Ethernet Network Jack 10Base T 100Base Tx with auto MDI MDIX switching Gateway Telephone Jacks 1 4 and BYPASS FXO ports use traditional 2 c...

Page 107: ...Answer Seconds Before Forwarding 5 though 45 15 Intercom Call Forward No Answer Target Type Voicemail Extension Outside Phone Number Voicemail Phone Line Call Forward No Answer Target Type Off Voicemail Extension Outside Phone Number Auto Attendant Auto Attendant Call Forward No Answer Telephone Number 32 Digits Maximum Nothing Delete Extension All extensions Nothing Directory First and Last Name ...

Page 108: ...s to outside line Enabled Disabled Enabled Contrast 1 through 9 5 Current Greeting Primary Alternate Pre Set Pre Set Current Name Personal Pre Set Pre Set Date and Time when server is not available 12 00PM January 1 2009 Directory List All Personal System Extension All First Name Last Name toggle First Name Last Name First Name IP Configuration Auto Static Auto Key Beeps On Off On Preferred Audio ...

Page 109: ...e 28 Gateway Parts List ǎǐǔ Business Telephone System from AT T System Installation Quick Start Guide For complete installation information see the Installation and Configuration Guide available at Ɠ Ɠ Ɠ Ƥ Important Product Information Cat 5 Ethernet LAN Cable Gray Four Phone Cords Power Adapter SB35010 Gateway Mounting brackets and screws Installation Quick Start Guide ...

Page 110: ...kset Parts List Figure 29 illustrates the Deskset parts Figure 29 SB35020 Deskset Parts List Quick Start Guide AT T SB35020 Deskset Quick Start Guide Important Product Information SB35020 Deskset Base Deskset Stand Handset Power Adapter Blue Tag Handset Cord Cat 5 Ethernet LAN Cable Gray ...

Page 111: ...t install the equipment near a sink bathtub or shower Electrical Storms Electrical storms can sometimes cause power surges harmful to electronic equipment For your own safety exercise caution when using electrical appliances during storms Cleaning Your Unit Your unit has a durable plastic casing that should retain its luster for many years Clean it only with a soft cloth slightly dampened with wat...

Page 112: ...ke it to an authorized service facility Opening or removing parts of the unit other than specified access doors may expose you to dangerous voltages or other risks Incorrect reassembling can cause electric shock when the product is subsequently used Do not overload wall outlets and extension cords The power adapter is intended to be correctly oriented in a vertical or floor mount position The pron...

Page 113: ...ephone into this jack Call Forward No Answer Automatically forward unanswered calls to Voicemail the Auto Attendant an extension or outside phone number The system administrator can configure a Call Forward No Answer setting for each line connected to the Gateway and an Intercom Call Forward No Answer setting for each Deskset Cat 5 wiring A twisted pair data cable commonly used in offices for comp...

Page 114: ... default The original product settings FXO Foreign Exchange Office The Gateway telephone signaling interface between the telephone lines and the LAN Gateway A network device equipped for interfacing with another network that uses different protocols greeting preset The voice message that plays to callers if the user has not recorded an outgoing message grounding An electrical ground connection tha...

Page 115: ...dard protocol that assures time synchronization in a computer network Network Termination Unit NTU A device that terminates a network access point off hook Indicates that you are on a phone call have lifted the corded handset or have pressed the SPEAKER or HEADSET key to answer a call or to prepare to place a call You are off hook from the moment that you hear a dial tone to when you hang up a cal...

Page 116: ...son to perform functions such as setting up and modifying system configurations This system administrator can be an employee or your telephone equipment provider System Directory see System list System list This list of names and phone numbers is created and maintained by the system administrator All system users can sort and view this list system operator The extension that callers reach by diali...

Reviews: