


2-3
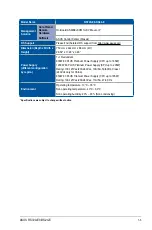
ASUS RS720-E9-RS24-E
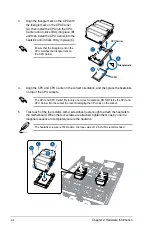
2.2.1
Installing the CPU and heatsink
To install a CPU:
1.
Remove the rear cover. For more information, see the section
Chassis cover
.
2.
Remove the air duct screw (A), remove the air ducts (B), and then remove the PnP
caps (C) from the CPU sockets.
Keep the PnP cap. ASUS will process Return Merchandise Authorization (RMA) requests
only if the motherboard comes with the PnP cap on the LGA 3647 socket.
2.2
Central Processing Unit (CPU)
The motherboard comes with a surface mount LGA 3647 socket designed for the Intel
®
Xeon
®
Processor Scalable Family Series.
•
Upon purchase of the motherboard, ensure that the PnP cap is on the socket and
the socket contacts are not bent. Contact your retailer immediately if the PnP cap
is missing, or if you see any damage to the PnP cap/socket contacts/motherboard
components. ASUS will shoulder the cost of repair only if the damage is shipment/
transit-related.
•
Keep the cap after installing the motherboard. ASUS will process Return Merchandise
Authorization (RMA) requests only if the motherboard comes with the cap on the LGA
3647 socket.
•
The product warranty does not cover damage to the socket contacts resulting from
incorrect CPU installation/removal, or misplacement/loss/incorrect removal of the PnP
cap.
Summary of Contents for RS720-E9-RS24-E
Page 1: ...2U Rackmount Server User Guide RS720 E9 RS24 E ...
Page 10: ...x ...
Page 24: ...Chapter 1 Product Introduction 1 14 ...
Page 64: ...Chapter 2 Hardware Information 2 40 ...
Page 69: ...3 5 ASUS RS720 E9 RS24 E 3 3 Rail kit dimensions 589mm 43 6mm 900mm 43 6mm ...
Page 70: ...Chapter 3 Installation Options 3 6 ...
Page 72: ...Chapter 4 Motherboard Information 4 2 4 1 Motherboard layout ...
Page 96: ...Chapter 4 Motherboard Information 4 26 ...
Page 140: ...5 44 Chapter 5 BIOS Setup ...
Page 158: ...6 18 Chapter 6 RAID Configuration ...
Page 180: ...A 8 Appendix ...