ASUS RS100-E6/PI2
5-15
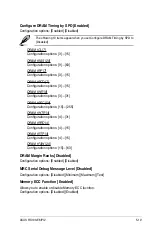
Ratio CMOS Setting [Auto]
Allows you to adjust the ratio between CPU Core Clock and BCLK Frequency. Use
the <+> and <-> keys to adjust the value.
Configuration options: [Auto] [09.0] [10.0] [11.0] [12.0] [13.0] [14.0] [15.0] [16.0]
[17.0] [18.0] [19.0] [20.0]
C1E Support [Enabled]
Allows you to enable or disable Enhanced Halt State support.
Configuration options: [Disabled] [Enabled]
Hardware Prefetcher [Enabled]
Allows you to enable or disable the Hardware Prefetcher function.
Configuration options: [Disabled] [Enabled]
Adjacent Cache Line Prefetch [Enabled]
Allows you to enable or disable the Adjacent Cache Line Prefetch function.
Configuration options: [Disabled] [Enabled]
Max CPUID Value Limit [Disabled]
Setting this item to [Enabled] allows legacy operating systems to boot even without
support for CPUs with extended CPUID functions.
Configuration options: [Disabled] [Enabled]
Intel(R) Virtualization Tech [Enabled]
The Intel
®
Virtualization Technology allows a hardware platform to run multiple
operating systems separately and simultaneously, enabling one system to virtually
function as several systems. Configuration options: [Disabled] [Enabled]
Scroll down for more items.
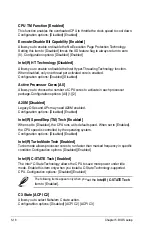
v02.61 (C)Copyright 1985-2008, American Megatrends, Inc.
BIOS SETUP UTILITY
Advanced
CPU TM Function
[Enabled]
Execute-Disable Bit Capability [Enabled]
Intel(R) HT Technology
[Enabled]
Active Processor Cores
[All]
A20M
[Disabled]
Intel(R) SpeedStep(TM) Tech [Enabled]
Intel(R) TurboMode Tech
[Enabled]
Intel(R) C-STATE Tech
[Enabled]
C3 State
[ACPI C2]
C6 State
[Enabled]
C State package limit setting [Auto]
C1 Auto Demotion
[Enabled]
C3 Auto Demotion
[Enabled]
←→
Select Screen
↑↓
Select Item
+- Change Option
F1 General Help
F10 Save and Exit
ESC Exit
Sets the ratio between
CPU Core Clock and the
FSB Frequency.
Note:If an invalid
ratio is set in CMOS
then actual and
setpoint values may
differ.
Summary of Contents for RS100-E6 PI2
Page 1: ...1U Rackmount Server RS100 E6 PI2 User Guide ...
Page 18: ...Chapter 1 Product introduction 1 8 ...
Page 22: ...Chapter 2 Hardware setup 2 4 3 Secure the cover with three screws ...
Page 48: ...Chapter 4 Motherboard information 4 2 4 1 Motherboard layout ...
Page 130: ...6 34 Chapter 6 RAID configuration ...


