background image

art5.4/8.8

5

6.  Installing and placing the unit.

Make sure you leave a minimum 4 cm of space free around the unit to allow accumulated operating heat to dissipate.

• Base connection of loudspeakers 

  Provide cabling (star-form) cabling from the loudspeakers to the unit (fi g2-12). When doing so respect the polarity 

of the loudspeaker: red clamp of the loudspeaker with the red wire connection, black clamp of the loudspeaker with 

the black wire connection. We recommend use of banana plugs. The loudspeaker may be of a 4 or 8 ohm type.

• RF antenna

  Connect the RF antenna supplied to the connection provided for it ((fi g2-2). Avoid placing in the immediate vicinity 

of possibly interfering transmitters, such as plasma screens, monitors, antennas,…). If installing the ART5.4/8.8 unit 

inside a metal cabinet, install the RF antenna outside the cabinet. Changing the position of the antenna once con-

nected may result in better reception.

• FM antenna

  You can make use of the FM antenna cable supplied. Plug this into the connection intended for it (fi g 2-10). 

We recommend use of an outdoor antenna or coax connection for still better reception.

• Optional: Connecting an external sound source 

•  Any sound source can be connected via an RCA cable (e.g. Oehlbach) with the RCA inputs on the back of the unit 

(fi g2-11). Respect the colours thereby (black/red). The external sound sources can be controlled via the infrared 

ports (see fi g. 2)

• Power cord

After making all connections, plug the power cord supplied into the unit (fi g2-14) and a correctly installed mains 

socket.
 

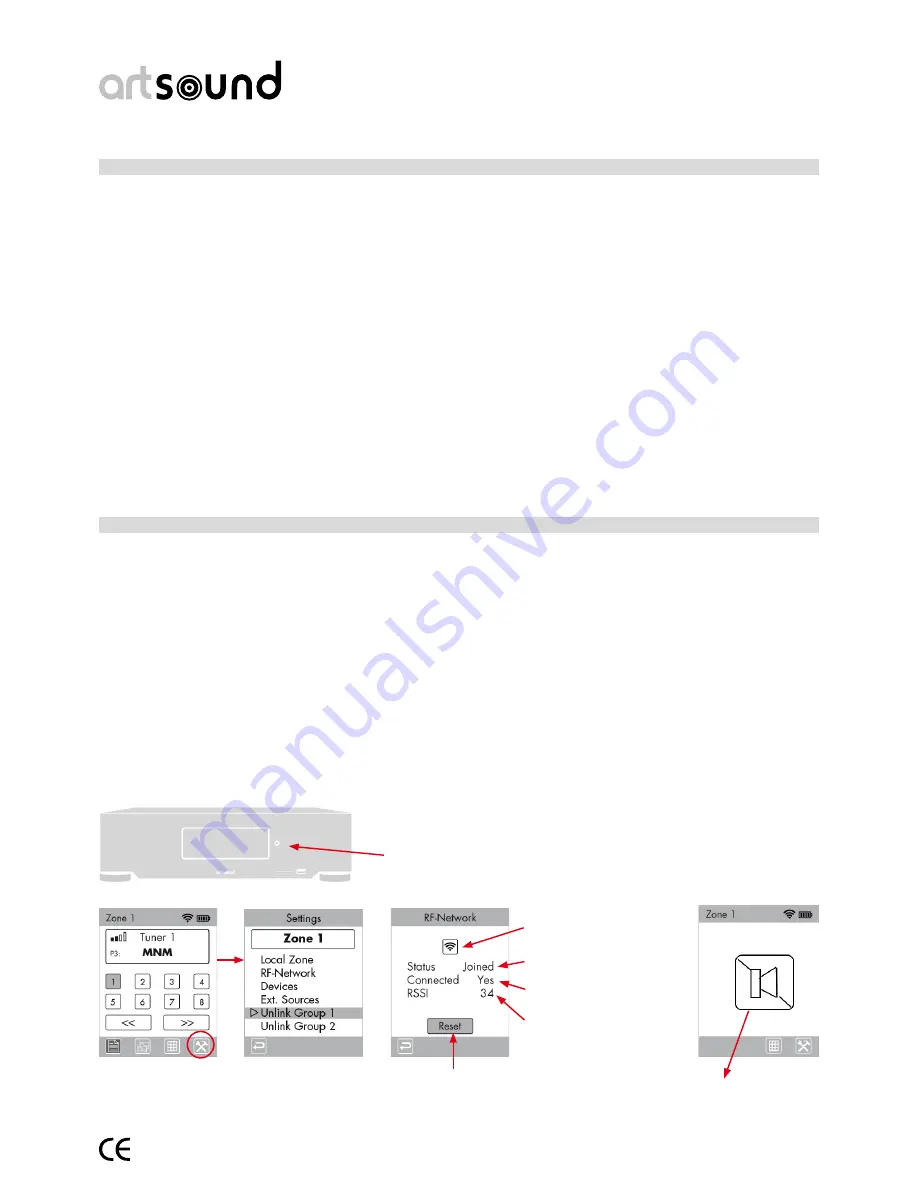
7.  Synchronising the rF remote control with the unit.

Before the ART5.4/8.8 unit can be used with the remote control supplied (RM54.88) it must be synchronised in the 

wireless network of the ART5.4/8.8 system.

•  Briefl y press (<1 sec.) the ‘setup’ button on the front of the unit. The message “add remote” appears.

•  Then press longer (2 sec.) on the ’setup’ button, whereby “entering RF mode” appears.

•  Via the menu on the remote control go to “settings”, “RF-network”, press on “reset” (= OK button for 2 sec.). 

The remote control will then seek contact with the unit. After some time (up to 30 sec.) the message “remotes 

added #” appears on the unit’s display, whereby the number will increase by one (remote control found for this 

 session).

•  Then briefl y press (<1 sec.) the ‘setup’ button on the front of the unit to exit this mode. “leaving RF mode” appears 

on the display.

•  It may now take up to 30 sec. before the network is set up with its security. 

•  Note:  If a second ART5.4/8.8 unit is in the area, we recommend switching it off while synchronising the remote 

 control.

•  Several remote controls can be synchronised in the same way.

Find network

Connected with main unit

Secured 

Reception level

RM88 has joined the 

RF network. Zone 1 

switched off.

Setup button

Settings

2 sec

Summary of Contents for ART 5.4

Page 1: ...m into operation Keep these instructions in case you need to refer to them later The pictures in this manual are merely an example Check our website for any updates of this manual www artsound be Hous...

Page 2: ...te sources coupled in analogue mode infrared control 11 11 2 Synchronising the IR codes devices 11 11 3 Creating the external sources layout 12 11 4 Assigning an external source to a device 13 11 5 Re...

Page 3: ...ent on a cloth carpet or other flammable materials Have the equipment installed by a specialist and follow his advice on its use 3 Contents of the box Check whether the following components are in the...

Page 4: ...lume higher Menu navigation and selection center button is ENTER Confirm Volume lower Back to previous menu Zone on off Fig 1 Fig 2 Fig 1 Fig 2 1 Off button 1 IR out ports 8 Expansion port S 4 art8 8...

Page 5: ...ig2 11 Respect the colours thereby black red The external sound sources can be controlled via the infrared ports see fig 2 Power cord After making all connections plug the power cord supplied into the...

Page 6: ...0 Poor range possible loss of communication Whenever the antenna symbol is moving there is no connection with the base unit ART8 8 or ART5 4 9 rF network reset 9 1 With an rF network reset all synchro...

Page 7: ...that zone by pressing the standby button 10 3 How do I select another zone Select Zones Confirm 10 4 How do I define a group It is possible to include one or more zones in a group so that they will ma...

Page 8: ...find and save my favourite radio station Note To save a station with the mono option first select the mono option and only then save B Deleting a zone from a group C Cancelling the total group a addi...

Page 9: ...be deleted from the database If you have to index a large number of tracks for example on a USB hard disk we would advise you do this on an NAS Network Access Server drive because of the more permane...

Page 10: ...control for a zone Go to the Settings screen and select Local Zone then choose Sound You can adjust the low and high tones 10 12 Adjusting the maximum volume for a zone If you want to limit the volum...

Page 11: ...select Devices Choose a Device which is free 1 8 and Rename in the next screen e g CD player via the keypad and press OK Select Settings Select Devices Select 1 source Select Rename Select IR Codes i...

Page 12: ...a learned IR code In the setup menu choose Devices and select the device wanted from the list e g CD player In the following menu option choose Layout You will now see the 10 empty button fields Choos...

Page 13: ...urce 1 3 for ART8 8 and 1 2 for ART5 4 Choose the option Assign Device Choose the desired device e g CD player 11 5 renaming the external source Go to Settings and choose Ext Sources Choose the desire...

Page 14: ...a range of a lot of devices including routers Even so the range of the computer must also be set to within that same range You may also set this permanent IP address to suit your needs using the webse...

Page 15: ...is active no volume 6 Operate the selected source in this example choose a preset for Tuner 1 12 2 3 Detail of sources Tuner 1 and Tuner 2 1 Select the source you want to use Tuner 1 2 Fine tuning of...

Page 16: ...aylist will be 50 randomly selected tracks 4 Make your selection here search Music Database Muziekdatabase list with all artists list with all albums search via file system managing the playlists 12 2...

Page 17: ...d mouse button for options 12 2 8 Music database of albums Muziekdatabank albums List of all indexed albums Use right hand mouse button for options 12 2 9 Music databank of le system Muziekdata bank b...

Page 18: ...name of the drive e g N2200 Step 2 Note down the exact name of the shared folder on the network drive In our example our music is in the iTunes_music folder Step 3 Select Add network share Netwerk sh...

Page 19: ...art5 4 8 8 19 5...

Page 20: ...music on this computer Step 3 enter this data in the Network Shares of the webserver The user name and password are those that you log in with Note 4 for Windows XP if your computer is included in a l...

Page 21: ...ac cessible both via the network with the ART5 4 8 8 see configuration of network shares and with the PC where iTunes or Windows MediaPlayer is located Step 1 iTunes exporting playlists Step 2 Decide...

Page 22: ...groups With the ART5 4 8 8 it s possible to create 2 groups 2 or more zones can be combined in one group So one group reacts as one single zone Assign a name to the group check off the relevant zone a...

Page 23: ...ge the name of the device for example i Pod docking Step 2 Using the right hand mouse button click on one of the keys to which you want to assign the IR function Step 3 Select a function e g Previous...

Page 24: ...or via a trigger input Example of a schedule In a doctor s surgery the radio in the waiting room has to be switched on at 8 a m on Mondays and Tuesdays Step 1 Press on add toevoegen and assign a name...

Page 25: ...this action list Step 5 Click on Add Toevoegen alongside Events Give a name e g Waiting Room Wachtkamer Alongside Day Dag select weekly setting and check Monday Maandag and Tuesday Dinsdag Indicate th...

Page 26: ...Adding database scan Database scan toevoegen This very useful function which enables you to automatically synchronise the database See also 12 3 1 You can also choose to start an automatic synchroni s...

Page 27: ...help you Choose Help check for updates In case you have the message Server not find you have to check your network settings a valid DNS ad dress should be available Take the same DNS address as your...

Page 28: ...s The right mouse functions are replaced by additional buttons 12 6 Mobile webserver surf to http ipadres mobile This is the mobile version ideal for use with smaller touchscreens such as those of a s...

Page 29: ...place it in the active playlist and only then to delete the active playlist delete YES 12 6 5 External source The keys configured in the full ver sion of the webserver see 12 3 4 appear on the extern...

Page 30: ...p 50KHZ Digital players 3 x digital player model art8 8 1 x digital player model art5 4 Decoder format mp3 wav wma m4a USB connections 2 USB connections 1 x front and 1 x rear USB 2 0 compatible with...

Page 31: ...art5 4 8 8 31 www artsound be House of Music nv Kruishoutem Belgium www artsound be Tel 32 9 380 81 80 Fax 32 9 386 12 35 info artsound be...

Reviews: