background image

5

BEFORE FIRST USE

1.  Read all instructions and important safeguards.

2.  Remove all packaging material and check that all items have been received in good condition.

3.  Tear up all plastic bags as they can pose a risk to children.

4.  Make sure the unit is unplugged. Open the top lid, remove the funnel and other detachable parts and clean them in warm, soapy water. Rinse and dry 

thoroughly. 

5.  Pour cold drinking water into the water tank to level “10”. Do not add coffee. Plug the cord into the power outlet and press the ON/OFF button to have 

the water filter through the coffee maker and into the Carafe. Repeat 2-3 times to ensure the coffee maker is clean.

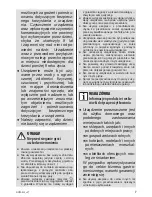
•  Set the current time by pressing the 

PROG/1-4 CUP button once. “CLOCK” 

will appear on the upper-right corner of 

the LCD Display. Set to the current time 

by pressing the HOUR and MINUTE 

buttons to adjust the hours and minutes 

accordingly.

To Set the Clock:

Coffee Maker

GRIND OFF

1-4 CUP

AUTO

RUN

PROG/1-4 CUP

GRIND OFF

MIN

HOUR

ON/OFF

AUTO

CLOCK

10

MAX

8

6

4

2

Coffee Maker

GRIND OFF

1-4 CUP

AUTO

RUN

PROG/1-4 CUP

GRIND OFF

MIN

HOUR

ON/OFF

AUTO

CLOCK

Summary of Contents for ACM-900GB

Page 1: ...to the store Aroma s customer service experts are happy to help Call us toll free at 1 800 276 6286 Answers to many common questions and even replacement parts can be found online Visit www AromaCo co...

Page 2: ...and brew feature lets you pour a cup of coffee mid brew perfect for those rushed early mornings The durable permanent filter makes brewing cup after cup hassle free while cleaning is a breeze as all r...

Page 3: ...fee maker to cool completely before putting on or removing any parts and before cleaning 10 Do not operate this appliance when the power cord or plug is damaged if it malfunctions or is dropped or has...

Page 4: ...lled by children or tripped over unintentionally c The extension cord should be a grounding type 3 wire cord Short Cord Instructions IMPORTANT SAFEGUARDS 2 Grounding Instructions This appliance must b...

Page 5: ...3 10 MAX 8 6 4 2 PARTS IDENTIFICATION Lid Funnel Support Carafe Keep Warm Plate Water Tank Cover Water Level Indicator Window Water Tank...

Page 6: ...G 1 4 CUP GRIND OFF MIN HOUR ON OFF AUTO Filter Cover Grind Off Indicator Light Auto Indicator Light LCD Display 1 4 Cup Indicator Light Run Indicator Light PROG 1 4 CUP Button HOUR Button GRIND OFF B...

Page 7: ...t add coffee Plug the cord into the power outlet and press the ON OFF button to have the water filter through the coffee maker and into the Carafe Repeat 2 3 times to ensure the coffee maker is clean...

Page 8: ...on the Filter Cover pointing towards the marking Place the Filter into the Funnel so it rests securely Once the Filter is set correctly into the Funnel rotate the Filter counterclockwise until an audi...

Page 9: ...s the coffee maker will eventually begin dripping coffee again If serving with the Carafe for longer than 30 seconds turn the coffee maker off by pressing the ON OFF button twice 10 MAX 8 6 4 2 9 Make...

Page 10: ...e the coffee maker automatically sets to brewing 5 12 cups Plug the power cord into the outlet The display will show a 12 00 with the colon blinking Close the Lid Make sure the Carafe is placed secure...

Page 11: ...ght will illuminate The brewing process can be interrupted by pressing the ON OFF button twice at any time The appliance will resume brewing once the ON OFF button is pressed again You can remove the...

Page 12: ...the current time Press the PROG 1 4 CUP button again after the current time has been set TIMER will show on the upper left corner of the LCD Display Set to the desired start time by pressing the HOUR...

Page 13: ...arafe for serving If a pre programmed time has been set for the coffee maker and the Auto indicator light is illuminated the coffee maker can still be used at any time To operate press the ON OFF butt...

Page 14: ...Be sure to unplug the appliance before cleaning To protect against electrical shock do not immerse cord plug or the coffee maker base in water or liquid All removable parts are dishwasher safe 3 2 CAU...

Page 15: ...cator Window use a ratio of water to descaler of 4 to 1 Make sure the Carafe is placed securely on the Keep Warm Plate Press the ON OFF button once The Run indicator light will illuminate and the coff...

Page 16: ...ank with water up to the level 10 marking on the Water Level Indicator Window Press the ON OFF button to let the coffee maker run a full cycle Once complete do this at least two more times to complete...

Page 17: ...and store it in a refrigerator to maintain its freshness 3 For optimum coffee taste buy whole coffee beans and finely grind them just before brewing 4 Do not re use coffee grounds since this will gre...

Page 18: ...ranty is also invalid in any case that the product is taken apart or serviced by an unauthorized service station This warranty gives you specific legal rights which may vary from state to state and do...

Page 19: ...17 NOTES...

Reviews: