background image

001.10610.EN rev

. 13

Care and Maintenance

16

Care and Maintenance

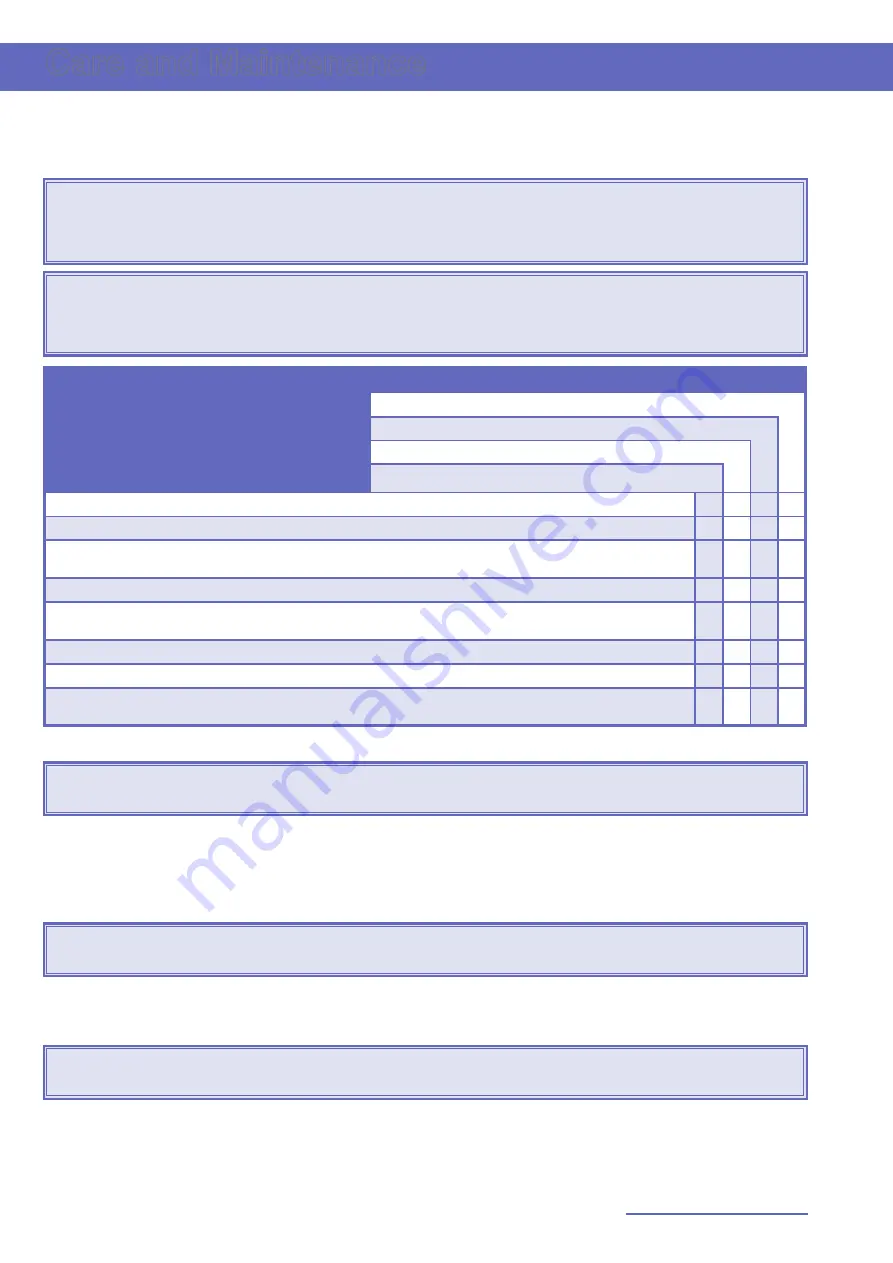
Preventive Maintenance Schedule

The 

EASYTRACK

 is subject to wear and tear, and the following actions must be performed when specified 

to ensure that the product remains within its original manufacturing specification.

WARNING

: The points on this checklist are the minimum the manufacturer recommends. In some 

cases more frequent inspections should be carried out. Continuing to use the 

EASYTRACK

 without 

conducting  regular  inspections  will  seriously  compromise  the  user  and  resident  /  patient’s  safety. 

Preventive maintenance specified in this manual can prevent accidents.

WARNING: 

Safety  related  maintenance  and  authorized  service  must  be  carried  out  by  qualified 

personnel, fully trained in servicing procedures by Arjo and equipped with correct tools and proper 

documentation, including 

Parts List

 and

 Service Manua

l. Failure to meet these requirements could 

result in personal injuries and / or unsafe equipment.

POINTS TO BE INSPECTED BY  

USER / SERVICE TECHNICIAN 

FREQUENCY

Annually / every 1400 transfer / every 50 assembling*

Monthly 

Before every use

Before installing  

   

Inspect for evidence of external damage or missing parts.

Ensure all components are in working order.

Using the clip-on level, make sure that all posts are straight. If any post is not straight remove the 

track and level post accordingly.

Red mark on top of each post (under the top plate) is not visible.

The tracks are secured in place. Press down on each track to make sure they are locked onto the 

posts.

Clean the inside of the tracks to ensure there is no dust or grease build-up inside the tracks.

Check to make sure that the trolleys move freely along the tracks.

Make sure the padding on the foot and top plate is clear of any foreign substance and is not 

damaged. Have the paddings replaced accordingly.

* Which ever comes first: Annually - every 1400 patient transfer cycles - every 50 assembling/disassembling cycles.

WARNING

: If any of the above inspection point fails, DO NOT USE the 

EASYTRACK

 system until 

appropriate corrective action is taken.

Annual Inspection by an Authorized Technician

The 

EASYTRACK

 must be inspected by a qualified Arjo technician on an annual basis to ensure 

the proper functioning of its components, as well as the safety of the patients and care givers that 

use the 

EASYTRACK

. Please contact your local representative to make arrangements.

NOTE

: If the product does not work as intended, immediately contact your local Arjo agent for 

support.

Cleaning

To clean the 

EASYTRACK

, wipe it down with a damp cloth using warm water and mild detergent. 

CAUTION

: Do not use phenol, chlorine or any other type of solvent that may damage the 

finish.

To ensure a better rolling surface for the trolley wheels, clean the inside of the track every four 

months. To do so, insert a damp cloth in the opening and slide it from one end of the track to the 

other.

Summary of Contents for EASYTRACK 9330010

Page 1: ...001 10610 EN rev 13 10 2019 INSTRUCTIONS FOR USE EASYTRACK SYSTEM 3 POST ASSEMBLY Model no 9330010...

Page 2: ...ing to the Arjo group of companies Arjo 2019 As our policy is one of continuous improvement we reserve the right to modify designs without prior notice The content of this publication may not be copie...

Page 3: ...ice 3 Homecare Environment Considerations 3 Symbols Used 4 General Symbols 4 Product Description 5 EASYTRACK System Requirements 6 Ceiling Requirements 6 Floor Requirements 6 Other Requirements 6 Room...

Page 4: ...Page intentionally left blank...

Page 5: ...Arjo vendor If a serious incident occurs in relation to this medical device affecting the user or the patient then the user or patient should report the serious incident to the incident to the medica...

Page 6: ...part and lead to a patient fall The life span is the safe operating time period before a complete overhaul is required Following are factors that have an impact on the EASYTRACK life span aging of th...

Page 7: ...r Do not drop product may cause breakage Do not completely submerge in water Do not attempt to over extend the track past the locking point Do not install product if Neoprene on top or bottom plate ap...

Page 8: ...5223 3 15 Points out the manufacturer s catalogue number Indicates a potential risk see Instructions for Use for corrective action SN Points out the manufacturer s serial number SWL SWL is the maximum...

Page 9: ...5 Post top for pivot post 700 10560 1 6 Top plate 700 10400 3 7 Pivoting Track extendable 1 9 3 m with the standard trolley 700 10850 1 8 Standard trolley 700 10650 1 9 Standard post 700 10500 2 10 C...

Page 10: ...t fall Floor Requirements Flooring must comply to local building code standards WARNING Termites or water damages may affect the structure of the floor Floor must be clear of any dust grease water or...

Page 11: ...the three posts considering the following see Fig 6 Distance from the wall adjacent to the two standard posts to allow clearance for the pivot track overhang Minimum distance of 1 9m 75 between the t...

Page 12: ...ps into place Fig 10 5 Take one of the posts out of the box Turn the post upright Place the clip on level see Fig 2 item 16 onto the post at approximately waist height Fig 11 6 Place the post onto the...

Page 13: ...longer visible Fig 19 Incorrect Correct Red mark visible Red mark not visible WARNING Red mark must not be visible for the post to be safely secured see the warning label apposed on each post as show...

Page 14: ...f the pivot post Tilt the track upward 45 to latch it onto the post Fig 28 21 Extend the track and thread the wheels of the trolley through the upper portion of the track Fig 29 22 Continue to extend...

Page 15: ...lation against Fig 36 Make sure the red mark on top of each posts is not visible Using the clip on level make sure that all posts are straight Make sure that the both tracks are locked into place and...

Page 16: ...ged from the trolley tilt it to a 45 angle and lift the end at the pivoting post to release it from the hooks Fig 42 9 Put the end stopper back on the track and secure it by tightening the Allen key 1...

Page 17: ...essed in when there is downward pressure on them Pressure must be released to press in pin d Push top portion of post downward e Repeat until the metal pins are no longer visible and the top of the po...

Page 18: ...the post when turning the upper portion clockwise See assembling instruction step 9 4 Not able to tighten post enough to hide the red mark Have you extended the post long enough a Release pressure usi...

Page 19: ...and layout Does the pivoting track need to be more centred between the two standard posts See figure below Pivoting post may need to be moved so it is more centred between the two standard posts Follo...

Page 20: ...vel post accordingly Red mark on top of each post under the top plate is not visible The tracks are secured in place Press down on each track to make sure they are locked onto the posts Clean the insi...

Page 21: ...0 kg 440 lb Range Fixed Track 1900 3160 mm 74 124 1 2 Pivot track 1900 3160 mm 74 124 1 2 Post length 2130 2745 mm 84 108 Material Aluminium END OF LIFE DISPOSAL Package Corrugated cardboard recyclabl...

Page 22: ...Page intentionally left blank...

Page 23: ...6 87426222 E mail Italy promo arjo com MIDDLE EAST Arjo Middle East FZ LLC Office 908 9th Floor HQ Building North Tower Dubai Science Park Al Barsha South P O Box 11488 Dubai United Arab Emirates Dire...

Page 24: ...d health challenges With products and solutions that ensure ergonomic patient handling personal hygiene disinfection diagnostics and the effective prevention of pressure ulcers and venous thromboembol...

Reviews: