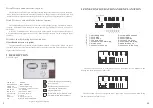
Figure13: The LCD display when NO 2 remote armed the system
ARMED
08: Setting time and date. The system time should be set with Year-Month-Date
Hour-Minute - Day using the numeric keypad of the panel.
7 = Sunday; 1 = Monday; 2 = Tuesday; 3 = Wednesday;
LOG
RMOT
M
D
H
M D
4 = Thursday; 5 = Friday; 6 = Saturday. (a 24 hour mode)
09: PIN code set, this a 6 Digit Code for the Remote Access, Keypad Dis-Arm. Enter the
required PIN No using the numeric Keypad on the panel. Cancel the PIN using the
Delete key on the panel. Default PIN: 123456
RMOT
ARMED : keypad armed
Figure14:
The LCD display when t
he panel is armed by keypad
10: Set number of ringing in times before answer. Cancel this set using Delete key on the
panel. When the PIN code or the number of ringing is not set, the panel couldn't have
Remote access; Default number: 9
LOG
M
D
H
M D
ALM
11. Arming with sounder ON/OFF 0: no sounder when arming 1: sounder when arming
12: Two way communication ---Speak: 0: No 1: YES. Default: 0
When SPEAK is required, within 2.5 seconds after transmitting data to the C.S, the
Panel. Will receive the SPEAK request from C.S. If it is not required, the panel hangs
up automatically
ALM
:
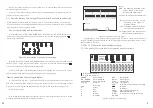
phone line cut_off alarm
Figure15: The LCD display when the phone line is cut
13: Engineer Option. Listen to dial out DTMF. 0 = NO : 1 = YES. This option will
Automatically extinguish when the panel is closed or on the hour. Default: 0
14: Mains Fail alarm. The panel will alarm when mains power fails
0 = NO ; 1 =YES.
LOG
M
D
H
M D
ALM
15: Exit O:
٠
OFF /Delay timer with sounder ONN
١
: OFF. Default: ON.
16: Phone line cut alarm: The panel will automatically check the line and alarm when It
Detects it is not ok. 0: NO 1: YES. Default: 0
17: Test period of 24 hours: 1 = avaible 0 = OFF
System config
Auto armed time
ALM
:
tamper alarm
ARMED
H
M
Figure16: The LCD display when there is a tampered alarm
SET
CONFIG
TIMED
LOG
M
D
H
M D
ALM
The second auto armed Auto armed
ALM
:
main power fail alarm
Figure17: The LCD display when the power fails
The second auto armed
:
press * or # to select the 1– 6
ARMED
:
default
PART ARMED
:
press the arm key to select ARMED or PART ARMED
Figure11 : The second auto armed time is at 13:30
15
12
Summary of Contents for ZDAS-300
Page 2: ......

