Press the key fob Dis-Arm will return the control panel back to normal status. Otherwise
the Walk Test will Auto extinguish approximately 30 seconds after last test signal was
received.
3.6 Deleting Registered Key Fobs
If no further actions take place the panel will automatically return to normal state after
approximately 30 seconds. Otherwise at the end, press the Dis-Arm key on a registered Key
Fob to return the panel to normal state.
3.16 View detector's total in every zone
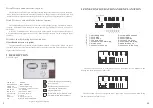
Deleting Registered Key Fob: Press the DELETE key on the Keypad, a series of - - - will
appear on the LCD. Press the Disarm key on a current registered Key Fob or entering the
preprogrammed PIN code, and the word 'DEL Sensor' will appear on the LCD.Press '0' on the
numeric Key pad to select the Key Fob Zone and the LCD will display Zone 0, press the
registered No of the Key Fob you wish to delete. e.g. key fob No 2, the LCD will now display
Zone 0 2. Press DELETE key to delete No 2 Key Fob.
If no further actions take place the panel will automatically return to normal
state after approximately 30 seconds. Otherwise at the end, press the Dis-Arm key
on a registered Key Fob to return the panel to normal state.
3.7 Deleting Registered Sensors
Deleting Registered Sensors: Press the DEL key on the Keypad, a series of - - - will
appear on the LCD. Press the Disarm Key on a current registered Key Fob or entering the
preprogrammed PIN code, and the word 'DEL Sensor' will appear on the LCD. Press 1 to 8
on the numeric Keypad to select the Zone the detector to be deleted is allocated to. e.g. Zone
3 and the LCD will display Zone 3, press the registered No of the detector you wish to delete.
e.g. detector No 2, the LCD will now read Zone 3 2. Press Delete key to delete No 2 detector
in Zone 3.
If no further actions take place the panel will automatically return to normal state after
approximately 30 seconds. Otherwise at the end, press Dis-Arm key on a registered Key Fob
to return the panel to normal state.
3.8 The Zone Setting and Allocation
The alarm system has 8 zones which can be configured depending on your requirements.
The Factory Default Zone configuration settings are as follows:
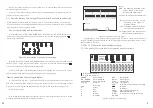
How To view the detector's total In a Zone: Press the Sensor key on the keypad, a series
of - - - will appear on the LCD. Press the Disarm key on any current registered Key Fob or
enter the preprogrammed PIN code, and the word 'DEL Sensor' will appear on the LCD.
Using the *and # keys scroll through the Zones and their registered detectors. e.g. If the
LCD displays: Zone 0 2 this means 2 key fobs are registered. If the LCD displays Zone 5 3
means 3 detectors are registered in the Zone 5 etc.
3.17 Speak and listen in
The function of speak and listen in: When the Panel alarms, the C.S operator or user
could access the speak and listen in function of the panel by pressing the corresponding
keys on the telephone keypad, then the user or operator could know what is going on within
the premise.(the MIC & SPEAK inside the panel)
3.18 record & playback the private voice
Function: When the panel alarms, it will auto dial the user telephone numbers After the
user press the * to confirm, he can listen to the recorded alarming message, which informs
the user what happens. The user can press 9 to replay the message.
How to record/play the message: In the disarmed status, press the OGM and hold it
for 2 seconds. The panel LCD will display COPY.At this time, you can record the alarming
message now. The recording time is 12 seconds. Press OGM, you can hear the recorded
message.
LOG
M
D
H
M D
No 1 Zone Fire;
No 2 Zone Panic ;
No 3 zone: Entry/Exit ;
No 4 . 5 . 6 Zone Exterior Intruder;
No 7 Zone Interior Intruder
;
No 8 zone Watchdog
9
18
Summary of Contents for ZDAS-300
Page 2: ......

