


17
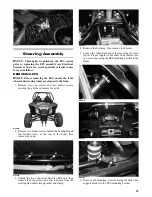
Steering/Body/Controls
The following steering components should be inspected
periodically to ensure safe and proper operation.
A. Steering wheel secure.
B. Steering has equal and complete full-left and
full-right turning capability.
C. Steering sector mounting bolts tight.
D. Ball joints not worn, cracked, or damaged.
E. Tie rods not bent or cracked.
F. Knuckles not worn, cracked, or damaged.
G. Cotter pins not damaged or missing.
H. Steering wheel tilt locks securely.
The frame and welds should be checked periodically for
damage, bends, cracks, deterioration, broken compo-
nents, and missing components.
Hood
WC078D
WC549B
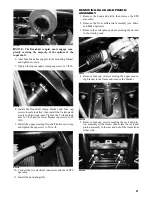
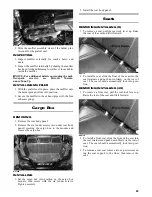
REMOVING
1. Remove two fender screws (A) and two machine
screws (B) with washers from the grille and remove
the grille.
2. Remove two side fender screws (C), one on left and
one on right located above and behind the headlight
assemblies.
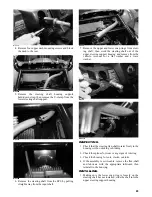
3. Reach up through the front fender wells and remove
two fender screws (D) from the rear of the hood and
remove the hood.
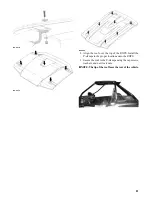
INSTALLING
1. Lay the hood in place on the frame; then install the
rear fender screws (D).
2. Install the two side fender screws (C); then place the
grille on the vehicle and install the two machine
screws (B) and fender screws (A). Tighten all fasten-
ers securely.
Front Bumper Assembly
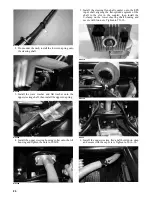
REMOVING
1. Remove the cap screws securing the upper bumper
support to the bumper.
2. Remove the bolts and lock nuts securing the bumper
to the frame; then remove the bumper.
INSPECTING
Inspect all welds for cracking or bending.
INSTALLING
1. Place the front bumper assembly into position and
secure using the existing cap screws. Finger-tighten
only at this time.
2. Secure the upper bumper support to the bumper
using the bolts and new lock nuts. Tighten all hard-
ware to 20 ft-lb.
Rear Body Panel
REMOVING
1. Remove the seats (rear seats only on the 4X); then
remove the machine screws securing the rear body
panel to the frame and rear splash panel.
WC346A