background image

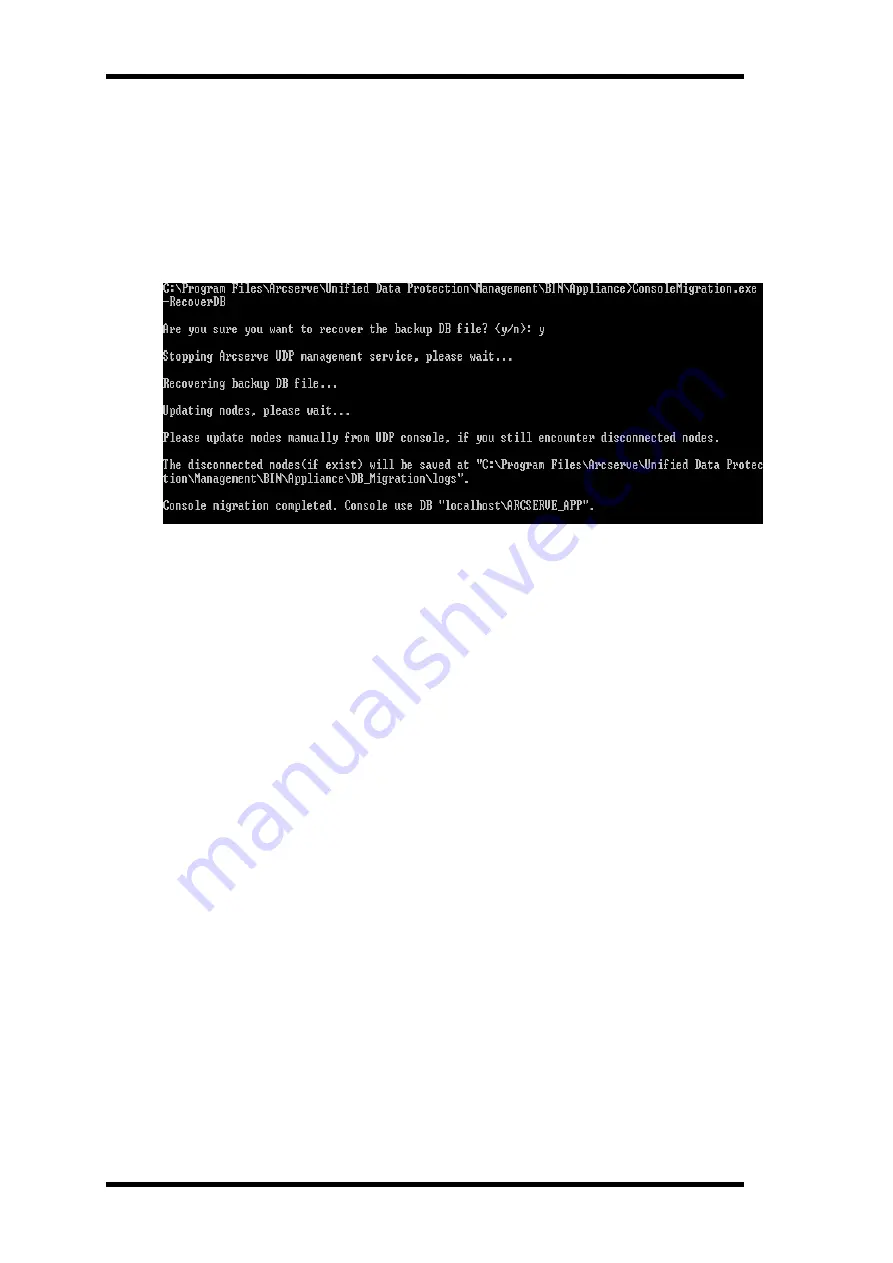
Migrate Arcserve UDP Console Using ConsoleMigration.exe

database recovery process is completed, the nodes are updated for new
Arcserve UDP Console. If any nodes are failed to get updated, the dis-
connected nodes are recorded in the

DisconnectedNodesInfo-<mm-dd-

yyyy>.txt

file under the path

C:\Program Files\Arcserve\Unified Data Pro-

tection\Management\BIN\Appliance\DB_Migration\logs

. You can manually

update the disconnected nodes from the new Arcserve UDP Console.

Note:

In Arcserve UDP Console, if any site other than Local Site exists, follow

the steps mentioned in

NewRegistrationText.txt

file to register the site again.

You have completed migration of Arcserve Appliance Console to the new Arcserve
UDP Console successfully.

You can use this tool to perform console migration for Arcserve UDP Console con-
nected with remote SQL database. After the migration is complete, the migrated
Arcserve UDP Console is configured to connect with the same remote SQL data-
base.

Note:

In Arcserve UDP v6.5 Update 4,

-force

option is introduced in

Con-

soleMigration.exe

command to force the recovery backup database file migration

to the target console under the following conditions:

1. When you want to perform console migration between two consoles where

the source console uses SQL Server Enterprise edition and the target con-
sole uses SQL Server Express edition. In this case, the minimum required
Database size of the source UDP console is 4000 MB.

2. When you want to perform console migration from a console that uses an

advanced version of SQL Server database to a console that uses an older
version of SQL Server database. For example, migrating from a console
using SQL Server 2016 to a console using SQL Server 2014.

114 Arcserve Appliance User Guide

Summary of Contents for 7100

Page 1: ...Arcserve Appliance User Guide Version 6 5 ...

Page 2: ... and partial copies of the Documentation have been returned to Arcserve or destroyed TO THE EXTENT PERMITTED BY APPLICABLE LAW ARCSERVE PROVIDES THIS DOCUMENTATION AS IS WITHOUT WARRANTY OF ANY KIND INCLUDING WITHOUT LIMITATION ANY IMPLIED WARRANTIES OF MERCHANTABILITY FITNESS FOR A PARTICULAR PURPOSE OR NONINFRINGEMENT IN NO EVENT WILL ARCSERVE BE LIABLE TO YOU OR ANY THIRD PARTY FOR ANY LOSS OR ...

Page 3: ... solutions for many top issues and common problems You can use our Live Chat link to instantly launch a real time conversation between you and the Arcserve Support team With Live Chat you can get imme diate answers to your concerns and questions while still maintaining access to the product You can participate in the Arcserve Global User Community to ask and answer questions share tips and tricks ...

Page 4: ...esolved by support after a reasonable period of time to resolve Arcserve will accept RMA and provide a hardware swap for a unit of equivalent value Information needed for the RMA request Product serial number located on the back of the appliance Arcserve Order Number Partner contact name Partner phone number Partner Email address Customer contact name if available Phone number if available Email a...

Page 5: ... Series 13 What is Included in the Box of Appliance 9000 Series 14 What is Not Included in the Box 15 Available Models 16 Models 7100 7300v 17 Models 7400 7600v 19 Models 8100 8400 21 Models 9012 9504DR 23 Controls and Indicators 25 Front Panel 7100 7300v 26 Front Panel 7400 7600v 28 Front Panel 8100 8200 30 Front Panel 8300 8400 32 Front Panel 9012 9048 34 Front Panel 9072 DR 9504 DR 36 Rear Pane...

Page 6: ...ve Appliance Used as Arcserve UDP Console and RPS 69 Upgrade the Arcserve Appliance Used as Arcserve UDP RPS 70 Upgrade Steps When Two or More Arcserve Appliance Are Used in the Environment 71 Upgrade the Arcserve UDP Linux Agent on the Arcserve Appliance 72 Upgrade the Arcserve Backup on the Arcserve Appliance 73 Upgrade Sequence for UDP Console RPS and Agent 74 Chapter 5 Configuring the Arcserve...

Page 7: ...Boot Option in 9012 9504DR Series Appli ance 142 Clear Configuration and Apply Appliance Factory Reset 145 How to Replace Factory Reset Image Using Set Appliance Image Utility 148 Remove and Replace a Hard Drive 152 How to Perform Bare Metal Recovery BMR without Preserving Data 154 How to Perform Bare Metal Recovery BMR and Preserving Data 169 Chapter 9 Performing Appliance Capacity Expansion 177 ...

Page 8: ...e Appliance from Another Appliance Reports Duplicated Nodes 233 Linux Backup Server Cannot Communicate with Any Node in the Network 234 Linux Backup Server Cannot Get the Network DNS Suffix 236 Default Time Zone on the Appliance 237 Licenses Error even when the licenses are available 238 Arcserve UDP Console Shows Error while adding Remote Console in Replicate to a Remotely Managed RPS Task 239 Un...

Page 9: ...stand how to use Arcserve Appli ance To understand about Arcserve Appliance view Introduction Rest of the sec tions help you install and use Arcserve Appliance This section contains the following topics Language Support 2 Product Documentation 3 Chapter 1 About Arcserve Appliance Documentation 1 ...

Page 10: ...cludes local language support for the user interface of the product online help and other doc umentation as well as local language default settings for date time currency and number formats This release is available in the following languages English Chinese Simplified Chinese Traditional French German Italian Japanese Portuguese Brazil Spanish 2 Arcserve Appliance User Guide ...

Page 11: ...how to use the various protection Plans Arcserve UDP Release Notes Provides high level description of the major features system requirements known issues documentation issues and limitations of Arcserve Unified Data Protection Arcserve UDP Agent for Windows User Guide Provides detailed information on how to use Arcserve UDP Agent in a Windows operating system This guide includes such information a...

Page 12: ......

Page 13: ... contains the following topics Introduction 6 Safety Precautions 11 What is Included in the Box 12 What is Not Included in the Box 15 Available Models 16 Controls and Indicators 25 Ports Used by the Appliance 49 Chapter 2 Introducing the Arcserve Appliance 5 ...

Page 14: ...implifies disaster recovery activities The Arcserve Appliance is fully integrated with the industry leading Arcserve Uni fied Data Protection software pre installed in state of the art hardware The appli ance provides a complete and integrated data protection solution for all users to not only meet your current demands but also the ever changing backup archive and disaster recovery DR requirements...

Page 15: ...m backup data Replicate backup data to recovery point Servers and remote recovery point Servers Restore backup data and performs Bare Metal Recovery BMR Copy selected data backup files to a secondary backup location Configure and manage Arcserve Full System High Availability HA for critical Servers in your environment Arcserve UDP replicates backup data that is saved as recovery points from one Se...

Page 16: ...ackup source node The latest version of Arcserve UDP Agent Linux is preinstalled in a virtual machine within the appliance This virtual machine becomes the Linux Backup Server Arc serve UDP Agent Linux is installed at the default installation path in the Arcserve Appliance When you open the Console the Linux Backup Server is already added to the Con sole The native host name of the Linux Backup Se...

Page 17: ... information about supported operating systems see Compatibility Matrix Arcserve RHA lets you replicate data to a local or remote Server helping you to recover that data if you face a Server crash or site disaster You may switch your users to the replica Server manually or automatically if you have licensed High Availability For more information about how to install and configure Arcserve Replicat...

Page 18: ...e operations An extensive set of options and agents extends data protection throughout the enterprise and delivers enhanced functionality including online hot backup and restore of application and data files advanced device and media management and disaster recovery Arcserve Appliance includes integration with Arcserve Backup for performing a backup to tape Arcserve Backup is installed at C Progra...

Page 19: ...ng to unpack connect install power on or operate an Arcserve Appliance Failure to adhere to the safety precautions can result in personal injury equipment damage or malfunction For more information about the safety precautions see the Safety Precautions Appendix Chapter 2 Introducing the Arcserve Appliance 11 ...

Page 20: ...What is Included in the Box What is Included in the Box The section describes what is included in the box of following Appliance series 8000 Series 9000 Series 12 Arcserve Appliance User Guide ...

Page 21: ...it that contains the following 2 quick install outer rails 2 inner rail extensions 3 rail adapters standard rail mounting only Other associated hardware as required Arcserve faceplate Microsoft Client Access License Note Inspect the box that the appliance was shipped in and ensure that no items are missing from the box and that there are no visible signs of damage If any items are missing or damag...

Page 22: ...ook US Power cords 2x a Note Inspect the box that the appliance was shipped in and ensure that no items are missing from the box and that there are no visible signs of damage If any items are missing or damaged retain all packaging materials and contact Arcserve Sup port The following items are included in the R740 Accessory box with a Rack Rail kit BEZEL DELL 2U CUS 14G BEZEL ASSEMBLY LCD AR 380 ...

Page 23: ... Not Included in the Box The following items are not included in the box and may be needed for installation and configuration of the appliance Monitor Keyboard External Storage Device if needed Chapter 2 Introducing the Arcserve Appliance 15 ...

Page 24: ...erve Appliance 7000 series 8000 series and 9000 series are available in a variety of different models designed to meet your specific needs Models 7100 7300v Models 7400 7600v Models 8100 8400 Models 9012 9504 DR 16 Arcserve Appliance User Guide ...

Page 25: ... replication advanced vir tualization support agentless backup remote virtual standby tape support applic ation consistent backups granular restore unified reporting and dashboard On Appliance Vir tual Standby N A N A Up to 3 VMs N A Up to 3 VMs Warranty and Technical Specifications Full System Depot Warranty 3 Years Physical Dimen sions H x W x D in Inches 1 7 x 17 2 x 25 6 1U 19 Rack Mount rails...

Page 26: ...le load startup 93 116 143 122 164 143 125 167 145 125 167 145 129 188 152 AC voltage fre quency range 100 240v Ampere rating 7 5 Amp Max 1 TB 1 000 000 000 000 bytes On V models space available for backup is reduced by the size of virtual standby VMs Estimated capacity assuming a typical 3 1 deduplication and compression ratio Actual backup capacity may vary significantly based upon data type bac...

Page 27: ...irtual standby tape support application consistent backups granular restore unified reporting and dashboard On Appliance Vir tual Standby N A Up to 6 VMs N A Up to 9 VMs N A Up to 12 VMs Warranty and Technical Specifications Full System Depot Warranty 3 Years Physical Dimen sions H x W x D in Inches 3 5 x 17 2 x 25 6 2U 19 Rack Mount rails provided Remote man agement and net work interface ports 1...

Page 28: ...208 257 358 240 296 369 240 296 369 AC voltage fre quency range 100 240v Ampere rating 11 Amp Max 1 TB 1 000 000 000 000 bytes On V models space available for backup is reduced by the size of virtual standby VMs Estimated capacity assuming a typical 3 1 deduplication and compression ratio Actual backup capacity may vary significantly based upon data type backup type schedule and more 20 Arcserve A...

Page 29: ...B SAS 12G 6x 4TB SAS 12G 7x 4TB SAS 12G 8x 4TB SAS 12G 9x 4TB SAS 12G 10x 4TB SAS 12G 11x 4TB SAS 12G 12x 4TB SAS 12G 6x 8TB SAS 12G 7x 8TB SAS 12G 8x 8TB SAS 12G 9x 8TB SAS 12G 10x 8TB SAS 12G 11x 8TB SAS 12G 12x 8TB SAS 12G DIMMs Max DIMMs 4x 8GB DDR4 2400 8 4x 16GB DDR4 2400 8 4x 32GB DDR4 2400 8 Cards LSI SAS9200 8E Power Sup plies 2x hot swap redundant 500W AC Platinum Two x 920W hot swap red...

Page 30: ...Available Models guest OS workload Arcserve also provides the option to add additional RAM to the standard appliance configuration based on customer needs 22 Arcserve Appliance User Guide ...

Page 31: ...B 10 DIMMS 576 GB 24 DIMMS 768 GB 24 DIMMS SSD drive 480GB SSD 2 x 1 9 TB SSD RAID1 Processor Intel Xeon Sil ver 4108 8 CORE 1 8 GHz Intel Xeon Silver 4114 10 CORE 2 2 GHz Number of Processors 1 2 RAID Card PERC H730P Low Profile adaptor 2 GB NV Cache PERC H730P MiniCard 2 GB NV Cache RAID Con figuration RAID 5 RAID 6 Drive Bays 4 16 Expansion Kit NA 11 10 8 6 4 6 4 NA RAID 2 NA 6 Drives 3 x 2 TB ...

Page 32: ...troller Broadcom 5719 Quad Port 1G NIC Dual Port 10G Copper Dual Port 10G SFP Dual Port FC 16G HBA Dual Port 10G Copper Dual Port 10G SFP Dual Port FC 16G HBA Dual Port 10G SFP Dual Port FC 16G HBA Powe Sup plies Dual Hot Plug Redundant Power Sup ply 1 1 550 W Dual Hot Plug Redundant Power Supply 1 1 750 W iDRAC Enterprise 1 24 Arcserve Appliance User Guide ...

Page 33: ...y to control various functions and a quick view reference of the status of the appliance and components Front Panel 7100 7300v Front Panel 7400 7600v Front Panel 8100 8200 Front Panel 8300 8400 Front Panel 9012 9048 Front Panel 9072 DR 9504 DR Rear Panel 7100 7300v Rear Panel 7400 7600v Rear Panel 8100 8200 Rear Panel 8300 8400 Rear Panel 9012 9048 Rear Panel 9072 DR 9504 DR Chapter 2 Introducing ...

Page 34: ...ure power is completely removed from the appliance unplug the power supply cable before performing maintenance 2 Reset button Used to reboot the appliance 3 Power LED Solid Green Indicates that the power is being sup plied to the power supply of the appliance This LED should normally be on when the appliance is operating 4 Device Activity LED Blinking Amber Indicates activity on at least one of th...

Page 35: ...reen Indicates activity on the cor responding drive 10 Hard Drive HDD LED Solid Red Indicates failure of the corresponding hard drive With the Arcserve Appliance if one hard drive fails the rest of the drives will kick in immediately to ensure no data is lost and the appliance continues to work nor mally Therefore to guard against any problems asso ciated with multiple hard drive failures it is im...

Page 36: ...nsure power is completely removed from the appliance unplug the power supply cable before performing maintenance 2 Reset button Used to reboot the appliance 3 Power LED Solid Green Indicates that the power is being supplied to the power supply of the appliance This LED should normally be on when the appliance is oper ating 4 Device Activity LED Blinking Amber Indicates activity on at least one of ...

Page 37: ...iled 9 Hard Drive HDD LED Blinking Green Indicates activity on the corresponding drive 10 Hard Drive HDD LED Solid Red Indicates failure of the corresponding hard drive With the Arcserve Appliance if one hard drive fails the rest of the drives will kick in immediately to ensure no data is lost and the appliance continues to work normally There fore to guard against any problems associated with mul...

Page 38: ...ely removed from the appliance unplug the power supply cable before performing maintenance Reset button Used to reboot the appliance Power LED Solid Green Indicates that the power is being supplied to the power supply of the appliance This LED should normally be on when the appliance is operating HDD LED Blinking Amber Indicates activity on at least one of the hard drives Network Interface Card NI...

Page 39: ...sponding drive Hard Drive HDD LED Solid Red Indicates failure of the corresponding hard drive With the Arcserve Appliance if one hard drive fails the rest of the drives will kick in immediately to ensure no data is lost and the appli ance continues to work normally Therefore to guard against any problems associated with multiple hard drive failures it is important to replace a hard drive as soon a...

Page 40: ...ower supply to the appli ance components When turning off the power the main power is turned off but standby power is still supplied Therefore to ensure power is completely removed from the appliance unplug the power supply cable before performing maintenance Reset button Used to reboot the appliance Power LED Solid Green Indicates that the power is being supplied to the power supply of the applia...

Page 41: ...ion to locate the Server from a remote location Power Failure LED Indicates a power supply module has failed Hard Drive HDD LED Blinking Green Indicates activity on the corresponding drive Hard Drive HDD LED Solid Red Indicates failure of the corresponding hard drive With the Arcserve Appliance if one hard drive fails the rest of the drives will kick in immediately to ensure no data is lost and th...

Page 42: ...nts There are up to five status LEDs and an overall system health LED Chassis health and system ID bar For more information see link l Quick Sync 2 wireless Indicates a Quick Sync enabled system The Quick Sync feature is optional This feature allows management of the system by using mobile devices This feature aggregates hardware or firmware inventory and various sys tem level diagnostic and error...

Page 43: ...Contains the power button USB port iDRAC Direct micro port and the iDRAC Dir ect status LED 7 Information Tag NA The Information Tag is a slide out label panel that contains system information such as Service Tag NIC MAC address and so on If you have opted for the secure default access to iDRAC the Inform ation tag also contains the iDRAC secure default password Chapter 2 Introducing the Arcserve ...

Page 44: ...ick Sync 2 wireless 2 Drive slots NA Enable you to install drives that are supported on your system For more information see link 3 Right control panel NA Contains the power button VGA port iDRAC Direct micro USB port and two USB 2 0 ports 4 Information tag NA The Information Tag is a slide out label panel that contains system information such as Service Tag NIC MAC address and so on If you have o...

Page 45: ...he appli ance Note The default user name password for IPMI access is ADMIN ARCADMIN case sensitive We recommend that you change the password as soon as possible For details about how to change the IPMI password see How to Change the IPMI Password 3 External Storage Device Port SAS port for tape drive Used to connect an external storage device hard drive tape drive etc to the appliance These portab...

Page 46: ...rt 1 ETH0 for Network 1 9 Network Data I O Port 2 Used to transfer network data to and from the appliance ETH1 for Network 2 10 VGA Connector Used to connect a monitor to the appliance if needed 38 Arcserve Appliance User Guide ...

Page 47: ...fore per forming maintenance 2 IPMI Port Remote Management The IPMI Intelligent Platform Management Interface port is used to monitor the physical health of Servers such as temperature voltage fans power supplies and the appli ance Note The default user name password for IPMI access is ADMIN ARCADMIN case sensitive We recommend that you change the password as soon as possible For details about how...

Page 48: ...twork 1 9 Network Data I O Port 2 Used to transfer network data to and from the appliance ETH1 for Network 2 10 VGA Connector Used to connect a monitor to the appliance if needed 11 External Storage Device Port Tap Auto loader Library LSI SAS 9212 4i4e Used to connect an external storage device Tape Auto loader Library to the appliance These portable external storage devices can be used to store b...

Page 49: ... AC Power Inlet 2 5 COM Port 6 IPMI Port Remote Management 7 Low Profile PCI Expansion Slot 8 PCI Expansion Slot 9 Power Good LED 1 10 Power Supply Lock 1 11 Power Good LED 2 12 Power Supply Lock 2 13 USB 2 0 Port 1 Black 14 USB 2 0 Port 2 Black 15 USB 3 0 Port 3 Blue 16 USB 3 0 Port 4 Blue 17 Network Data I O Port 1 ETH0 for Network 1 18 Network Data I O Port 2 ETH1 for Network 2 Chapter 2 Introd...

Page 50: ...Controls and Indicators 19 VGA Port 20 External Storage Device Port SAS port for tape drive option 42 Arcserve Appliance User Guide ...

Page 51: ... Power Supply Module 1 Fan 5 Rear SSDs optional 6 IPMI Port Remote Management 7 External SAS HBA Ports 8 Half length PCI Expansion Slots 9 Internal RAID Controller 10 Full length PCI Expansion Slots 11 Power Supply Module 2 Lock 12 Power Supply Module 2 Power Good LED 13 Power Supply Module 2 AC Receptacle 14 Power Supply Module 2 Fan 15 COM Port 16 USB Port 1 generation 2 17 USB Port 2 generation...

Page 52: ...Controls and Indicators 19 USB Port 4 generation 3 20 ETH0 Network 1 21 ETH1 Network 2 22 VGA Port Monitor 23 UID LED 44 Arcserve Appliance User Guide ...

Page 53: ... information see link 4 Full height riser slot Use the card slots to connect full height PCIe expansion cards on full height riser 5 Power supply unit PSU For more information about the PSU con figurations see link 6 Power supply unit PSU For more information about the PSU con figurations see link 7 LOM riser ports 2 For more information about the PSU con figurations see link 8 USB 3 0 port 2 Use ...

Page 54: ... button for 15 seconds Notes l To reset iDRAC using system ID ensure that the system ID button is enabled in the iDRAC setup l If the system stops responding during POST press and hold the system ID but ton for more than five seconds to enter the BIOS progress mode 46 Arcserve Appliance User Guide ...

Page 55: ...n see link 3 Rear handle NA The rear handle can be removed to enable any external cabling of PCIe cards that are installed in the PCIe expansion card slot 6 4 Full height PCIe expan sion card slot 2 NA The PCIe expansion card slot riser 2 con nects up to two full height PCIe expansion cards to the system For more information see link 5 Full height PCIe expan sion card slot 2 NA The PCIe expansion ...

Page 56: ...al device to the system For more information see link 11 iDRAC9 dedicated port Enables you to remotely access iDRAC For more information see link 12 System identification button The System Identification ID button is avail able on the front and back of the systems Press the button to identify a system in a rack by turning on the system ID button You can also use the system ID button to reset iDRAC...

Page 57: ...ppliance The following topics provide information about ports that are used by Arcserve UDP Arcserve Backup and the Appliance for Linux Support Arcserve UDP Arcserve Backup Appliance for Linux Support Chapter 2 Introducing the Arcserve Appliance 49 ...

Page 58: ... Appliance Arcserve UDP This section contains the following topics Components installed on Microsoft Windows Components installed on Linux Production node protected by UDP Linux remotely 50 Arcserve Appliance User Guide ...

Page 59: ...ween the Arcserve UDP console and Microsoft SQL Server databases when they reside on dif ferent com puters Note You can modify the default com munication port when installing SQL Server 4090 TCP Arcserve UDP Agent HATransServer exe Transfers data for Virtual Standby tasks in the proxy mode 500 0 5060 TCP Arcserve UDP Server GDDServer exe Reserved for Arcserve UDP RPS Global Deduplication Data Stor...

Page 60: ...Console and the Arcserve Backup Global Dashboard Primary Server syn chronize data 6054 TCP Arcserve Backup CA ARCserve Com municationFoundation WindowsService exe Com munication that lets the Arcserve UDP Console and the Arcserve Backup Primary Server syn chronize data 8006 To shut down Tomcat that is used by the Arcserve UDP console 8014 TCP Arcserve UDP Console Tomcat7 exe Specifies the default ...

Page 61: ...y the default com munication port when you install the Arcserve UDP components 8014 TCP Arcserve UDP Server httpd exe Specifies the default HTTP HTTPS com munication port between the Arcserve UDP Server and Arcserve UDP consoles Specifies the default shared port and the only port you must open when you use the Arcserve UDP Server as the replication destination Chapter 2 Introducing the Arcserve Ap...

Page 62: ...stall the Arcserve UDP components 8015 TCP Arcserve UDP Console Tomcat7 exe Specifies the default HTTP HTTPS com munication port between remote man agement con soles and the Arcserve UDP Server Specifies the default HTTP HTTPS com munication port between remote man agement con soles and the Arcserve UDP Agent Note You can modify the default com munication 54 Arcserve Appliance User Guide ...

Page 63: ... Web Services to communicate with the Arc serve UDP RPS Port Sharing Service on the same Server Note The port cannot be cus tomized and can be ignored for the firewall setting 1800 5 CA ARCserve CommunicationFoundation WindowsService exe To shutdown Tomcat that is used by the Arcserve UDP Server or Agent Chapter 2 Introducing the Arcserve Appliance 55 ...

Page 64: ...the user wants to use the PXE boot feature This port is required for incom ing communications Note The port number cannot be customized 69 UDP Arcserve UDP Linux tffpd Used for the PXE boot Server Only required if the user wants to use the PXE boot feature This port is required for incom ing communications Note The port number cannot be customized 8014 TCP Arcserve UDP Linux Java Specifies the def...

Page 65: ...ring is supported for replication jobs All data on different ports can be forwarded to port 8014 default port for the Arcserve UDP Server which can be modified during install ation When a replication job runs between two recovery point Servers across WAN only port 8014 needs to be opened Similarly for remote replications the Remote administrator needs to open or forward port 8014 for data replicat...

Page 66: ...n Foundation CA ARCserve Com municationFoundation WindowsService exe Arcserve Com munication Foundation 6502 TCP CASTapeEngine Tapeng exe Arcserve Tape Engine 6503 TCP CASJobEngine Jobengine exe Arcserve Job Engine 6504 TCP CASDBEngine DBEng exe Arcserve Data base Engine 7854 TCP CASportmapper Catirpc exe Arcserve PortMapper 4152 3 TCP CASDiscovery casdscsvc exe Arcserve Dis covery Service 4152 4 ...

Page 67: ...36 TCP NAT port redirection redirects 8036 on appliance to the Linux Backup Server port 8036 50000 TCP NAT port redirection redirects 50000 on appliance to Linux backup server in order to backup other Linux node to cloud using 50000 port 50001 TCP NAT port redirection redirects 50001 on appliance to Linux backup server in order to backup other Linux node to cloud using 50001 port 50002 TCP NAT por...

Page 68: ...is file is not recommended filter INPUT ACCEPT 0 0 FORWARD ACCEPT 0 0 OUTPUT ACCEPT 0 0 A INPUT p tcp m tcp dport 22 j ACCEPT A INPUT p tcp m tcp dport 67 j ACCEPT A INPUT p tcp m tcp dport 69 j ACCEPT A INPUT p tcp m tcp dport 8014 j ACCEPT A INPUT p tcp m tcp dport 8016 j ACCEPT A INPUT p tcp m tcp dport 8017 j ACCEPT A INPUT p tcp m tcp dport 8021 j ACCEPT A INPUT p tcp m tcp dport 8035 j ACCEP...

Page 69: ... INPUT j REJECT reject with icmp host prohibited A FORWARD j REJECT reject with icmp host prohibited COMMIT 3 Save the iptables file 4 Restart the iptables service using the following command etc init d iptables restart You have added the ports to CentOS 6 6 x64 firewall successfully Chapter 2 Introducing the Arcserve Appliance 61 ...

Page 70: ...llowing topics How to Install Arcserve Backup r17 5 SP1 63 How to Install 8100 8200 Series Appliance 64 How to Install 8300 8400 Series Appliance 65 How to Install 9012 9048 Series Appliance 65 How to Install 9072 9504DR Series Appliance 65 62 Arcserve Appliance User Guide ...

Page 71: ...allASBU bat Note If you are launching the bat file from a non English Windows system the following screen appears Select the language to install Arcserve Backup r17 5 SP1 otherwise go to step 2 2 Enter the Administrator password and start the installation of Arcserve Backup r17 5 SP1 After installation completes the Arcserve Backup icon is added to your desktop You can now log into Arcserve Backup...

Page 72: ... Series Appliance The appliance is intended for installation in restricted areas only Only qualified per sonnel should perform Initial setup and maintenance For the complete installation process see Appliance Installation of 8100 8200 64 Arcserve Appliance User Guide ...

Page 73: ...ppliance The appliance is intended for installation in restricted areas only Only qualified per sonnel should perform Initial setup and maintenance For the complete installation process see Appliance Installation of 9012 9048 How to Install 9072 9504DR Series Appliance The appliance is intended for installation in restricted areas only Only qualified per sonnel should perform Initial setup and mai...

Page 74: ...e This section contains the following topics How to Apply a License After Upgrading Arcserve Software 67 Upgrade Sequence on Arcserve Appliance 68 Upgrade Sequence for UDP Console RPS and Agent 74 Chapter 4 Upgrading Arcserve UDP on the Appliance 66 ...

Page 75: ...ng Arcserve Backup to r17 5 the original license key on the Arcserve Appliance will not work To obtain the new license keys for Arcserve Unified Data Protection v6 5 and Arcserve Backup r17 5 contact your account representative For more details about adding a license key for Arcserve UDP see Arcserve Product Licensing Online Help 67 Arcserve Appliance User Guide ...

Page 76: ...ade the Arcserve Appliance Used as Arcserve Console and RPS Upgrade the Arcserve Appliance Used as Arcserve UDP RPS Upgrade Steps When Two or More Arcserve Appliances Are Used in the Environment Upgrade the Arcserve UDP Linux Agent on the Arcserve Appliance Upgrade the Arcserve Backup on the Arcserve Appliance Upgrade Sequence for UDP Console RPS and Agent Chapter 4 Upgrading Arcserve UDP on the A...

Page 77: ...rcserve Appliance Upgrade the Arcserve Appliance Used as Arcserve UDP Console and RPS Upgrade this Arcserve Appliance then follow up the upgrade sequence described to upgrade the environment 69 Arcserve Appliance User Guide ...

Page 78: ... on Arcserve Appliance Upgrade the Arcserve Appliance Used as Arcserve UDP RPS Upgrade the complete productive environment For details refer to the upgrade sequence Chapter 4 Upgrading Arcserve UDP on the Appliance 70 ...

Page 79: ...ole product environment For details refer to upgrade sequence If you see warning as displayed below when you add an Appliance as RPS from Arcserve UDP Console after upgrade refer to the Backing Up Arcserve Appli ance from Another Appliance Reports Duplicated Nodes topic in the Troubleshooting section 71 Arcserve Appliance User Guide ...

Page 80: ... Follow these steps 1 Upgrade the Arcserve UDP Console that manages the Linux Backup Server envir onment 2 Upgrade the Linux Backup Server on the Arcserve Appliance For more information see Arcserve Unified Data Protection Agent for Linux Online Help Chapter 4 Upgrading Arcserve UDP on the Appliance 72 ...

Page 81: ...quence on Arcserve Appliance Upgrade the Arcserve Backup on the Arcserve Appli ance Refer to the Arcserve Backup Implementation Guide to complete upgrade on the Arcserve Appliance 73 Arcserve Appliance User Guide ...

Page 82: ...DR site 3 Upgrade Arcserve UDP RPS Data Center 4 Upgrade Arcserve UDP Agentless Proxy some Agents in Data Center 5 Upgrade Arcserve UDP RPS Remote site 6 Upgrade Arcserve UDP Agentless Proxy and some Agents at the remote site Note Repeat Step 5 and 6 for each remote location 7 Upgrade Arcserve UDP Virtual Standby Monitor Note According to the replication backward support policy always upgrade the ...

Page 83: ...liance This section contains the following topics How to Configure Network Settings for Arcserve Appliance 76 How to Set Up the Arcserve Appliance 81 Configure Arcserve Appliance as Gateway 90 Chapter 5 Configuring the Arcserve Appliance 75 ...

Page 84: ...s opens Read and accept the terms The UDP End User License Agreement dialog opens 2 Read and accept the license agreement and click Next Welcome to the Arcserve Appliance Configuration Tool screen appears 3 Enter the following details Hostname Enter a host name for the appliance Assigning a name helps identify the appliance on your network Add this Arcserve Appliance to a domain Select the check b...

Page 85: ...the network settings After you reboot the appliance you can access the appliance from any other machine using the URL https hostname 8015 4 Click Save The following dialog opens By default Arcserve UDP discovers all network con nections in a network If some connections are not assigned then manually edit and specify the connection details Chapter 5 Configuring the Arcserve Appliance 77 ...

Page 86: ...How to Configure Network Settings for Arcserve Appliance 6 To edit a network connection click Edit from the Network Connections box 78 Arcserve Appliance User Guide ...

Page 87: ...Save Note Optionally you can also modify the hostname domain date and time 8 To apply the changes click Reboot Appliance to restart the appliance The appliance restarts with a new hostname After restarting the Login screen opens 9 Enter the user name and password and click Enter The Arcserve Appliance Configuration screen appears Chapter 5 Configuring the Arcserve Appliance 79 ...

Page 88: ...How to Configure Network Settings for Arcserve Appliance 10 When the appliance configuration screen reopens click Launch Wizard 80 Arcserve Appliance User Guide ...

Page 89: ...g appears You can manage the UDP console either as a stand alone instance or you can remotely manage from another UDP console The remote console management function is useful when you are managing multiple UDP consoles 2 Select whether you want to manage the appliance locally default or from another UDP console If the appliance is managed from another UDP console then specify the UDP console URL u...

Page 90: ...and confirm the encryption password for this data store 5 Click Next The Email and Alert dialog opens You can define the email Server that is used to send alerts and the recipients who would get the alerts You can select options to get alerts based upon successful jobs failed jobs or both 82 Arcserve Appliance User Guide ...

Page 91: ...he Arcserve Appliance 6 Specify the following email and alert details Service Specifies the email services such as Google Mail Yahoo Mail Live Mail or Other Email Server Chapter 5 Configuring the Arcserve Appliance 83 ...

Page 92: ...nder The recipients will receive the mail from this sender Recipients Specifies the recipients who will receive the alerts You can use semi colons to separate multiple recipients Options Specifies the encryption method to use for the communication channel Connect using a proxy Server Specifies the proxy Server user name and port number if you are con necting to the mail Server through a proxy Serv...

Page 93: ...ole Username and Password Specifies the username and password to connect to the remote console Connect using a proxy Server Specifies the proxy Server details if the remote console is behind a proxy Server 10 If you do not want the appliance to replicate to a remotely managed RPS select the This appliance will not replicate to a remotely managed RPS option 11 Click Next The Create a Plan dialog op...

Page 94: ...name of the plan If you do not specify a Plan Name the default name Protection Plan n is assigned Session Password Specifies a session password The session password is important and required when you restore data How do you want to add nodes to the plan Specifies the method to add nodes to the plan Select one of the fol lowing methods Hostname IP Address Refers to the method to manually add the no...

Page 95: ... Hyper V Server Refers to the method to import the virtual machine nodes from Microsoft Hyper V Servers After you select a method specify the details on each dialog 13 After the nodes are added to your plan click Next The Backup Schedule dialog opens 14 Enter the following schedule Arcserve UDP agent install or upgrade schedule The latest version of the Arcserve UDP agent is installed on source no...

Page 96: ...log opens 16 From the dialog review the details of your plan If necessary you can edit the nodes or the schedule by clicking Edit Nodes or Edit Schedule or you can add or delete a plan Edit Nodes Modifies the source nodes you want to protect Edit Schedule Modifies the backup schedule 17 After verifying the plans click Next The Next Steps dialog opens You have successfully completed the configurati...

Page 97: ...How to Set Up the Arcserve Appliance 18 Click Finish to exit the wizard and open the Arcserve UDP Console Chapter 5 Configuring the Arcserve Appliance 89 ...

Page 98: ...Console navigate to Infrastructures and click Sites 4 Click Add a Site 5 Follow the instructions provided in the Add a Site wizard to install Arcserve UDP Remote Management Gateway on the Arcserve Appliance Note After installing Arcserve UDP Remote Management Gateway on the Arcserve Appliance clicking Launch Wizard on the Arcserve Appliance wizard does not launch the Arcserve UDP Console To access...

Page 99: ...d Nodes to a Plan 94 Create a Backup Plan for Linux Nodes 104 Create a Backup Plan to a Tape Device 105 Create an On Appliance Virtual Standby Plan 106 Create Plan to Backup the Linux Backup Server 107 Setting up to Perform Linux Instant VM Job to Local Appliance Hyper V 112 Migrate Arcserve UDP Console Using ConsoleMigration exe 113 Migrate Pre installed Linux Backup Server to CentOS 7 4 115 Perf...

Page 100: ...vate Arcserve Product on the Appliance Activate Arcserve Product on the Appliance For activating Arcserve product on the Appliance see Arcserve Product Licensing Online Help 92 Arcserve Appliance User Guide ...

Page 101: ...erve wizard is a three step process 1 Add the nodes you want to protect You can select Windows nodes or virtual machines from vCenter ESX or Hyper V Servers 2 Define the backup schedule 3 Review and confirm the plan In addition to a basic plan Arcserve UDP lets you create complex plans and control many parameters from the UDP Console To create complex plans from the UDP Console see the Arcserve UD...

Page 102: ...lets you add nodes using the following methods Manually entering the node IP Address or hostname Add Nodes by Hostname IP Address Discovering nodes from an active directory Add Nodes by Active Directory Importing virtual machine nodes from VMware ESX vCenter Servers Add vCenter ESX Nodes Importing virtual machine nodes from Microsoft Hyper V Servers Add Hyper V Nodes 94 Arcserve Appliance User Gui...

Page 103: ...DP Agent Windows is installed on these nodes Follow these steps 1 On the Add Nodes by Hostname IP address dialog enter the following details Hostname IP Address Specifies the hostname or IP address of the source node User name Specifies the user name of the node having administrator privileges Password Specifies the user password Description Specifies any description to identify the node Cancel Pl...

Page 104: ...s added to the right pane To add more nodes repeat the steps All the added nodes are listed on the right pane 3 Optional To remove the added nodes from the list on the right pane select the nodes and click Remove 4 Click Next The nodes are added to the plan 96 Arcserve Appliance User Guide ...

Page 105: ... 1 On the Add Nodes by Active Directory dialog enter the following details Username Specifies the domain and user name in the domain username format Password Specifies the user password Computer Name Filter Specifies the filter to discover node names Cancel Plan Creation Cancels the plan that you just created 2 Click Browse The discovered nodes are displayed Chapter 6 Working with Arcserve Applian...

Page 106: ...rked with green check marks If a node fails verification re enter the credentials and click Apply again Note You must verify each node before you can add it to the list 4 Click Add to List The selected node is added to the right pane 5 Optional To remove the nodes from the right pane select the nodes and click Remove 6 Click Next The nodes are added to the plan 98 Arcserve Appliance User Guide ...

Page 107: ... by vCenter ESX dialog specify the following vCenter ESX Server details Hostname IP Address Specifies the hostname or the IP address of the vCenter ESX Server Port Specifies the port number to be used Protocol Specifies the protocol to be used Username Specifies a user name of the Server Password Specifies the user password Cancel Plan Creation Cancels the plan that you just created Chapter 6 Work...

Page 108: ...Add Nodes to a Plan 2 Click Connect The discovered hostnames are displayed 100 Arcserve Appliance User Guide ...

Page 109: ...des that you want to add and then click Add to List The selected nodes are added to the right pane 5 Optional To remove the nodes from the right pane select the nodes and click Remove 6 Click Next The nodes are added to the plan Chapter 6 Working with Arcserve Appliance 101 ...

Page 110: ...e or the IP address To import virtual machines that are in Hyper V clusters specify either the cluster node name or Hyper V host name Username Specifies Hyper V user name having the administrator rights Note For Hyper V clusters use a domain account with administrative privilege of the cluster For standalone Hyper V hosts we recommend using a domain account Password Specifies the password of user ...

Page 111: ...ptional You can type the node name in the filter field to locate the node in the tree 4 Select the nodes and then click Add to List The selected nodes are added to the right pane 5 Optional To remove the nodes from the right pane select the nodes and click Remove 6 Click Next The nodes are added to the plan Chapter 6 Working with Arcserve Appliance 103 ...

Page 112: ...to the Console Follow these steps 1 Open the Arcserve Appliance Console 2 Click resources Plans All Plans 3 Create a Linux Backup plan 4 Specify the Source Destination Schedule and Advanced configurations Note For more information about each of the configurations see How to Create a Linux Backup Plan in the Solutions Guide 5 Run the backup plan 104 Arcserve Appliance User Guide ...

Page 113: ...nager is the interface that lets you manage Arcserve Backup After you add the tape device to Backup Manager configure the device Note For more information on configuring and managing the device see Managing Devices and Media in Arcserve Backup Administration Guide 3 Successfully complete at least one backup job using the UDP Console You need at least one successful backup that you can write to a t...

Page 114: ...t you have a successful backup plan 2 Open the Arcserve Appliance Console 3 Navigate to the plans and modify the backup plan 4 Add a Virtual Standby task 5 Update the Source Destination Virtual Machine configurations Note For more information about the configurations see How to Create a Virtual Standby Plan topic in the Arcserve UDP Solutions Guide 6 Save and run the plan 106 Arcserve Appliance Us...

Page 115: ...rcserve UDP Console click the resources tab 2 Click All Nodes in the right pane 3 From the center pane click Add Nodes The Add Nodes to Arcserve UDP Console dialog opens 4 From the Add Nodes by drop down list select Add Linux Node 5 Provide the node credentials and click Add to List 6 Click Save The added Linux node is displayed in the All Nodes list Chapter 6 Working with Arcserve Appliance 107 ...

Page 116: ...Create Plan to Backup the Linux Backup Server 7 Navigate to All Plans and create an Agent based Linux plan The Source tab appears 108 Arcserve Appliance User Guide ...

Page 117: ...Create Plan to Backup the Linux Backup Server 8 From the Add drop down list select Select Nodes to Protect in Arcserve UDP Chapter 6 Working with Arcserve Appliance 109 ...

Page 118: ...ct dialog opens 9 Protect the added Linux node and click OK The Destination tab appears 10 The default destination displayed is the data store created using Appliance wizard Select Local disk or shared folder to backup the node if required 110 Arcserve Appliance User Guide ...

Page 119: ...an to Backup the Linux Backup Server 11 After providing the settings related to plan click Save You can perform backup for the added Linux Backup Server successfully Chapter 6 Working with Arcserve Appliance 111 ...

Page 120: ... Routing and Remote Access 4 Run the following command with PowerShell to reconfigure Routing and Remote Access for the newly added virtual network switch in step 1 using DOS command line C Program Files Arcserve Unified Data Pro tection Engine BIN Appliance powershell Rebuild VMSwitch ps1 Note The Linux Backup Server Linux BackupSvr is rebooted during the pro cess 5 To perform Linux instant VM jo...

Page 121: ...te the migration process follow these steps 1 On old Arcserve UDP Console perform backup for the Arcserve UDP data base The DB_Migration folder is created successfully 2 On the new Arcserve UDP Console copy the DB_Migration folder to the fol lowing path UDP_Home Management BIN Appliance 3 If the new Arcserve UDP Console is Arcserve UDP Appliance then change hostname and reboot the system and finis...

Page 122: ...ration for Arcserve UDP Console con nected with remote SQL database After the migration is complete the migrated Arcserve UDP Console is configured to connect with the same remote SQL data base Note In Arcserve UDP v6 5 Update 4 force option is introduced in Con soleMigration exe command to force the recovery backup database file migration to the target console under the following conditions 1 Whe...

Page 123: ...r this download is 0A51C1020CB8EA569B9DCEAF7BF226E0 and extract the files to the local drive For example if you extract the files to drive X the path is displayed as below 4 Open the PowerShell command line and enter the following command to change the directory path to the folder that includes Linux_migration ps1 file cd C Program Files Arcserve Unified Data Protection Engine bin Appliance 5 Run ...

Page 124: ...yper V manager successfully 6 Update the Linux backup server from the Arcserve UDP Console After the migration of Linux Backup Server to CentOS 7 4 all the Linux backup server settings such as Linux backup plans Linux nodes and Linux jobs are migrated and configured in the Arcserve Appliance Console suc cessfully 116 Arcserve Appliance User Guide ...

Page 125: ...re listed as follows Ensure that you can connect to both Appliance 8200 and Appliance 8400 Capacity of the new Appliance should have enough memory to hold all the data on the original Appliance In the Arcserve Appliance 8200 ensure that no job runs For more information on Console migration refer the How to Migrate Arc serve UDP Console Using ConsoleMigration exe topic To migrate from any Appliance...

Page 126: ...ackup Arc serve Appliance 8200 to this data store Note You can just ignore the following warning The Arcserve UDP Recovery Point Server data store is configured on volume X Y This volume will not be backed up 2 After the backup perform BMR on the Appliance 8400 using the recovery point you get on the step above and select driver megasas inf manually 3 After the BMR restart the Appliance 8400 accor...

Page 127: ...between Arcserve Appliances 4 Now rebuild the network switch on 8400 Appliance Follow these steps a Open Routing and Remote Access and click Disable Routing and Remote Access Chapter 6 Working with Arcserve Appliance 119 ...

Page 128: ...teps to copy the data on 8200 Appliance to 8400 Appli ance and import the data on to 8400 Appliance a Stop all the UDP services on Arcserve Appliance 8200 using the fol lowing command in the command line C Program Files Arcserve Unified Data Protection Management BIN cmdutil exe stopall b Copy all the data on disk X and Y from Arcserve Appliance 8200 to 8400 manually 120 Arcserve Appliance User Gu...

Page 129: ...Perform Migration between Arcserve Appliances c On 8400 Appliance start all UDP services and then import the data copied from 8200 Appliance Chapter 6 Working with Arcserve Appliance 121 ...

Page 130: ...Perform Migration between Arcserve Appliances 122 Arcserve Appliance User Guide ...

Page 131: ... the Arcserve UDP Console from Arcserve Appliance 8200 to 8400 Note For more information about how to migrate the Arcserve UDP Console from Appliance 8200 to 8400 refer How to Migrate Arcserve UDP Console Using ConsoleMigration exe Follow these steps 1 Stop all the Arcserve UDP services on Arcserve Appliance 8200 using the fol lowing command in the command line C Program Files Arcserve Unified Dat...

Page 132: ...Perform Migration between Arcserve Appliances 2 Copy all the data on disk X and Y from Arcserve Appliance 8200 to 8400 manually 124 Arcserve Appliance User Guide ...

Page 133: ...services and then import the data stores copied from 8200 Appliance Note The Arcserve UDP log files are not migrated to the new fresh Appli ance You have migrated the existing Arcserve Appliance to another fresh Arcserve Appli ance successfully Chapter 6 Working with Arcserve Appliance 125 ...

Page 134: ...dify the Input Source of Pre installed Linux Backup Server You can change the Keyboard of pre installed Linux Backup Server Follow these steps 1 Log into Arcserve Appliance as administrator 2 Click Settings 3 Click Region Language 126 Arcserve Appliance User Guide ...

Page 135: ...Modify the Input Source of Pre installed Linux Backup Server 4 Click to select a new input source Chapter 6 Working with Arcserve Appliance 127 ...

Page 136: ...Modify the Input Source of Pre installed Linux Backup Server 5 Select the language and keyboard layout 128 Arcserve Appliance User Guide ...

Page 137: ...Modify the Input Source of Pre installed Linux Backup Server 6 Click Add Input source is successfully added Chapter 6 Working with Arcserve Appliance 129 ...

Page 138: ...ver Remotely You can monitor Arcserve Appliance remotely This section contains the following topics Working with IPMI 131 Working with Integrated Dell Remote Access Controller iDRAC 136 Chapter 7 Monitoring the Appliance Server Remotely 130 ...

Page 139: ...Working with IPMI Working with IPMI This section contains the following topics 131 Arcserve Appliance User Guide ...

Page 140: ... the pre vious screens press Escape key 3 Select the IPMI tab at the top of the main BIOS screen Note By default the configuration address source is set to DHCP 4 Verify that the IP address is correct You can connect to the IPMI interface using your web browser only if your Server is on the same network 5 Note the Station IP Address 6 Enter the Station IP address on your web browser After you are ...

Page 141: ...rname field Default ADMIN 8 Enter your password in the Password field Default ARCADMIN The home page IPMI main screen is displayed 9 Click the Configuration option from the top bar The Configuration screen is displayed 133 Arcserve Appliance User Guide ...

Page 142: ...om the Users List 12 Click Modify User The Modify User screen is displayed 13 Enter your user name ADMIN 14 Select the Change Password option The password field is enabled 15 Enter the new password and confirm 16 Click Modify to save the changes Chapter 7 Monitoring the Appliance Server Remotely 134 ...

Page 143: ... webpage pop up window appears 3 Click OK BIOS IPMI download screen appears 4 Click the zip file corresponding to the revision of IPMI model The file downloads and Firmware Upload screen appears 5 Extract files from the downloaded zip file 6 Click Browse on the Firmware Upload screen and select the bin file from the extracted files 7 Click Upload Firmware Firmware Image uploads 8 Click Start Upgra...

Page 144: ...monitor system status manage system information and launch virtual console Follow these steps Log into iDRAC 1 Launch a browser and navigate to https iDRAC IP address iDRAC login page displays 2 Enter the following information User Name root Password ARCADMIN 3 Click Login Monitor System Status and Manage System Information You can monitor iDRAC system status and manage the following system inform...

Page 145: ...ess Controller iDRAC The Virtual Console page displays The Virtual Console Viewer displays the remote system desktop You can take the control of remote system and run the operations using keyboard and mouse 137 Arcserve Appliance User Guide ...

Page 146: ...set Using Boot Option in 9012 9504DR Series Appli ance 142 Clear Configuration and Apply Appliance Factory Reset 145 How to Replace Factory Reset Image Using Set Appliance Image Utility 148 Remove and Replace a Hard Drive 152 How to Perform Bare Metal Recovery BMR without Preserving Data 154 How to Perform Bare Metal Recovery BMR and Preserving Data 169 Chapter 8 Restoring or Repairing the Arcserv...

Page 147: ... the Boot Menu of the Arcserve Appliance Using UDP factory reset you can return your Arcserve Appliance to clean and non configured status Note You can also select the Preserve the backup data option while running UDP factory reset Follow these steps 1 Press F11 to invoke Boot Menu 2 Select the boot option UDP Factory Reset A page about factory reset is displayed 139 Arcserve Appliance User Guide ...

Page 148: ...the selection of the Preserve existing backup data option all the data on the respective volumes of C X and Y in the original operating system is rebuilt 3 Click Reset A confirmation dialog appears You can click Cancel to reboot the Arcserve Appliance unit 4 After factory reset finishes you can perform either of the following actions Click Restart to reboot the appliance Click Shut Down to close t...

Page 149: ...Apply Arcserve UDP Factory Reset Using Boot Option in 7000 8000 Series Appliance 141 Arcserve Appliance User Guide ...

Page 150: ...series Using UDP factory reset you can return your Arcserve Appli ance 9012 9504DR series to clean and non configured status Note You can also select the Preserve the backup data option while running UDP factory reset Follow these steps 1 Press F11 on the keyboard to invoke Boot Menu 2 Select the boot option Integrated RAID Controller 1 UDP Factory Reset A page about factory reset is displayed Cha...

Page 151: ...If you clear the selection of the Preserve existing backup data option all the data on the respective volumes of C X and Y in the original operating system is rebuilt 3 Click Reset A confirmation dialog appears You can click Cancel to reboot the Arcserve Appliance unit 4 After factory reset finishes you can perform either of the following actions Click Restart to reboot the appliance Click Shut Do...

Page 152: ...Apply Arcserve UDP Factory Reset Using Boot Option in 9012 9504DR Series Appliance Chapter 8 Restoring or Repairing the Arcserve Appliance 144 ...

Page 153: ...e Arcserve UDP Console All the backed up data is preserved by default Notes Arcserve UDP provides the Preserve existing backup data option to help you preserve the existing data store If you select the Preserve existing backup data option only C volume is rebuilt Data at X volume and Y volume remain unchanged If you do not select the Preserve existing backup data option all the data on the respect...

Page 154: ...the confirmation dialog click Reset to launch the factory reset The Appliance machine is rebooted and the factory reset runs as displayed below Completion of factory reset displays a confirmation dialog Chapter 8 Restoring or Repairing the Arcserve Appliance 146 ...

Page 155: ...tion and Apply Appliance Factory Reset 4 From the confirmation dialog perform one of the following options Click Restart to reboot the appliance Click Shut Down to close the appliance 147 Arcserve Appliance User Guide ...

Page 156: ...nce v6 5 Update 4 image that is running on Windows 2016 only Currently the following two versions of Arcserve Appliance are available to down load Arcserve Appliance v6 5 Update 2 for Windows 2012 R2 You can download the Appliance image from the URL The MD5 for Appliance image download is 1E9FB62D395EF1812B1DBE9EDB8F2C6E Arcserve Appliance v6 5 Update 4 for Windows 2016 You can download the Applia...

Page 157: ...P v6 Update 1 then you can upgrade the Appliance to Arcserve UDP v6 5 Update 1 Follow these steps 1 Download the Appliance image of Arcserve Appliance v6 5 Update 1 and execute the Set Appliance Image Utility Perform the following steps to use set Appliance Image Utility a Download the Arcserve UDP v6 5 Update 1 Appliance image from the URL or contact support Note The md5 for Appliance image downl...

Page 158: ...e image completed 2 Perform the following steps to revert to Update 1 version of Appliance Note After replacing Appliance image in Arcserve UDP Console the Ori ginal Arcserve UDP version is changed to the desired Appliance release ver sion a From Arcserve UDP Console navigate to Settings and select Factory Reset The Original Arcserve UDP Version changes to Arcserve Appliance v6 5 Update 1 Chapter ...

Page 159: ...ease version is not dis played in Original Arcserve UDP version after replacing the Appliance image b Click Perform Factory Reset to revert from current version of Appli ance to the new Arcserve Appliance v6 5 Update 1 version For more information about Factory Reset refer the link 151 Arcserve Appliance User Guide ...

Page 160: ...hould also label the hard drives that you remove from the appliance so that you know which drive carrier they occupied Important Take proper safety precautions when handling the hard drives because they are static sensitive devices and can be easily damaged Wear a wrist strap to prevent any static discharge Touch a grounded object before removing the replacement hard disk from the antistatic shipp...

Page 161: ...ant Except for short periods of time swapping of the hard drives do not operate the appliance without the drive carriers fully installed 4 Remove the old hard drive from the drive carrier and install the new hard drive being careful to properly orient the replacement hard drive with the label on top and the visible components on the bottom 5 Slide the drive tray into the appliance until it is full...

Page 162: ...c serve UDP Boot Kit Follow these steps 1 Run the Create Arcserve UDP Boot Kit application in the Appliance and gen erate the bootable BMR ISO image or USB stick for x64 platform Note You need to include the local drivers for the ISO image To include the local drivers select the Include Local Drivers option in the Create Boot Kit for Bare Metal Recovery window For more information on how to create...

Page 163: ... Recovery BMR without Preserving Data 2 Boot the Arcserve Appliance using BMR ISO image or USB Stick The Arcserve bare metal recovery setup appears 3 Select the required language and click Next 155 Arcserve Appliance User Guide ...

Page 164: ...ta 4 Select the Restore from a Arcserve Unified Data Protection backup option and click Next The Select a Recovery Point wizard window appears 5 Click Browse and select Browse from Recovery Point Server Chapter 8 Restoring or Repairing the Arcserve Appliance 156 ...

Page 165: ... BMR without Preserving Data The Select Node window appears 6 Enter the Recovery Point Server Host Name User Name Password Port and Protocol 7 Click Connect 8 Once the connection is established click OK 157 Arcserve Appliance User Guide ...

Page 166: ...etal Recovery BMR without Preserving Data The Bare Metal Recovery BMR Select a Recovery Point dialog appears 9 Select the recovery point to restore and click Next Chapter 8 Restoring or Repairing the Arcserve Appliance 158 ...

Page 167: ...ry BMR without Preserving Data 10 Optional Enter the session password if prompted and click OK The Bare Metal Recovery BMR Choose a Recovery Mode dialog appears 11 Select Advanced Mode and click Next 159 Arcserve Appliance User Guide ...

Page 168: ...al Recovery BMR Adjust Disk Partitions dialog appears 12 Right click on the largest GUID Partition Table GPT disk available and click Clean Disk 13 After cleaning the disk right click on the same disk and click Commit Chapter 8 Restoring or Repairing the Arcserve Appliance 160 ...

Page 169: ...ow to Perform Bare Metal Recovery BMR without Preserving Data The Submit Disk Changes window appears 14 Click Submit 15 After the cleaning of disk is completed click OK 161 Arcserve Appliance User Guide ...

Page 170: ...How to Perform Bare Metal Recovery BMR without Preserving Data 16 From the Bare Metal Recovery BMR Adjust Disk Partitions dialog click Back Chapter 8 Restoring or Repairing the Arcserve Appliance 162 ...

Page 171: ...orm Bare Metal Recovery BMR without Preserving Data The Bare Metal Recovery BMR Choose a Recovery Mode dialog appears 17 Select Express Mode and click Next The BMR dialog appears 163 Arcserve Appliance User Guide ...

Page 172: ...ery BMR without Preserving Data 18 Click Yes The Summary of Restore Settings dialog appears 19 Click Cancel The Bare Metal Recovery BMR Adjust Disk Partitions dialog appears Chapter 8 Restoring or Repairing the Arcserve Appliance 164 ...

Page 173: ...n the Current Destination Disk Volume Layouts tab matches with the largest GPT disk available in the Original Source Disk Volume Layouts tab and click Next Note To view the size of partition hover the mouse to the disk to display the disk properties The Summary of Restore Settings dialog appears 21 Click OK 165 Arcserve Appliance User Guide ...

Page 174: ...ving Data The Bare Metal Recovery BMR Start Recovery Process dialog appears 22 Clear selection of the Do not start Agent service automatically after reboot option and wait for restore to complete Chapter 8 Restoring or Repairing the Arcserve Appliance 166 ...

Page 175: ...rm Bare Metal Recovery BMR without Preserving Data The Bare Metal Recovery BMR Insert Device Driver dialog appears 23 Select the required driver for raid controller and click Next 167 Arcserve Appliance User Guide ...

Page 176: ...etal Recovery BMR without Preserving Data The Reboot pop up appears and the Arcserve Appliance is rebooted auto matically The BMR process is completed successfully Chapter 8 Restoring or Repairing the Arcserve Appliance 168 ...

Page 177: ...erve UDP Boot Kit application in the Appliance and gen erate the bootable BMR ISO image or USB stick for x64 platform Note You need to include the local drivers for the ISO image To include the local drivers select the Include Local Drivers option in the Create Boot Kit for Bare Metal Recovery window For more information on how to create boot kit refer link 2 Boot the Arcserve Appliance using BMR ...

Page 178: ...ing Data The Arcserve bare metal recovery setup appears 3 Select the required language and click Next 4 Select the Restore from a Arcserve Unified Data Protection backup option and click Next Chapter 8 Restoring or Repairing the Arcserve Appliance 170 ...

Page 179: ...wizard window appears 5 Click Browse and select Browse from Recovery Point Server The Select Node window appears 6 Enter the Recovery Point Server Host Name User Name Password Port and Protocol 7 Click Connect 8 Once the connection is established click OK 171 Arcserve Appliance User Guide ...

Page 180: ... Metal Recovery BMR and Preserving Data The Bare Metal Recovery BMR Select a Recovery Point dialog appears 9 Select the recovery point to restore and click Next Chapter 8 Restoring or Repairing the Arcserve Appliance 172 ...

Page 181: ...very BMR and Preserving Data 10 Optional Enter the session password if prompted and click OK The Bare Metal Recovery BMR Choose a Recovery Mode dialog appears 11 Select Advanced Mode and click Next 173 Arcserve Appliance User Guide ...

Page 182: ... Recovery BMR and Preserving Data 12 On the Bare Metal Recovery BMR Adjust Disk Partitions dialog click Next 13 On the Summary of Disk Restore Settings screen click OK Chapter 8 Restoring or Repairing the Arcserve Appliance 174 ...

Page 183: ...eserving Data 14 On the Bare Metal Recovery BMR Start Recovery Process dialog clear selection of the Do not start Agent service automatically after reboot option and wait for restore to complete and machine reboot 175 Arcserve Appliance User Guide ...

Page 184: ...How to Perform Bare Metal Recovery BMR and Preserving Data The BMR process is completed successfully Chapter 8 Restoring or Repairing the Arcserve Appliance 176 ...

Page 185: ...xpansion This section contains the following topics Working with Expansion Kit in Arcserve Appliance 9012 9504 DR Models 178 Connecting Appliance Expansion Shelf to the Appliance Server 184 Chapter 9 Performing Appliance Capacity Expansion 177 ...

Page 186: ...esponding plans b Insert HDD in the empty disk slot 2 Perform the following steps to configure Raid 6 from iDRAC a Log into iDRAC and navigate to Configuration Storage Configuration and Physical Disk Configuration b Under Physical Disk Configuration section select Convert to RAID option from Actions drop down for each new disk A dialog appears to display the following warning message RAC0516 Conve...

Page 187: ...ction for all the disks e Navigate to Maintenance Job Queue The list of jobs running to convert the disks to Raid appears When con vert to RAID job is completed the status changes to Completed 100 3 Perform the following steps to create virtual disk a Navigate to Configuration Storage Configuration and Virtual Disk Configuration b Under Virtual Disk Configuration section click Create Virtual Disk ...

Page 188: ...ed Time Starts the create virtual disk operation at the scheduled time Discard All Pending Discards the create virtual disk operation for all the disks h Navigate to Maintenance Job Queue The list of jobs running to create virtual disk appears When create vir tual disk job is completed the status changes to Completed 100 i Navigate to Computer Management and Disk Management j Double click the new ...

Page 189: ...and the data store a Navigate to the Drive that you added and create a folder b From the Arcserve Appliance desktop launch the Arcserve Appli ance wizard Arcserve Appliance Configuration page opens c Click Launch UDP Console Arcserve UDP Console login page appears d Log into UDP Console as Administrator e Navigate to resources Destinations and Recovery Point Servers f Right click the Data Store an...

Page 190: ... new data folder The following example screen shows the details such as Volume capa city Used space Free space for Primary data path Expanded data path and the total values The total value is the sum of primary data path and expanded data path To view the data path details you can also run the following command as_gddmgr exe DataPath Display data store name Successfully added new expanded data pat...

Page 191: ...e navigate to resources Destinations and Recovery Point Servers i Right click the Data Store and click Start j Resume the plans that you paused before from UDP Console Data capacity of the Arcserve Appliance is successfully expanded Chapter 9 Performing Appliance Capacity Expansion 183 ...

Page 192: ...Connecting Appliance Expansion Shelf to the Appliance Server Connecting Appliance Expansion Shelf to the Appli ance Server This section contains the following topics 184 Arcserve Appliance User Guide ...

Page 193: ...3 LSI SAS 9200 8E HBA Qlogic Dual port HBA Quad Port 1G NIC Dual port 10G SPF Dual Port 10G Cop per Infield Expansion MegaRAI D SAS 9380 8e 1 8100 model sup ports only 8 TB Infield Expansion 2 8100 8 TB Expansion Shelf comes with inbuilt and pre con figured SSD 240 GB 3 8100 has 2 and 3 as optional slots One free slot is mandatory for Appli ance Infield Expansion MegaRAID SAS 9380 8e 4 If both the...

Page 194: ...in order to use Infield Expansion 5 SAS con nection is used between the Appli ance and Expansion shelf 6 8100 Expansion shelf comes with RAID 6 7 Expansion Shelf comes with Dual PSU 8 Follow Add data path instructions given in Expansion guide after connecting the expan sion shelf 9 Wherever a new SSD 186 Arcserve Appliance User Guide ...

Page 195: ...ic Dual port HBA Quad Port 1G NIC Dual port 10G SPF Dual Port 10G Cop per Infield Expansion MegaRAI D SAS 9380 8e 1 8200 model sup ports either 8 TB or 16 TB Infield Expansion Client can connect only one expansion shelf any time 2 8200 16 TB Expan sion Shelf comes with inbuilt and pre con figured SSD 480 GB 3 8200 has 2 and 3 as optional slots One free slot is mandatory for Appli ance Infield Expa...

Page 196: ...on Cards then you need to free at least one slot prefer ably slot 3 in order to use Infield Expansion 5 SAS con nection is used between the Appli ance and Expansion shelf 6 Expansion shelf comes with RAID 6 7 Expansion Shelf comes with Dual PSU 8 Follow Add data path instructions given in Expansion 188 Arcserve Appliance User Guide ...

Page 197: ...4 TB Disks OR 40 12x4 TB Disks 480 8 TB NA 16 TB 560 40 TB 790 2 5 6 LSI SAS 9200 8E HBA Qlogic Dual port HBA Quad Port 1G NIC Dual port 10G SPF Dual Port 10G Cop per Infield Expansion MegaRAI D SAS 9380 8e 1 8300 model sup ports either 8 TB or 16 TB OR 40 Infield Expansion Client can connect only one expansion shelf any time 2 8300 16 TB 40 TB Expansion Shelf comes with inbuilt and pre configured...

Page 198: ...ield Expansion MegaRAID SAS 9380 8e 4 If both the optional slots are filled with add on Cards then you need to free at least one slot pre ferrably slot 2 in order to use Infield Expansion 5 SAS con nection is used between the Appli ance and Expansion shelf 6 Expansion shelf comes with RAID 6 6x4 TB 190 Arcserve Appliance User Guide ...

Page 199: ...ansion guide after connecting the expan sion shelf 9 Wherever a new SSD is required follow the Migrate HASH des tination to new SSD instructions given in Expansion Guide Only for Appliance 8300 con nect with 40 TB Appli ance expan sion shelf there is one unat tached 2 TB SSD that you need to place in Chapter 9 Performing Appliance Capacity Expansion 191 ...

Page 200: ...5 6 LSI SAS 9200 8E HBA Qlogic Dual port HBA Quad Port 1G NIC Dual port 10G SPF Dual Port 10G Cop per Infield Expansion MegaRAI D SAS 9380 8e 1 8400 model sup ports either 8 TB or 16 TB OR 40 TB Infield Expansion Client can connect only one expansion shelf any time 2 8400 Requires no addtional SSD 3 8400 has 2 5 and 6 as optional slots One free slot is mandatory for Appli ance Infield Expansion Me...

Page 201: ...ne slot prefer ably slot 2 in order to use Infield Expansion 5 SAS con nection is used between the Appli ance and Expansion shelf 6 Expansion shelf comes with RAID 6 7 Expansion Shelf comes with Dual PSU 8 Follow the Add data path instructions given in the Expansion guide after connecting the expan Chapter 9 Performing Appliance Capacity Expansion 193 ...

Page 202: ...Connecting Appliance Expansion Shelf to the Appliance Server sion shelf 194 Arcserve Appliance User Guide ...

Page 203: ...ice that any items in the box are damaged contact Arcserve Sup port Appliance Expansion Shelf Note The number of available disks in the expansion shelf depends on the capacity of the Appliance Expansion shelf CVPM02 Module CacheVault Power Module02 and Cable MegaRAID SAS 9380 8e RAID Controller Chapter 9 Performing Appliance Capacity Expansion 195 ...

Page 204: ...Appliance Expansion Shelf to the Appliance Server SAS Cables Two SAS Cables which are used to connect the MegaRaid Controller in the Appliance Expansion Shelf and Appliance Server 196 Arcserve Appliance User Guide ...

Page 205: ... Expansion Shelf to the Appliance Server SSD optional Note For Appliance 8300 only you need to connect with 40TB Appliance expansion and you have one unattached 2TB SSD Chapter 9 Performing Appliance Capacity Expansion 197 ...

Page 206: ... CacheVault Power Module02 CVPM02 to MegaRAID Con troller 9380 8e 3 Pause all the Arcserve UDP plans and ensure that there are no running jobs on the Appliance Server 4 Power off the Appliance Server and disconnect the power cord from the power supply Note Disconnect the computer from the power supply to avoid the risk of damaging the system or electric shock 5 Remove the cover of the Appliance Se...

Page 207: ...e slot c Save the bracket screw if applicable d Align the MegaRAID Controller 9380 8e to a PCIe slot e Press down gently but firmly to seat the raid controller correctly in the slot 7 Secure the MegaRAID Controller 9380 8e bracket to the chassis of the sys tem 8 Replace the cover of the Appliance Server chassis 9 Connect the MegaRAID Controller 9380 8e in the Appliance Server and the MegaRAID Cont...

Page 208: ...nly for Appliance 8300 40 TB expansion shelf Note If a 40 TB Appliance Expansion Shelf connected to an Appliance 8300 plug the 2 TB SSD shipped with the Appliance Expansion Shelf into the empty SATA slot at the rear panel of the Appliance 8300 200 Arcserve Appliance User Guide ...

Page 209: ...nce Expansion Shelf and power on the Appliance Expansion Shelf 12 Reconnect the power cords of the Appliance Server and power on the Appli ance Server 13 Log into the Appliance Server open the MegaRAID Storage Manager and login as administrator Chapter 9 Performing Appliance Capacity Expansion 201 ...

Page 210: ...where the two controllers are listed b Select the Controller 9380 8e and ensure that all the disks connected to the controller 9380 8e are online and available Note If there are any disks that are not online right click and select Scan Foreign Configuration c Select the Import Import logical configuration from all foreign drives option and click OK 202 Arcserve Appliance User Guide ...

Page 211: ...gate to the Logical tab where you can see the following disks are con figured with RAID 6 For other modules of the expansion shelf one SSD is set as RAID 0 and listed under LSI MegaRAID SAS 9380 8e Appliance server 8100 8 TB expansion shelf Appliance server 8200 16 TB expansion shelf Appliance server 8300 16 TB expansion shelf Chapter 9 Performing Appliance Capacity Expansion 203 ...

Page 212: ...Appliance Server 16 Open Computer Management and navigate to Disk Management and per form the following steps a Format the Appliance Expansion Shelf assembled disk as NTFS and assign a drive letter For example V 204 Arcserve Appliance User Guide ...

Page 213: ...helf to the Appliance Server b Format the SSD as NTFS and assign a drive letter For example W You have connected the Appliance Expansion Shelf to the Appliance Server successfully Chapter 9 Performing Appliance Capacity Expansion 205 ...

Page 214: ...section contains the following topics Adding a data path on the expansion shelf to the Arcserve UDP data store Migrating Hash Destination to the new SSD Checking the Overall Capacity of Data Store from Arcserve UDP Console Resuming all the plans from Arcserve UDP Console 206 Arcserve Appliance User Guide ...

Page 215: ...e a folder in the volume on the Appliance expansion shelf such as V data 2 Stop the data store and use the following command to expand the data store to the Appliance expansion shelf as_gddmgr exe DataPath Add data store name NewDataPath new data folder as_gddmgr exe DataPath Display data store name Chapter 9 Performing Appliance Capacity Expansion 207 ...

Page 216: ... 8300 16 TB expansion shelf Appliance server 8300 40 TB expansion shelf Follow these steps 1 Create a hash folder on the new SSD such as W Arcserve data_store hash 2 Ensure the data store is stopped If not stop the data store from the Arc serve UDP Console 3 Modify the data store from the Arcserve UDP Console and set the Hash Destination to W Arcserve data_store hash 4 Save the modification of the...

Page 217: ...iance Server Checking the Overall Capacity of Data Store from Arc serve UDP Console The overall capacity is the capacity of the Appliance server plus the capacity of the Appliance expansion shelf Chapter 9 Performing Appliance Capacity Expansion 209 ...

Page 218: ...Connecting Appliance Expansion Shelf to the Appliance Server Resuming all the plans from Arcserve UDP Console Resume all the paused plans from the Arcserve UDP Console 210 Arcserve Appliance User Guide ...

Page 219: ...g the Network Configuration Details 212 How to Configure the NIC Teaming Process 217 How to Disable DHCP Server 219 How to Configure IP Address for the Preinstalled Linux Backup Server 220 How to Enable Round Robin on the DNS Server to Balance Load 222 Chapter 10 Working with Network Configuration 211 ...

Page 220: ... need to change the host name of the built in Linux User saves an IP on the network for the Linux Backup Server The Linux Backup Server can connect to any machine on the public network Any machine on the public network can connect to the Linux Backup Server through the special port of Appliance Server only Network Configuration Details On the Hyper V Manager an internal only virtual switch Linux B...

Page 221: ...n see Hyper V Virtual Ethernet Adapter named as LinuxBkpSvr You have con figured the IPv4 for this switch as 192 168 10 1 by default as below You have configured DHCP Server on the appliance machine by default The DHCP Server works only on the Hyper V virtual adapter Chapter 10 Working with Network Configuration 213 ...

Page 222: ...e 192 168 10 2 in the Address Pool to ensure the built in Linux Backup Server can get the IP 192 168 10 2 We have configured NAT on the Appliance machine We have configured port redirection on the appliance for the Linux Backup Server 214 Arcserve Appliance User Guide ...

Page 223: ...erver After getting the IP the backend script C Program Files Arcserve Unified Data Protection Engine BIN Appliance resetdhcp ps1 communicates with Linux to change the system locale of the Linux to make it consistent with the system loc ale of the Appliance Windows OS Chapter 10 Working with Network Configuration 215 ...

Page 224: ...Understanding the Network Configuration Details 216 Arcserve Appliance User Guide ...

Page 225: ... Appliance Wizard Note If a DHCP or static IP address is used you can configure the IP address for the NIC Team in the Network Connections screen Ensure that a valid IP address is assigned to the NIC Team and is available on your network 2 From the Server Manager select Tools Routing and Remote Access The Routing and Remote Access dialog opens 3 Right click the node of the Appliance Server and sel...

Page 226: ...ata Pro tection Engine BIN Appliance resetnic bat The configuration completes and the following message appears To verify that the configuration is working log into the Linux Backup Server in the Hyper V Manager and ping the IP address for the specific computers on your intranet If this fails review and repeat this procedure 218 Arcserve Appliance User Guide ...

Page 227: ...Engine BIN Appliance Configuration Appliance properties 2 Modify the file to DHCP_ENABLE false The Appliance properties appears as below DHCP_ENABLE false AdapterName LinuxBkpSvr Appliance_IPAddress 192 168 10 1 Linux_IPAddress 192 168 10 2 3 Save the file 4 Delete the file C Program Files Arcserve Unified Data Pro tection Engine BIN Appliance dhcpdone flag 5 Run C Program Files Arcserve Unified D...

Page 228: ...e_IPAddress as 192 168 100 1 and Linux_IPAddress as 192 168 100 2 Note The IP address of Appliance_IPAddress sets to the network interface LinuxBkpSvr Hyper V Virtual Ethernet Adapter used to communicate with this preinstalled Linux Backup Server The IP address of Linux_IPAddress is set to the preinstalled Linux Backup Server Please ensure Appliance_IPAddress and Linux_IPAddress use the IP address...

Page 229: ... Backup Server will shut down and restart during the process if you change the Linux_IPAddress 6 Run the following command from the command prompt C Program Files Arcserve Unified Data Pro tection Engine BIN Appliance powershell resetdhcp ps1 Chapter 10 Working with Network Configuration 221 ...

Page 230: ...in Name Service DNS Server to get load balance among the network interfaces For more information on load balancing between servers refer to RFC 1794 How to Add a Record for Additional IP Addresses to Domain Name Service Server When a server has two or more network interface cards NICs or more than one IP address for an NIC you can add a record for the additional IP address es to the DNS server by ...

Page 231: ...he DNS Server to Balance Load Using this method a Resolver always obtains IPAddress1 when sending a query for Altname1 and always obtains IPAddress2 when sending a query for Altname2 Chapter 10 Working with Network Configuration 223 ...

Page 232: ...y Precautions This section contains the following topics General Safety Precautions 225 Electrical Safety Precautions 227 FCC Compliance 228 Electrostatic Discharge ESD Precautions 229 Chapter 11 Understanding Safety Precautions 224 ...

Page 233: ...ely at https www arcserve com support Decide on a suitable location for the rack unit that will hold the appliance It should be situated in a clean dust free area that is well ventilated and free of clutter Avoid areas where heat electrical noise and electromagnetic fields are generated You will also need it placed near at least one grounded power outlet Depend ing on the model the appliance inclu...

Page 234: ...ewelry or metal objects from your body which are excellent metal conductors that can create short circuits and harm you if they come into contact with printed circuit boards PCBs or areas where power is present After accessing the inside of the appliance close the appliance and secure it to the rack unit with the retention screws after ensuring that all connections have been made Chapter 11 Unders...

Page 235: ...s should be nearby to switch off the power if necessary Use only one hand when working with powered on electrical equipment This is to avoid making a complete circuit which will cause electrical shock Use extreme caution when using metal tools which can easily damage any elec trical components or circuit boards they come into contact with Do not use mats designed to decrease electrostatic discharg...

Page 236: ... pursuant to part 15 of the FCC Rules These limits are designed to provide reasonable protection against harmful interference when the equipment is operated in a commercial environment This equipment generates uses and can radiate radio frequency energy and if not installed and used in accordance with the instruction manual may cause harmful interference to radio communications Operation of this e...

Page 237: ...gned to decrease electrostatic discharge as protection from electrical shock Use a grounded wrist strap designed to prevent static discharge Use antistatic or electrostatic discharge ESD preventive clothing or gloves Keep all components and printed circuit boards PCBs in their antistatic bags until ready for use Touch a grounded metal object before removing the board from the antistatic bag Do not...

Page 238: ...he Network 234 Linux Backup Server Cannot Get the Network DNS Suffix 236 Default Time Zone on the Appliance 237 Licenses Error even when the licenses are available 238 Arcserve UDP Console Shows Error while adding Remote Console in Replicate to a Remotely Managed RPS Task 239 Unable to Perform VSB Task Using Another Appliance as Monitor 241 IVM Job Fails to Create Linux IVM to ESXi Server with HBB...

Page 239: ...P address is 192 168 10 2 navigate to the Arcserve UDP Console and update the Linux Backup Server node that you are trying to connect 5 If the IP address is not 192 168 10 2 follow the instructions in the Troubleshoot from DHCP Microsoft Management Console MMC section Troubleshoot from DHCP Microsoft Management Console MMC Important Ensure that the DHCP Server service is running appropriately on t...

Page 240: ...Linux Backup Server Fails to Connect from the Console The Linux Backup Server now connects from the Console Chapter 12 Troubleshooting 232 ...

Page 241: ...ion as an instance of Arcserve UDP Recov ery Point Server managed by another Arcserve UDP console Solution 1 Stop the data store in the Appliance B node from the RPS pane of the UDP con sole 2 Log into Appliance B and delete the registry key of the Node ID that is located under HKEY_LOCAL_MACHINE SOFTWARE CA ARCserve Unified Data Pro tection Engine 3 Restart the Arcserve UDP Agent Web Service from...

Page 242: ...2 Navigate to the following location to verify if network adapter LinuxBkpSvr exist as shown below Control Panel Network and Internet Network Connections 3 If LinuxBkpSvr is unavailable navigate to the following location and verify if flag file adapterNameChanged flag exists C Program Files Arcserve Unified Data Pro tection Engine BIN Appliance If existing remove the adapterNameChanged flag file 4...

Page 243: ...lag from the following location C Program Files Arcserve Unified Data Pro tection Engine BIN Appliance 9 Using Command Line enter folder C Program Files Arcserve Unified Data Pro tection Engine BIN Appliance and run resetdhcp ps1 as shown below C Program Files Arcserve Unified Data Pro tection Engine BIN Appliance powershell resetdhcp ps1 When the script runs successfully the communication issue f...

Page 244: ... Server to protect the Linux node due to the communication problems Symptom The status of the Linux Backup Server remains in a disconnected state on the UDP console The Update Node cannot update the Linux Backup Server successfully and the yellow warning icon will not change to green This occurs when the static IP address is set to the appliance Server that will then cause the Linux Backup Server ...

Page 245: ...om The default time zone is UTC 08 00 Pacific Time US Canada no matter what region you select when you first power on the appliance Solution Navigate to Arcserve Backup Appliance Wizard click Edit and set Date and Time to change the time zone 237 Arcserve Appliance User Guide ...

Page 246: ... the licenses are available Licenses Error even when the licenses are available For more information on license related errors in the Appliance even when the licenses are available refer the link Chapter 12 Troubleshooting 238 ...

Page 247: ...of a different appliance machine as Recovery Point Server RPS in the Remote Console field then the below error mes sage is displayed in the Arcserve UDP Console Note This issue is fixed in Arcserve Appliance that has default version of Arcserve UDP v6 5 Update 3 or higher Error message Please select a remote console This issue is caused due to the use of same GUID on local console and remote con s...

Page 248: ...Integrated Security SSPI sqlconn Open sqlcmd New Object System Data SqlClient SqlCommand sqlcmd Connection sqlconn sqlcmd CommandText delete from as_edge_configuration where Para mKey ConsoleUuid sqlcmd ExecuteNonQuery sqlconn Close 3 Restart UDP management service on the local appliance machine 4 Perform the following steps in the UDP Console of local machine a Select All nodes in Nodes view b Ri...

Page 249: ...ult version of Arcserve UDP v6 5 Update 3 or higher Error message Failed to connect to remote server IP port 4090 This issue is caused due to the same GUID present in both monitor Appliance and Arcserve UDP RPS Appliance machine To support VSB task follow these steps 1 Stop all the UDP services on Arcserve UDP RPS Appliance using the fol lowing command in the command line C Program Files Arcserve ...

Page 250: ...P RPS Appliance using the fol lowing command in the command line C Program Files Arcserve Unified Data Protection Management BIN cmdutil exe startall 4 From the UDP Console of local machine follow these steps a Select All plans in Plans view b Right click and click Deploy Now c Click OK to deploy all plans The Virtual Standby task is now supported Chapter 12 Troubleshooting 242 ...

Page 251: ...ta store already exists on the ESXi Server Solution This issue occurs if the Linux virtual machine is located on the ESXi Server with Host Based Backup Session HBBU on Appliance Data Store Follow these steps 1 Log into Linux backup server as root user 2 Navigate to the following path opt Arcserve d2dserver configfiles 3 Create a file with the name server env 4 Add the following text in the server ...

Page 252: ...Applying Best Practices The section contains the following topics Best Practices for Network Configuration 245 Best Practices for Windows Defender with PowerShell cmdlets 248 Chapter 13 Applying Best Practices 244 ...

Page 253: ... When both the Appliance and the Agent node are online on the same sub net work a connection problem occurs between the Appliance and an Agent node if there are multiple network interfaces connected to the same sub net work in the Appliance Symptom If both the Appliance and Agent nodes are online on the same sub network the following symptoms may occur On the Arcserve UDP Console when you deploy t...

Page 254: ...Server service and RRAS service on the Appliance and verify whether the problem is resolved or not For more information refer How to Disable DHCP Server On the Appliance and Agent node follow these steps Steps to be followed on Appliance 1 Run ipconfig all from DOS Command Prompt to get the avail able IPv4 address on the Appliance 2 Run Route Print from DOS Command Prompt to get the IPv4 Route Tab...

Page 255: ...vailable IPv4 address of Appliance one by one according to the order above to get the first IPv4 of the Appliance connected on the Agent node as follows 2 Modify the file C Windows System32 drivers etc hosts to add a record for the pair the_IPv4_got_above Appliance_hostname and save the file 247 Arcserve Appliance User Guide ...

Page 256: ...nder PS C Get MpPreference ExclusionProcess Gets exclusion processes of Defender PS C Add MpPreference ExclusionPath full_path_of_the_folder_or_file Excludes a folder or file to the exclusion list PS C Add MpPreference ExclusionProcess full_path_of_executable_pro grams Excludes files opened by the processes PS C Remove MpPreference ExclusionPath full_path_of_the_folder Removes a folder from the ex...

Page 257: ......

Page 258: ... of this product include software developed by third party software pro viders The following section provides information regarding this third party soft ware This section contains the following topic PuTTY Chapter 14 Acknowledgements 250 ...

Page 259: ...is copyright 1997 2015 Simon Tatham Portions copyright Robert de Bath Joris van Rantwijk Delian Delchev Andreas Schultz Jeroen Massar Wez Furlong Nicolas Barry Justin Brad ford Ben Harris Malcolm Smith Ahmad Khalifa Markus Kuhn Colin Wat son Christopher Staite and CORE SDI S A Permission is hereby granted free of charge to any person obtaining a copy of this software and associated documentation f...

Page 260: ...he Software without restriction including without limitation the rights to use copy modify merge publish distribute sublicense and or sell copies of the Software and to permit persons to whom the Software is furnished to do so subject to the following conditions The above copyright notice and this permission notice shall be included in all copies or substantial portions of the Software THE SOFTWAR...

Reviews: