


e-34
setup menus
The Setup menus allow you to configure all aspects
of your AVr360. The next few pages will go through
the menu items and explain their function. The Setup
menus will probably look quite daunting if you are new
to setting up home cinema, but the majority of them
need only be configured once when you first install the
system (or if your system changes or you move house!)
The only way to view the Setup menus is on your display
device (TV or projector) using the on-screen display
(OSD) capability of the AVr360. To view the OSD for
the initial setting up, connect any of the video outputs
to your display device. You do not need to have a video
source connected to the AVr360 video inputs.
entering Setup mode
To enter the setup menu, press the
MENU
button on the
remote control or font panel. The front panel display
shows ‘
SETUP MENU
’ and the setup menu (pictured
right) is displayed.
unstable oSd menu or picture display?
The default AVr360 output video resolution when first
powered up out of the box is 525-line/60Hz nTSC for
analogue video and “Preferred” for digital video. This
has been chosen as most display devices can synchronise
to this automatically. This can be changed in the Video
Outputs section of the Setup Menus.
If the output resolution and frame rate is forced to a
setting your display device does not support, the picture
may become unstable or may not display at all. To reset
the output video resolution and frame rate to the default
values to restore the display, press and hold the front
panel
Ok
button for three seconds. Alternatively, press
SHiFT
then
>
on the remote control to cycle between
different output resolutions until the picture returns.
navigating the setup menu
… using the remote control
The setup menu can be navigated by using the cursor
(arrow) keys on the remote control. This is by far the
easiest method.
1. To enter the setup menu, press the
MENU
button
(which is located immediately under the navigation
buttons).
2. Use the
B
and
C
keys to navigate up and down
the main section headings in the left-hand panel.
3. Once you have the main section that you require
highlighted, use the
E
key to enter the section.
4. Use the
B
and
C
keys to navigate up and
down the section settings in the right-hand panel.
Some settings may be greyed out. These are either
for information only (e.g. incoming sampling
frequency) or are not currently selectable (e.g.
network IP address when DHCP is used). Scroll bars
on the sides of the right hand panel indicate your
position in the settings list where there are more
items than can be displayed at once.
5. Pressing
Ok
selects a setting to change it, pressing
Ok
again de-selects the setting.
6. At any time, press the
MENU
button to exit the menu.
Any changes to settings are saved.
… using the keys on the front panel
The AVr360 front panel controls can be used to
configure the unit. Follow the instructions for using
the remote control, in this case using
iNPUT–
for down,
iNPUT+
for up,
iNFO
for left and
Ok
for right.
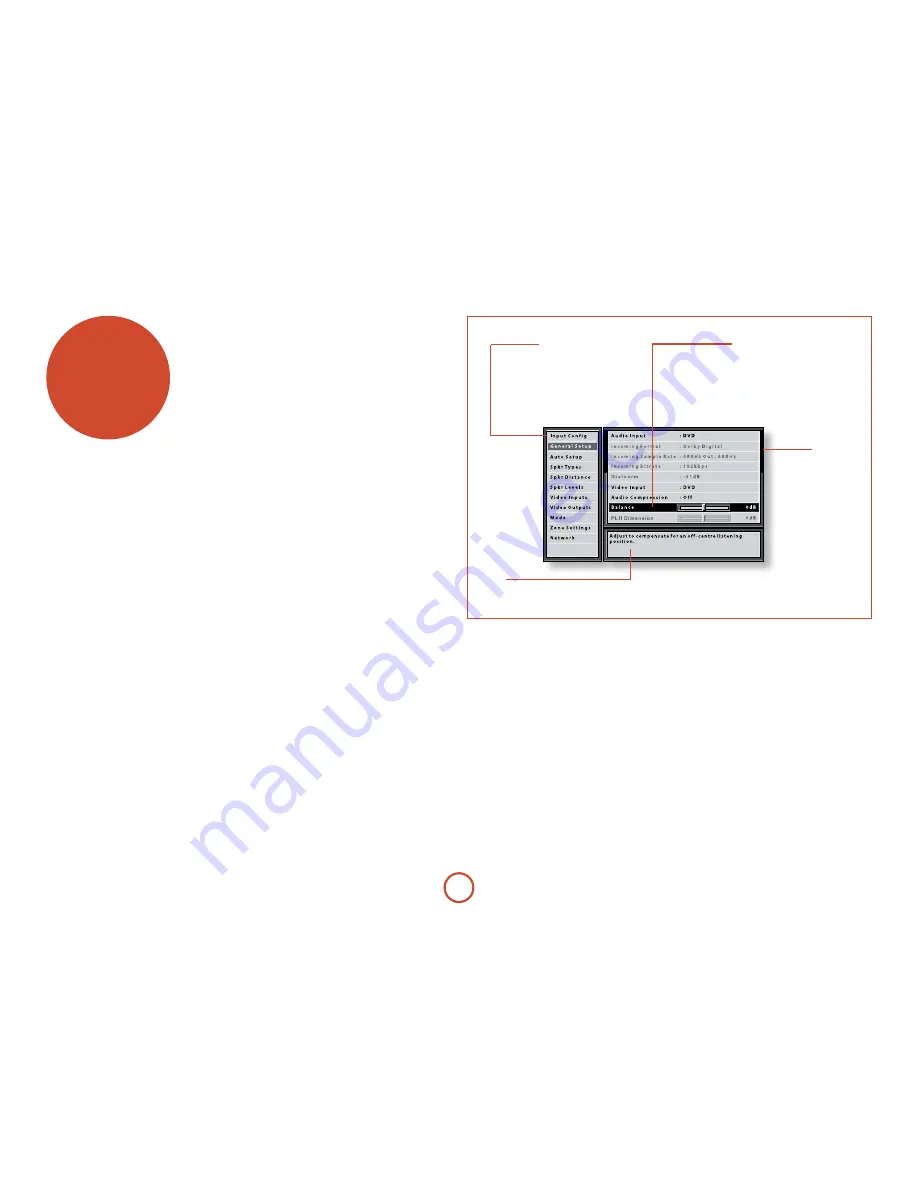
menu panel
The left-hand panel lists the setup
screens available for adjustment. The
selected menu is highlighted with a grey
band.
Help screen
The lower right-hand panel gives a short
help text for the feature being adjusted.
adjustment panel
The upper right-hand panel lists the
parameters you can change as a user.
The selected line is highlighted with
a black band. Lines that cannot be
selected are greyed-out.
scroll bars
These indicate the
position of the
displayed screen
within longer menus.
Summary of Contents for fmj AVR360
Page 1: ...AVR360 Handbook AVR surround amplifier English...
Page 4: ...E 4...
Page 13: ...E 13 English...
Page 31: ...E 31 English...
Page 43: ...E 43 English...
Page 47: ...E 47 English Zone 1 Multi room connection guide Zone 2...


